

Stem Stitch is also known as
Crewel stitch, Stalk stitch [EN], Punto de tallo [ES], Point de tige [FR], Stielstich [DE], Punto erba [IT], Ponto haste / Ponto pé de flor [PT], stjälksöm [SV].
About the Stem Stitch
Stem Stitch is one of the easiest to be done and perhaps even one of the first stitches to be taught to any beginner. Many times people often refer to embroidery work itself as Crewel Work, though the actual Crewel Stitch (Stem Stitch) is never as commonly employed in it! This creates a bit of confusion on if Crewel Work consists of only Crewel Stitch (Stem Stitch).
How to do the Stem Stitch
Let us now get to the procedure. To make the logic clearer for stem stitch, I have drawn a temporary stitch line with a pencil. A stitch line is through which all stitches will be running. Now, note that all the stitch points in stem stitch will fall ON the stitch line. I will be working this stitch from left to right. This instruction is for right-handed learners.
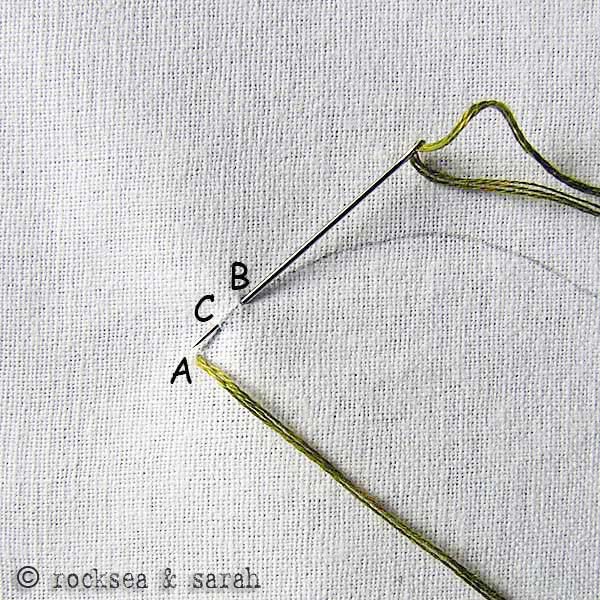 | 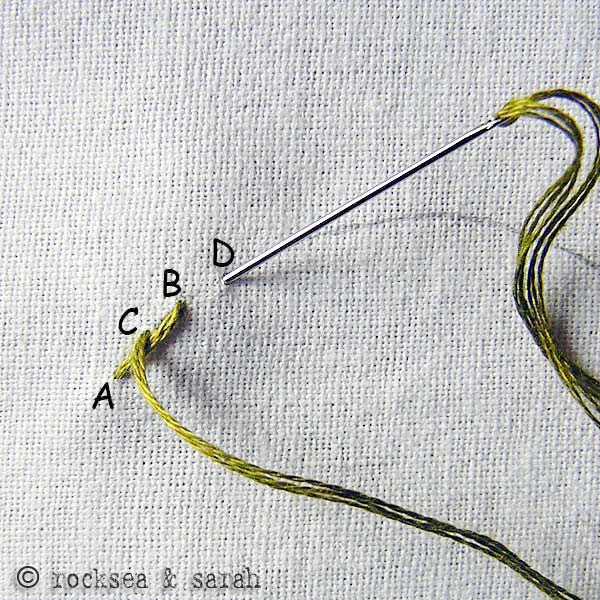 |
| Fig 1: Bring out the thread through A and take it in through B. Take the needle backwards and bring the thread out through C. Make sure the point C lies over the stitch A-B. | Fig 2: You need to note that the point C lies about halfway through A and B. Also note that C lies on top of the stitch A-B. So, all the subsequent stitch points will lie on top of their previous stitch. |
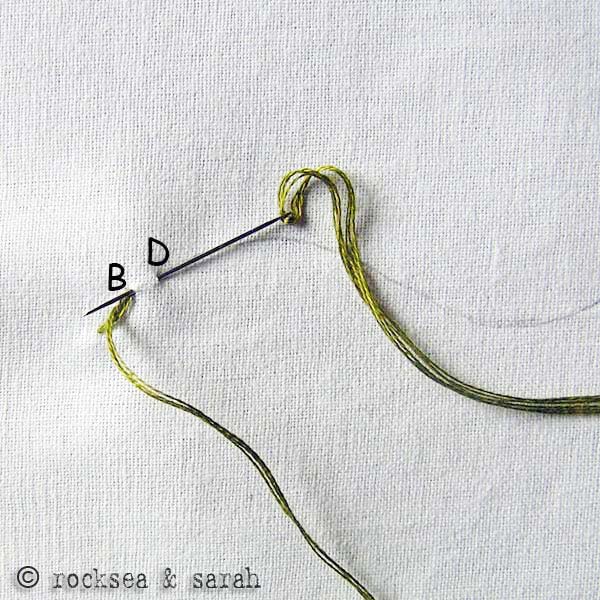 | 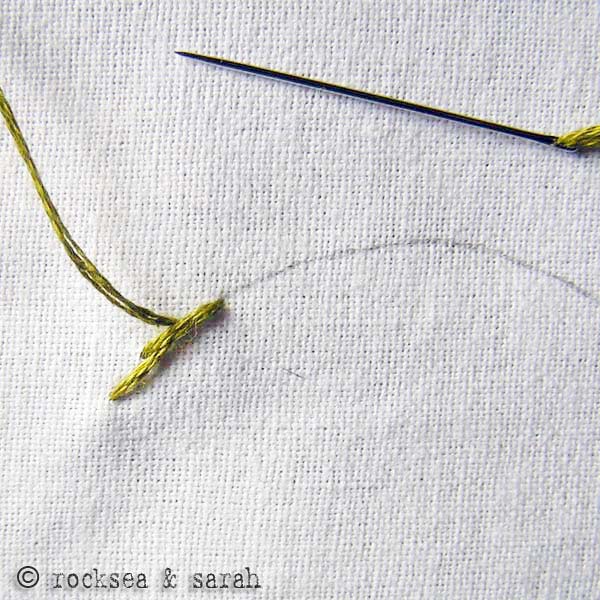 |
| Fig 3: Take the needle in through D. Try to mark D in such a way that the point B will lie halfway through C-D. Bring the needle out through B. | Fig 4: So, the pattern of two stitches of the stem stitch will be as shown above. |
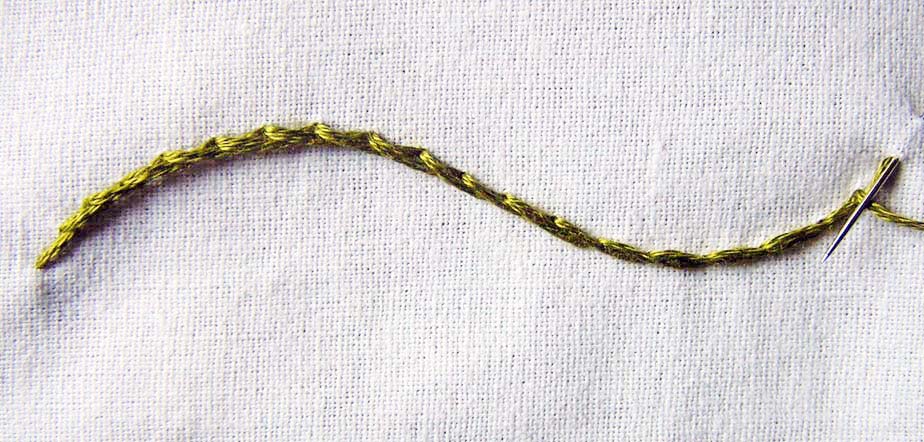 | |
| Fig 5: Continue this pattern of stitching with the needle coming out through the top of the previous stitch always. | |
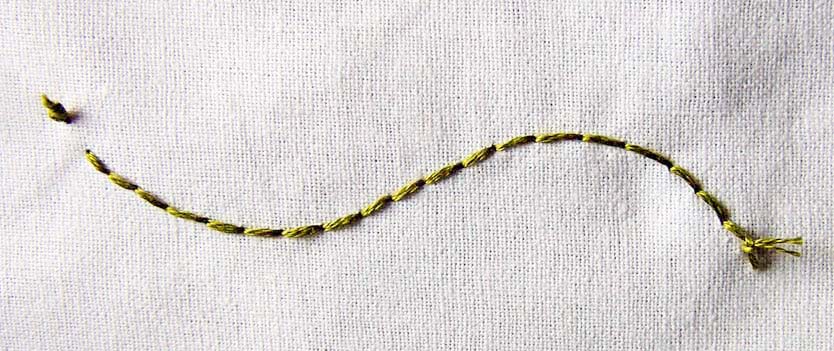 | |
| Fig 6: The reverse of the fabric will give you a back stitch pattern. | |
Learn to do Stem Stitch in 2 minutes!
Use this stitch on a pattern
Visit and Subscribe to Sarah’s YouTube Channel
Related Projects
Do you want to know where and how to use this stitch? Check out the projects below and learn more! Make something beautiful.
Redwork |

Learn this stitch along with 305 other stitches from our 600-page eBook.

Related Stitches from the Stem Stitch Family
Stem Stitch |
Whipped Stem Stitch |
Outline Stitch |
Cable Stitch |
Split Stitch |
Portuguese Stem |
Japanese Stitch |


Dear sarah,
I have done some work with back stitch, i just want to know that, at the back of the fabric it will be a thicker line of thread or as same as at the front, boz, what i have done is little messy i feel, but at the front it is very neat.
can you plz show the back of the fabric also.
regards
JYOTI
Sarah can u help me with stem stich,I need to do the stem stitch on top of cross stitches. Any help u can give me would be appreciated. Allison
Thank you so much for the detailed instructions & illustrations. I started experimenting after seeing your website, and did embroidery on yoke of nighties, when I was pregnant, but now graduated to doing cradle sheets and baby sheets for my baby and as gift.
I mostly use stem stitch and lazy daily. Thank u Sarah!!!
hai ur tutorials r super. i have one doubt. what is tube work and rope stitch in aari work. can u plz explain.
Thanks! The tutorial is superb, I was having a hard time learning this stitch (cross stitcher who’s trying her hand at free hand embroidery) and all of a sudden it works! Thanks again!
Hi Sarah,
First of all thank you for the tutorials. It is very much helpful to learn the stiches.
Please publish some tutorials for Bengal katha stich , gujrati stich & kashmiri stich.
Again Thank you
nice work sarah
your tutorial are very nice. I needed to write the methods of some stitches like chain stitch and some more as i took hand embroidery as my activity in my school . so to write the methods I took help of your method and as I also tried to make them and way to make them was very easy. thank-you to your tutorials for helping me !!
I loved it
Nyc work. 🙂 thanks i have lot of work at school of stem stich ahhhhh thanks. 😀
Thanks so much for these tutorials! I have always loved hand work but could never find any good stitch lessons. Now I can do more than just cross stitch! Again thank you for making easy to understand tutorials!
Tracy
Hi Sarah,
I liked the way you have explained hand embroidery here with the help of images.
Love it
Hi Sarah,
Ur website makes embroidery look so easy and interesting to learn. Iam working on something now and will share here once I complete it. Thanks for such a wonderful website!!
thank you sarah for the helpout with the stem stitch because i would’ve gotten a mark of zero for my technology education and i did not want to ask my teacher
Your tutorials are superb.i love them pls comment on my first small project

Dear Asna,
Thanks fro sharing your work with us. It will inspire many. 🙂 I liked the butterfly and the neat way you have done it. Are you still filling in the wings?
hii sarah ..thnk for your tutorials…
I am so blessed to have found your website! I am working on embroidery as an embellishment to a quilt top and your tutorials are fabulous! Thank you, thank you,thank you!
Dear Sarah THANKS TO ALL I HAVE FOUND ALL OF MY FINDINGS JUST ONLY ON YOUR SITE THANKS AGAIN
hellllloooooo,And ummm i picked textiles for my options in gcses and this site really helped me with the stitches thankyou very much,but i want to know how to do the flower stitch can you please help me with that.? thanks very much…. 🙂
I am so thrilled to find your site through Pintrest. I smock children’s clothes and always need a bit of help on the embroidery stitches that I come across every once in awhile.
Thank you so much for sharing!
may i know the type of needles and treads that you are using..?
by the way the site is vvvvv useful… i realy appreciate your effort…
I did this piece in nested stem stitch…approx. 5×8 inches. Stitches are very close together to make solid fill. Several people have commented it looks done by machine.
Wow! Val, what a wonderful piece of work. I must agree to the other comments that it does not look hand made at all…so very neat and precise. Thanks for sharing this here. 🙂
dear sarah,
i wanted to learn embroidery ,but dint know from where to begin with,,,i accidently happned to see ur site,,it helped me a lot,,, ur tutorial is simple and understantable,, good work!!!!thank u!
never seen such dedicated site
u make it look easier…so beautifully
DEAR MADAM….
THANKS FOR YOUR TUTORIALS…
PLZ PUBLISH THE TUTORIALS OF GUJRATI STICH, SHANTINIKATANI KATHA STICH, BHAGOLPURI KATHA STICH,AARI WORK
Dear Saraswati,
Many embroidery forms are still under construction. Since each of them takes a lot of researchadn effort to be made, time and patience is required.
Aari work is done using a special needle. I have made a tutorial where this work is reproduced using a simple embroidery needle. Check : https://www.embroidery.rocksea.org/hand-embroidery/zalakdozi/zalakdozi-tutorial/
I am all excited to start learning embroidery from ur tutorials…. ur blog is absolutely amazing and ends my search for good online tutorials..thanks for this blog!!! god bless u:-)
Dear Arefa,
We are happy that you find learnign form our pages would be interesting and good. Hope you enjoy your lessons. 🙂
your tutorial about embroydery is very help me to doing my tesis , thank you very much.
Dear Dewi,
We are happy that our pages are helping you in your work. What is the topic of your thesis? I wish to have a copy of it once you are done with it. 🙂
If you are using our pages for any information, we kindly request you to mention our reference in your thesis and give due credit.
All best wishes!
Very easy to learn.i just started to learn through your site.Thanks a lot for your good work. I have some doubts to ask !!!!
Dear Bhuvana,
Thankyou. 🙂
You can always bring your doubts to these pages, and I will try my best to clear them.
Hi Sarah,
Need samples and explanations for chicken work.If possible kindly add it to your site.
Hello Bhuvana,
Your request is welcome. Right now, I do not have any samples or tutorial ready for chicken work. A tutorial takes some time to be made, so not sure if I can put it up anytime soon, but will surely keep your request in mind and work towards it. 🙂