
Back Stitch is also known as
Puntos pespunte [ES], Point arrière [FR], Rückstich [DE], Punto indietro [IT], Ponto pesponto [PT], Efterstygn [Sv].
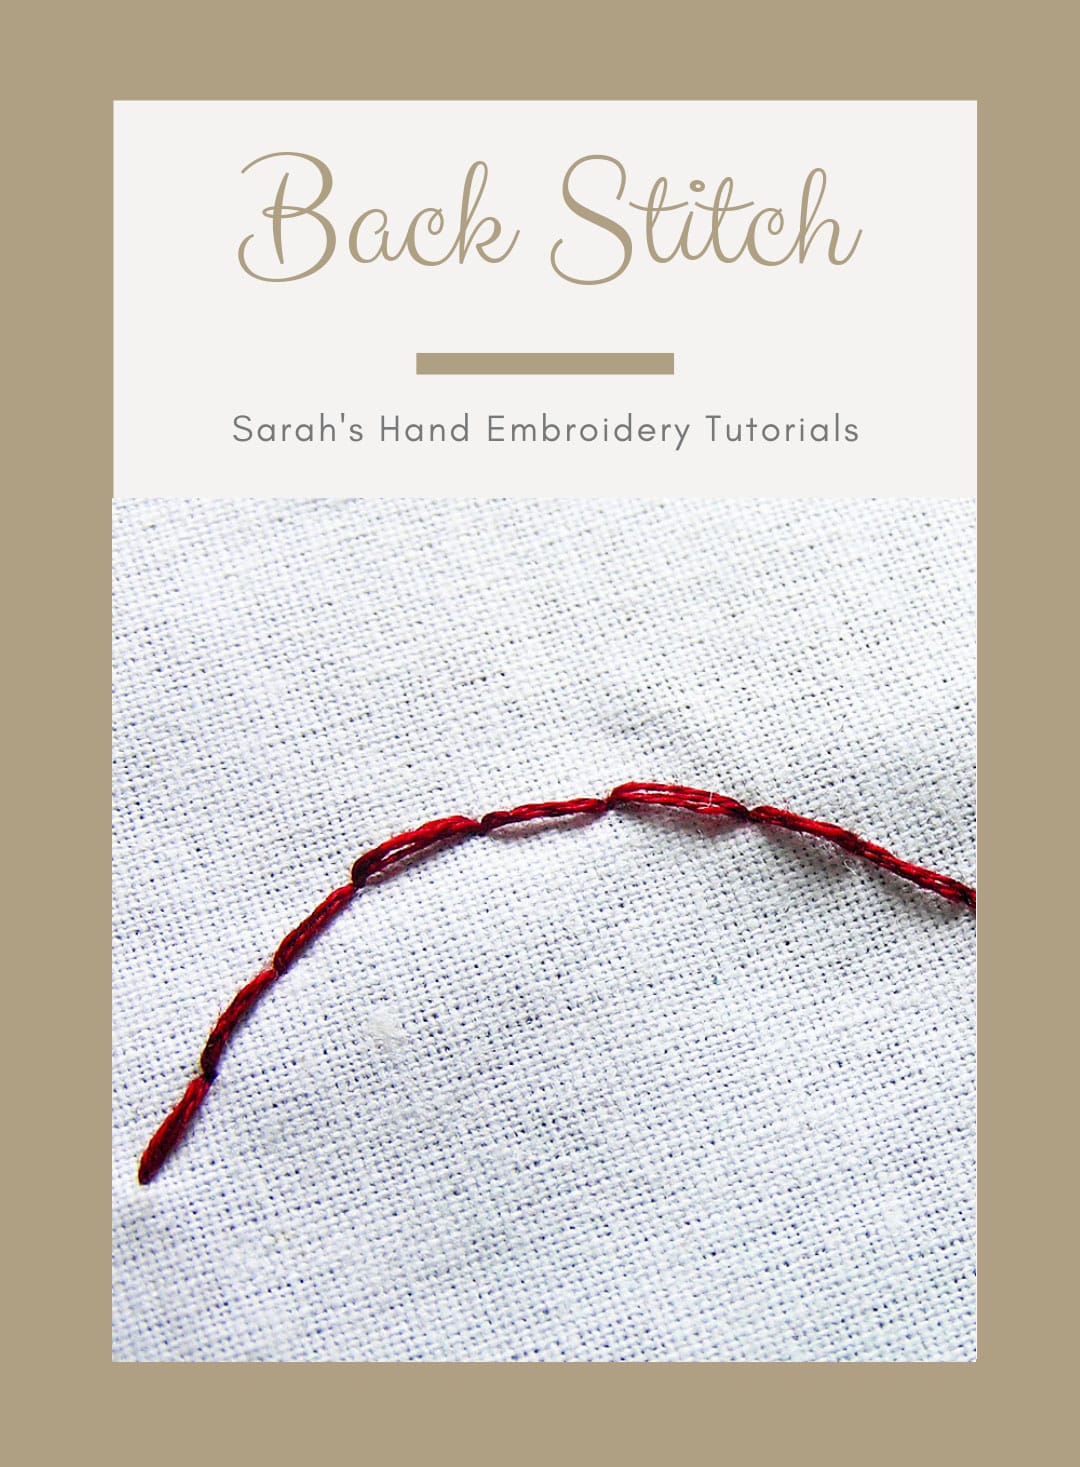
About the Back Stitch
Back Stitch is made by taking the thread backward, rather than the conventional forward motion, and thus the name. It can take curves well. There are no spaces between each stitch, giving it a continuous appearance. Like the Running Stitch, the Back Stitch also lays a foundation for many variations over it.
The Back Stitch is excellent for securing seams. It is a super-strong hand-stitch that can replace machine stitching when required. It is much stronger than the regular Running Stitch, though it uses more thread. The Back Stitch looks beautiful when it uses small stitches and maintains consistency in the lengths. The length of the stitch depends highly on the size of the pattern, though. A small pattern will call for small stitches than a bigger pattern.
How to do the Back Stitch
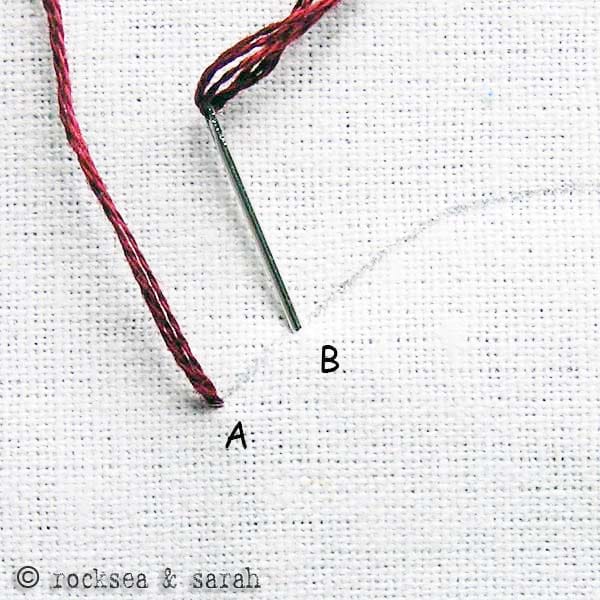 |  |
| Fig 1: Bring the thread through A and take it in through B. This creates one stitch. | Fig 2: Bring the thread through C and take it in through B. This way, we are creating a stitch by taking the thread backward. |
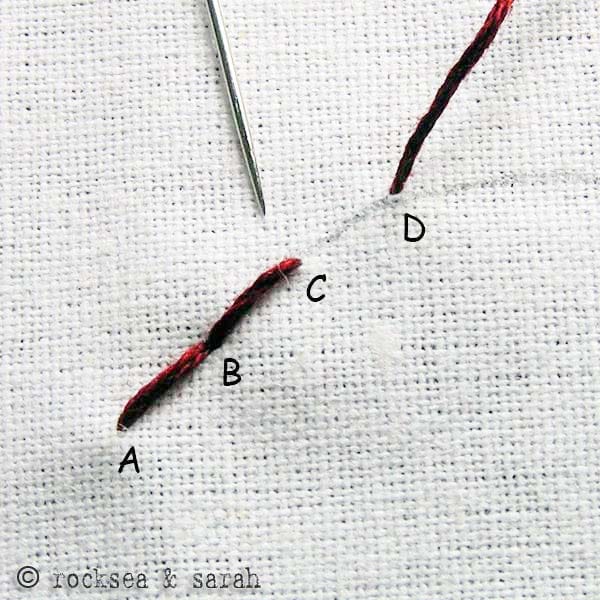 | |
| Fig 3: Bring the thread through D and take it in through C. Continue this pattern to finish the design. | |
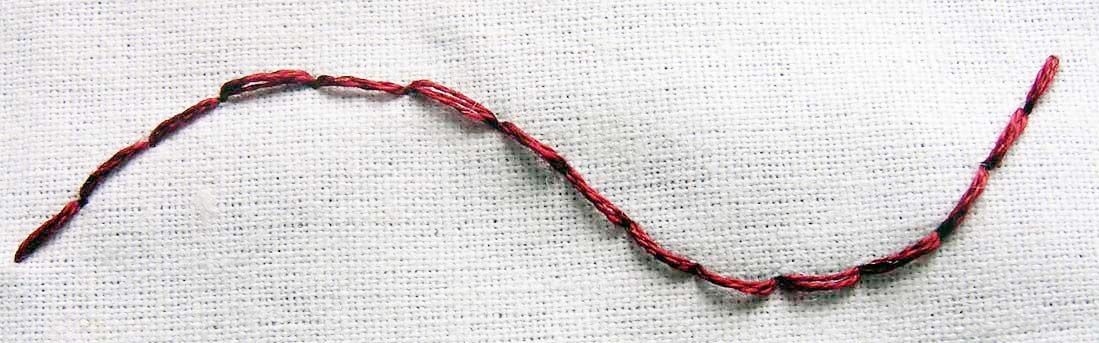 | |
| Fig 5: A finished line of Back Stitch will look like this. | |
Learn to do Back Stitch in 2 minutes!
Back Stitch – Everything you need to know
Learn two methods of doing the Back Stitch — the stab and the sew methods. Also learn how to join circles, make smooth curves, and turn corners.
Visit and Subscribe to Sarah’s YouTube Channel
Related Projects
Do you want to know where and how to use this stitch? Check out the projects below and learn more. Make something beautiful today❤️
Redwork |

Video on how to do the 3SAT Berries pattern
Learn Hand Embroidery Stitches | Back Stitch, Leaf Stitch, French Knot
Visit and Subscribe to Sarah’s YouTube Channel
Learn this stitch along with 305 other stitches from our 600-page eBook.

Related Stitches from the Back Stitch Family


Where can i learn more about it
A. O. A everyone!how are you sarah. I’m send you my herringbone ladder back stitch.

Regards,
Syeda toseefa abrar
A. O. A everyone!how are you sarah. I’m send you my herringbone ladder back stitch.
[img]https://www.embroidery.rocksea.org/images/embroidery/uploads/20211010_224322.jpg[/img
Regards,
Syeda toseefa abrar
Hi, Ms. Sarah, I got interested in your hand Stitches can you send me how do I start?
Hi and welcome to the world of hand embroidery! We have a small section where every beginner can start from. You can do the same and then explore the many other pages and projects in our website.
Start from here: https://www.embroidery.rocksea.org/reference/for-hand-embroidery-beginners/
Enjoy!
bring the thread through A and the make it in through B this creates one stitch?
Yes! It creates the first straight stitch. ☺️
Sarah thanks for your email and here I want to share something of mine

Thank you, Madhumita for sharing your work. It looks beautiful! I love the way you have made big bold flowers in the front of your kurta. 🙂
hi! super helpful tutorials, thank you! i just thought i should let you know a lot of them aren’t working, like i cant even click the pictures in any of the chevron stitches. hope it’s fixed, thanks again
Hi Lindsey,
Thanks for letting know. Please give us some time to check and repair what must be wrong.
Hi Sarah,
I have been learning a lot of things from this site. I would just like to ask a question: What is the best kind of stitch to do if my shorts have holes on it?
Thank you and may you always be blessed with happiness, prosperity, contentment, delight, enjoyment, success, cheerfulness, laughter and jubilation. 🙂
Dear Sally,
If you intend to cover up the holes in your shorts, you can try satin stitch or even the weave stitch. The size of the hole matters too. I hope this helped!
when did you started to do embroidiery
Thank you sarah. I learnt a lot from your site. This is my first embroidery that I want to share with you.

thank you.
Dear Suparna,
Thanks for sharing this lovely piece of work. For a first time, this is really nice. I hope you have found inspiration to do more after working on this. 🙂
Hello!
I a newbie when it comes to embroidery and am wondering one thing about the backstitch… I know you are not to knot the thread when starting and stopping your cross stitching, but how do you start and stop the back stitch? Do you knot these? Please help! Thank you!
Oops! I meant… I am a newbie! Ha!
Hi Kim,
I would knot for starting and ending a back stitch.
Hi Sarah, this is really appreciable job that you’ve done. I’m a complete naive to Embroidery world but your tutorial proved to be of real help. While sitting infront of my Laptop I felt as if you urself were sitting by me . great work! thankx a lot!! 🙂
hi, ate sarah.:)) i just want to know how to stitch a half of a box of aida cloth. thank you.:)) More power.!! Godbless.
Hey Sarah…
Thank you for this site… Its so simple to follow like a kid…
I found this site while Im searching for some hand emboidery patterns for my wife..She is just a beginner .. looking everyday.. more information from internet.. I am sure that ..I could recommend this for her.. despite of all those tutorials I gathered…
Good Luck
Hi Deepu,
It is nice to know how you are supporting your wife’s interest. We are working on an E-book right now. It might take a couple of months before we could make it available.
hi sarah
hope u will be dng gud.pls give tutorials for aari work also.im very much interested to learn that from yr site…….luv to yr kids.
Hello Thaarika,
Aari work is also known as Zalakdozi. I have a tutorial for doing aari work using normal embroidery needle instead of an ‘aari’. You can check this link: https://www.embroidery.rocksea.org/hand-embroidery/zalakdozi/zalakdozi-tutorial/
Hope this helps. 🙂
you are very talented! thank you for taking the time to show us all these stitches!!!! 🙂
Thanks Renee. 🙂
Here is a “Space Dog” that my son (5 years old) drew. I transferred it to the material and made it into an ornament to give to family for Christmas. Made of backstitches and French knots for the eyes. I used a knotted blanket stitch around the edge, but it was my first attempt – I am still learning that stitch.
Wow Caren! This is beautiful. 🙂 I am so inspired to know that you are stitching your son’s drawings as christmas ornaments. I should try something like this once my son tries drawing. When you say knotted blanket stitch, maybe you mean the buttonhole stitch? I will be putting up the buttonhole family of stitches next.
Thank you so much for your tutorials! I’m a beginner and I always have your site up while I’m doing my own work. Could you do a tutorial or, point me to a good one, on how to tie off your work at the back? My finishing knots seem to be a little loose and start to unravel.
Dear Michelle,
We are so glad that you have been refering from our tutorial pages. 🙂
I will be putting up a tutorial page on the basics of embroidery, whiich will also include how to tied off at the end. But, please do allow me some time.
In the meanwhile, I can give you a tip: when you finish with your work, and the needle is at the reverse side of the fabric, take the needle under the nearest stitch that shows up at the back of fabric. Do this without plucking the fabric beneath. Now, turn around the needle, making a loop with the thread and take the needle in through this loop. Pull the needle out and you have a secure knot that is neat and will never unravel. I hope you are able to follow this direction and it helps you.
I’m so glad you put this site up! I have been wanting to learn embroidery beyond just the back stitch (the only one I know how to do right now) yet avoiding it because it seemed so daunting at first. Your site inspires me to learn because so many of the stitches are so pretty and I can think of thousands of applications for them!
This is my first official bit of embroidery with a card, a gift for my other half for the coming holiday. More planned soon!
Dear Salem,
Your embroidery looks so adorable. 🙂 Thanks for sharing it with us. I can see that you have tried to use more than just the back stitch.
I am glad that you are inspired to learn more, fulfilling one purpose of our tutorial. Please put up more of your embroideries for us to see and others to feel inspired as well. 🙂
I can not tell you how happy and excited i am to find your site. I am sure this will help me in in learning stiches and embroidery very well. I have always been interested but cud never find a gud source untill today.. Thanks a lot. 🙂
🙂 It is a pleasure to know Shilpi.
Dear Jubi anty,

just wanted to show a stiched pice which was lying at my home.
Dear Harshita,
This looks really nice. Did you stitch this? Thanks for sharing this piece of work. We would like to see something stitched by you. 🙂
The instructions are extremely well – put. Thank you for sharing !
Thank you Riti. 🙂
dear sarah,
it is very educational. even though i know most of the basic stitches i find the site very advanced and informative.
i would like to know what is aida fabric.
And also i would like to do embroidery in my white kurta(long shirt).
please suggest some small but it should cover fully.
thank u
sheela
Dear Sheela,
Thanks a lot for your comment. 🙂
Aida fabric is what we also call Matty cloth. It is an even weave fabric and is used for cross stitching.
You can try some simple basic stitches to cover your kurta with floral patterns : use stem stitch, back stitch, chain stitch, lazy daisy, satin stitch, woven circles etc… You can also opt to fill it in with a repetition of spiral patterns using petal stitch, or rosette stitch or even basque stitch.
Hope this gives you some help and idea.
Dear Ranjitha,
You can start by going through ’embroidery home’ link, at the top of the page. Then, you can pick each embroidery from the right hand panel or from the ‘stitch dictionary’.
You can use satin stitch family to fill in flowers.
Hi,
i want to learn embroidery, wht is the basic steps ?
and how to fill the big flower can you explain.
hi, my self veenu kumari from jalandhar city, punjab. I am doing study in INTERNATIONAL INSTITUTE OF FASHION DESIGNING. I need a lot of material for my presentations like running stitch,satin stitch,stem stitch,bullion stitch,french knot stitch,mirror work,blanket stitch etc. so please do help me
I will be very thankful to you for this act of kindness
Dear Veenu,
Right now, I don’t have any materials on embroidery stitches that I can share with you for your presentation, but I hope the stitch lessons that I have posted here will help you with reference. If there is any other way I can help, please let me know.
Best wishes for your days at the institute. 🙂