
I will show you the most basic way to transfer the patterns onto a fabric using a sheet of carbon. I will also mention a few other commonly used tools which can be used for drawing or tracing the patterns over the fabric. So let’s begin!
| Fig 1: First, gather all the materials. You need:
1. Fabric |
Fig 2: You also need a pattern to trace. This is a pattern which was free-hand drawn to be used multiple times over fabric for embroidery. You can also find patterns on the Internet which can be printed for free. Click here for some patterns. |
| Fig 3: Start by placing the carbon sheet facing down on the fabric at the location where you want the design to be transferred. If you feel the need, you can fasten down the carbon sheet to the fabric using pins. | Fig 4: Now, place the pattern sheet, facing up, on the carbon sheet. Make sure that the carbon sheet is not smaller than the design which you want to transfer. Note that a needle has been used on the side to hold the pattern sheet, the carbon sheet, and the fabric together. This ensures that the carbon and the pattern sheet do not move while you are transferring the design. Fasten them down on all four sides. |
| Fig 5: Now, start tracing over the design with the blunt pencil. Make sure that you are applying a good amount of pressure to make sure that the design is being transferred. It is suggested that you peek once in a while on the fabric to make sure that the transfer is happening. You will require doing this only the first couple of transfers, just until you understand what amount of pressure to apply with your pencil. If the pencil tip is sharp, you might end up tearing the design sheet. Make sure that you have run over all the lines of the design! | Fig 6: A finished transferred design over the fabric will look like this. Since I had used a red carbon sheet, the transfer will look red. If getting a Tailor’s carbon sheet is difficult for some of you, try the ordinary carbon sheet, but in lighter colors. Using dark-colored carbon sheets can leave smudge marks after the transferring. |
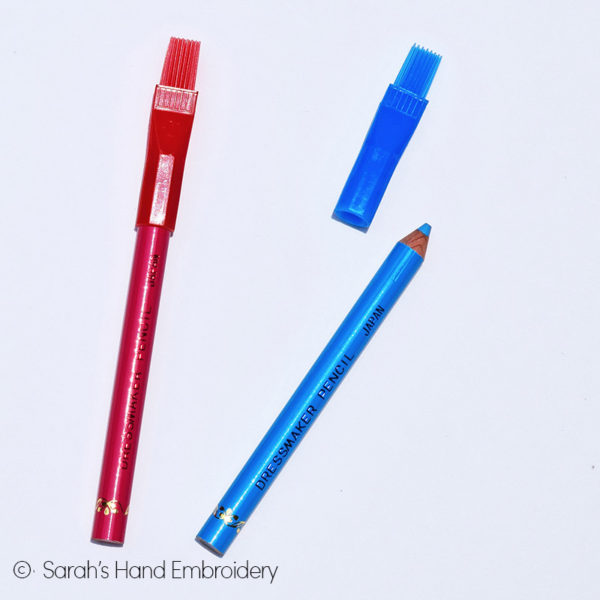
| Iron-on transfer pencil: This is a great tool to trace designs. All you have to do is draw a pattern with this pencil over a plain sheet of paper and place it face down over the fabric where you want to transfer the design. Now you just have to hot iron over the paper for about 5 or 10 minutes. The design gets transferred to the fabric below and is ready to be used for embroidery stitching. Keep in mind that the patterns would be flipped after transferring. |
Transfer pen: It looks like a sketch pen and works like one too. You can use this to just draw directly over the fabric. The marks made by this pen are easily removable with a damp cloth or upon wash. There are pens that are air soluble too. The marks made by these pens disappear in about a week, so if you are sure to finish a project in a couple of days, it can be a great tool. |
 |
|
| Tailor’s chalk: Tailor’s chalk is used by tailor’s to mark on the fabric before they cut or sew. It can very well be used for embroidery drawing as well and can be removed easily using a brush. The sample shown here is in the form of a pencil, which is much easier to use than the chalks that come in square shapes, which I used to use earlier. |
Learn more about Hand Embroidery along with 306 stitches from our 600-page eBook!

 Sarah has been researching and sharing hand embroidery lessons for over 18 years, making it accessible to everyone around the globe.


Non ricalco un bel niente non si vede il ricalco
Stai usando un foglio di carta carbone? Utilizza una superficie piana e dura come base. Assicurati che il foglio di carta carbone sia rivolto verso il basso sul tessuto e non verso l’alto. Usa un foglio di carta carbone nuovo, poiché quelli vecchi possono seccarsi e non dare il risultato desiderato. Usa una matita smussata o una penna a sfera ed esercita una pressione sufficiente mentre disegni il motivo.
thank you a lot sarah!
how can i get rid of carbon paper smudges?
Thank you for your explanations!
Can one use the office normal carbon sheet or must it be a special carbon sheet for textiles?
Thank you!
Hi Sara
You do get tailor’s carbon sheet, but I don’t think it is commonly available. So, yes, you can definitely use the office carbon, as do 😁. It has worked perfectly fine for me all these years.
Thank you for your reply and time!
Muy buena la página.
Clara, precisa, simple y abarcativa.
Tiene respuestas para una gran cantidad de dudas, y se detiene en muchos detalles de gran importancia.
Muchas gracias por tan buen aporte!
Hi Emedelce,
I am so happy that you found this page useful. Thank you!