
Here we are introducing a new art—String Art Embroidery.
Using String Art with Hand Embroidery
I had been curious about string art of late. I did a bit of research and tried it with Hand Embroidery, and I loved it! So, here is a small project for you all to try. Even the kids would love it- it is that easy. Of course, this is not a complicated pattern, but only an introduction to the application of String Art in Hand Embroidery. I hope it will inspire you all to explore more advanced forms later. Scroll down for more interesting information on this art and the tutorials.
|
|
An introduction and history
String Art was developed at the end of the 19th century by Mary Everest Boole, a woman of progressive thoughts and a self-taught mathematician. Interesting fact- her uncle, George Everest was the person after whom Mt. Everest was named! She invented Curve Stitching where one can create smooth curves using straight lines. Her idea was to create fun activities like Curve Stitching to help children explore the world of mathematics better. Mary Boole started Curve Stitching using thread and cardstock (thick paper). It later developed into a whole new art in itself growing into String Art which was taken up popularly in a more creative way during the 1960s by art lovers. It was done using nails over wooden boards and wool or embroidery threads to pull around the nails. The threads were drawn or pulled in straight lines to make curves and to make various designs with it.
String Art and Hand Embroidery
I was tempted to try this in Hand Embroidery. And why not!? If you are a person who does not want to hammer down nails on planks and yet try some small String Art, then this might interest you. String Art has been tried over wood, canvas, paper, and many other materials, but here we are trying it for the first time over the fabric, in combination with Hand Embroidery. Instead of hammering down the nails for the outline, you just have to stitch the outline on a fabric! And all you need is just your embroidery tool kit. Now, in this project, I will show you the very basics of how to do string embroidery. Once you have tried this and gotten the idea of it, I would encourage you to go advanced.
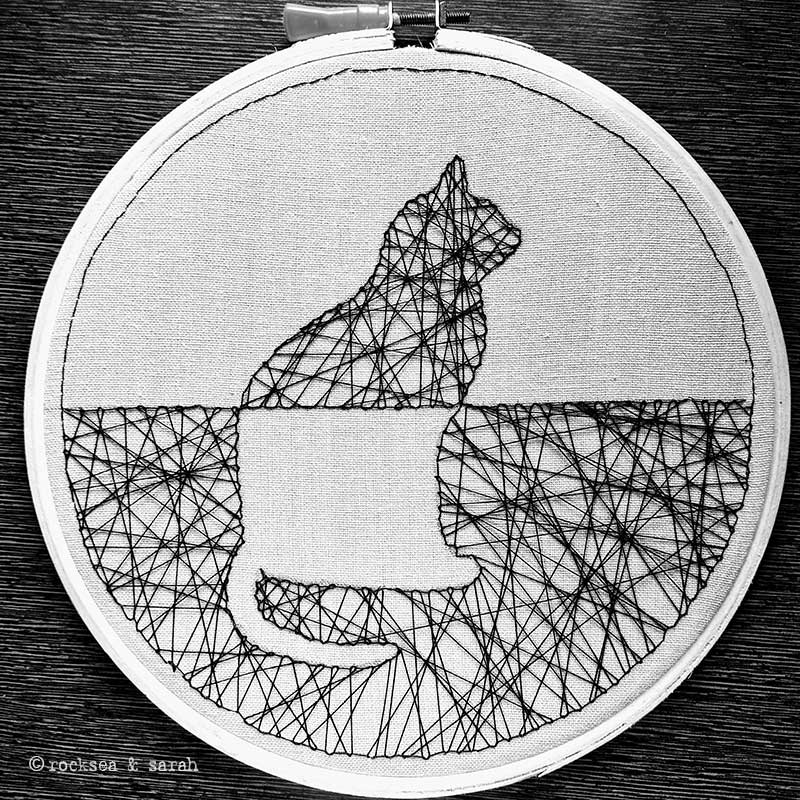
Understanding the String Art in Hand Embroidery
When you apply the String Art in Hand Embroidery, the most important thing you have to understand is that it is the stitch points that take the place of the nails or pins. So, if you are doing advanced string art, you need to count and mark the points, as you would in the normal string art, and make sure that these will be your stitch points where you take the needle in and out of the fabric while stitching the outlines. In the lesson below, I will be doing a simple String Art, where there is no need to count and mark the stitch points.
Things you need
- Embroidery hoop – preferably 6″ or more
- Embroidery needle and a tapestry needle
- Perle cotton thread or crochet thread
- Cotton Fabric
- A simple pattern
- Scissors
Here is the tutorial to make a cat using String Art in Hand Embroidery. I have used it to show how you can fill the background and the subject (cat) in the same frame.
 |
 |
| Fig 1: Trace your pattern over the fabric. Make sure the pattern is just an outline of the subject with no details. For this style of String Art Embroidery, I have marked a stitch line through the center of the pattern. Then, mount your fabric on the hoop | Fig 2: First, stitch over the center line using one of the outline stitches: Chain Stitch or Back Stitch. I have used the Back Stitch throughout. This center line will divide the pattern into two sides, helping us to treat them separately. |
 |
 |
| Fig 3: Now, stitch the outline of your pattern using the Back Stitch or the Chain Stitch. This is how my cat looks half-way through the stitching. | Fig 4: Now, stitch around the pattern using the Back Stitch or Chain Stitch. I used the edge of my embroidery hoop to guide me with the stitch. You can draw the outline if you wish to. |
 |
 |
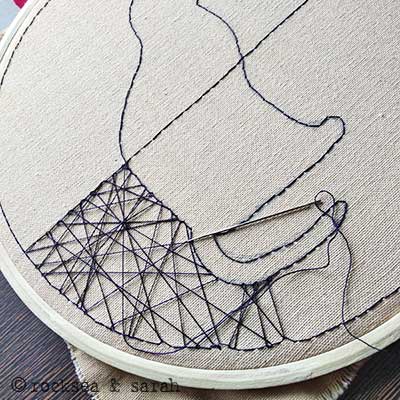
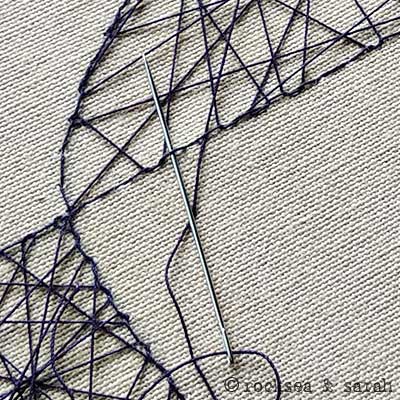
| Fig 5: Now, we begin weaving the thread between each stitch. Let’s do the background of the bottom half, first. Bring out the needle from near the outline. Now pass under each stitch and go in the opposite direction, just anywhere, and pass it under that stitch. Turn around your needle and pass it under the next stitch. Continue the process. | Fig 6: Try to cover as much ground as possible. Make sure you pass under each stitch at least once. Use a tapestry needle for the weaving if it helps you. This will avoid the plucking of fabric as you pass under each stitch. Once the bottom half of the pattern is done, it looks like this. |
 |
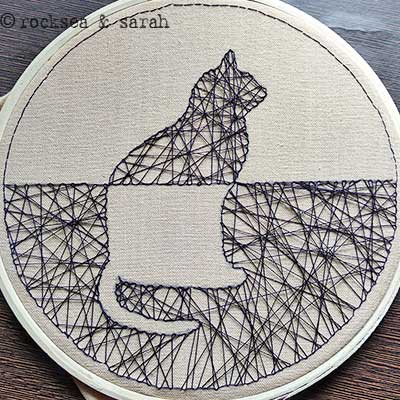 |
| Fig 7: Now, we cover the top half of the pattern. This time, we fill inside the cat. Again, come out from near the outline and take the thread under each stitch drawing it in a random direction each time to cover maximum ground. | Fig 8: Once you have made sure that you have gone under every stitch at least once, you can take the needle through the fabric and finish it off with a knot. The pattern is now finished! |
Try String Art Embroidery on paper!
|
String Art on paper
|

 Sarah has been researching and sharing hand embroidery lessons for over 18 years, making it accessible to everyone around the globe.


I just bought your Hand Embroidery for For Everyone. Is there any chance of getting a hardcopy of it?
Hi Arleigh,
A printed version is not available as of now, but you can feel free to print the pages you like from the ebook. Just adjust the print setting to fit the page. ☺
Estimada, muchas gracias por tanta generosidad, aunque soy una principiante, tus tutoriales son muy fáciles de entender, me pregunto si tus libros están español, miil gracias nuevamente
Muchas gracias por pasarte. Me alegra que estés disfrutando de nuestros tutoriales. Nuestros libros electrónicos están solo en inglés. Espero poder publicarlos en español algún día.
Muitíssimo obrigada pelo desprendimento de ensinar o que sabe de graça. Gratidão 🙏
Patricia, muchas gracias por sus amables palabras. Mis libros aún no están en español. Pero es un libro ilustrado con instrucciones paso a paso, por lo que no debería ser difícil de usar y seguir. 🙂
Espero poder traducir al español algún día.
Mucho amor,
sara
What a neat idea!
Puuuur-fect! 😀 Love the way you have done this. Thank you for sharing, Joyce!
Love this! With your permission, I plan to share your string art embroidery lesson as a program for our EGA chapter. Very much looking forward to making a “trial” piece 🙂
Such a great idea! 👍I’ll be using this with my makers classes – I’m pretty sure It will be easy to cone up with a variety of simple designs that the kids could use for this, thanks (as usual!😀)
Awesome! If you do end up making this with your class, and if it is fine, do share a couple of samples here. ☺️
Love it!
😊
I’m looking for instructions how to do embroidery on a doily – does anyone know to do this?
Never really tried before, but gives me a an idea to try it out sometime. If I could get the instructions done, will surely post it!
– Sarah
Me ha encantado la técnica, siempre me ha gustado el String art, pero no lo de los clavos y ahora con su proyecto se abren muchas posibilidades pues me encanta bordar y puedo probar hacerlo. GRACIASSSS
Gracias. Muy interesante y creativo. Se abre a un sin fin de ideas y proyectos. Les felicito por el esfuerzo.
Hi Ana!
Muchas gracias por tu apreciación. Me anima a compartir más experimentos y proyectos de este tipo. ☺️
Extremely glad to know about the historical facts behind String Art in Hand Embroidery. Looking forward to more such experiences.Thanks.
Thank you, Madhumita. Glad you liked it. 😊
Hey Sarah! I would love to talk more about your UFO experience from 2006? https://www.embroidery.rocksea.org/ufo/. I have witnessed something very similar and have been baffled about it ever since. Feel free to contact me anytime – suraj10nov@gmail.com, insta handle – psych_bobby
Wow!
😊😊