

About the Woven Picot Stitch
The Woven Picot Stitch is a beautiful 3D stitch that can tingle your imagination to stitch up something extraordinary. It is so easy to do that you might feel addicted to it! Due to its shape, it is most often used to make petals or leaves. Since the Woven Picot stands detached from the base material, it is a delight to use in Stump Work. This stitch requires an extra needle or a pin to work. I have used my tapestry needle, but stitchers often use a pin.
How to do the Woven Picot Stitch
Keep a spare needle, pin, or something similar handy to help you with the stitching.
 |
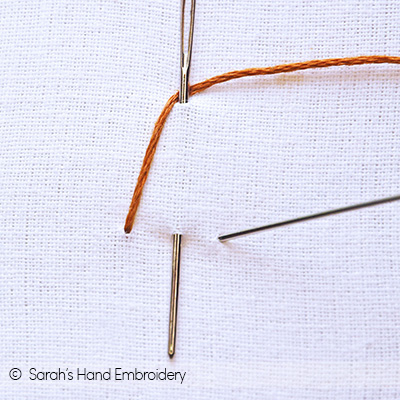 |
| Fig 1: Start by passing your pin or extra needle in and out of the fabric. The space created will be the length of your stitch. | Fig 2: Now, bring out your needle from the bottom, take the thread around the pin/extra needle, and pass it through the fabric, as shown. This will be the width of your stitch. |
 |
 |
| Fig 3: Next, come out very close to the pin/extra needle, and loop the thread around it, as shown. | Fig 4: Begin weaving between these three foundation strings you have made. Pass the needle up and down the vertical threads. |
 |
 |
| Fig 5: When you reach the other side, just turn around and weave back. | Fig 6: Continue with the weaving till the bottom. Do not pass the needle through the fabric at any point in time or even pluck the fabric under |
 |
 |
| Fig 7: Finish up the stitch by passing the needle through the fabric very close to the pin/extra needle. | Fig 8: This is what is formed! You can now pull out the pin/extra needle. |
 |
|
| Fig 9: Pick the Woven Picot up, and there you have a 3D structure. |
Learn this stitch along with 305 other stitches from our 600-page eBook.

 Sarah has been researching and sharing hand embroidery lessons for over 18 years, making it accessible to everyone around the globe.


