
Fly Stitch is also known as
Y stitch, Open loop stitch [EN], Punto de mosca [ES], Point de mouche [FR], Fliegenstich / Zweigstich [DE], Punto mosca [IT], Ponto mosca [PT].
How to do the Fly Stitch
This is an easy stitch and looks beautiful. As the name suggests, it looks like a ‘Y’. Horizontal or vertical rows of fly stitch can be done to create various effects. It can be topped with more decorations with contrasting threads too.
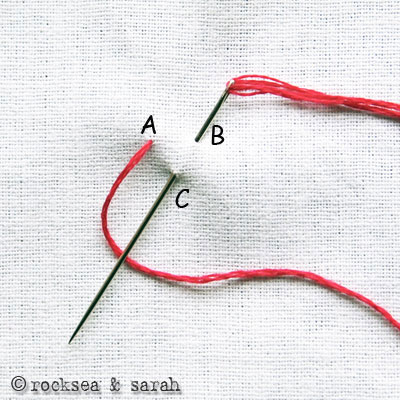 |  |
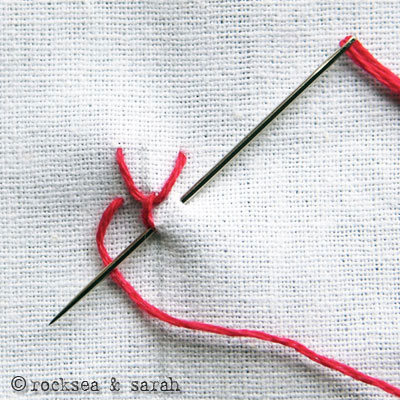
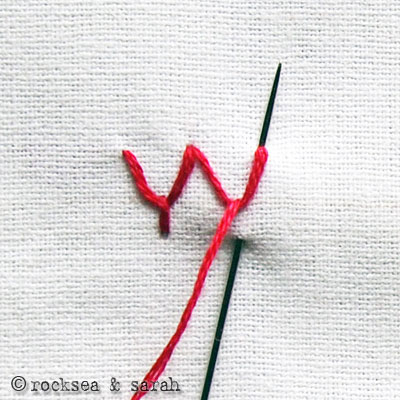
| Fig 1: Bring the needle out from A and put it in through B. Then, bring it out through C, which lies between and below A and B. Pull the needle out from over the working thread, as shown in the picture. this creates a ‘V’ shape. | Fig 2: Now, to create the ‘Y’ shape, you need to make a tail. So, put in the needle a little space right below C. |
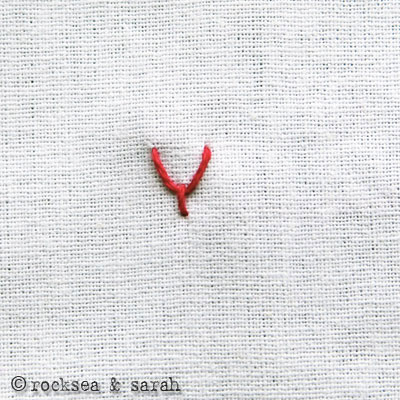 | |
| Fig 3: When you are finished, the stand-alone fly stitch would look like this. | |
| Variation 1: Vertical Row | |
| I have made a vertical line that will act as the stitch line for this illustration. To make a vertical row of fly stitch, consider making the tails of each fly stitch on the stitch line. The only thing to keep in mind is to keep the tails connected. It is easy to lose the ‘V’ shape in a bid to connect the tails…so try to keep checking the shape once a while. 🙂 You can also do a vertical line of fly stitch without connecting the tails…that is left up to your imagination. A vertical row of the Fly Stitch makes great textured fillings for leaves. | |
 | 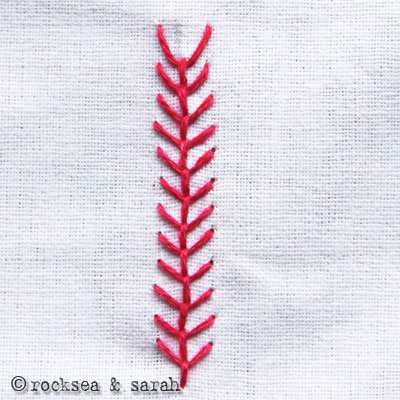 |
| Fig 4: Make a fly stitch. Continue for the second fly stitch in such a way that when you bring out the needle for the tail, it is brought out from the end tip of the previous tail. See illustration. | Fig 5: A vertical row will look like this…sort of like a fern. |
| Variation 2: Horizontal Row | |
| Here, you connect the top ends of the fly stitch to get a horizontal row. Of course, you can do it without connecting too. A horizontal row makes great border patterns. | |
 | 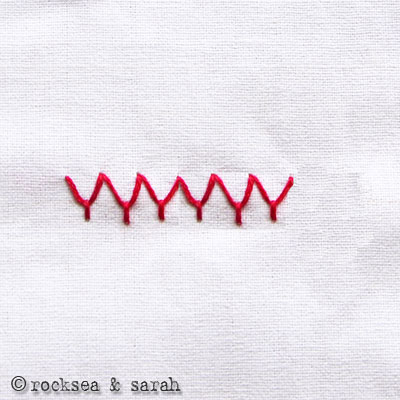 |
| Fig 4: Make a fly stitch. Continue for the second fly stitch in such a way that the top end is connected as illustrated and the tails will all fall neatly in a line. | Fig 5: A finished horizontal row of fly stitch would appear like this. You can always decorate over it using contrasting threads. |
Learn to do Fly Stitch in 2 minutes!
Learn this stitch along with 305 other stitches from our 600-page eBook.

Other stitches from the Fly Stitch Family


Did this! Words using Whipped Fly Stitch and the hearts using Chain Stitch. All thanks to your tutorials 🙂

Hi Niza. What beautiful work! It is such a great idea. I love it. Thank you for sharing it here. 🙂
Love your blog so much. I’ve just started fly stitching letters on my bag. Will share a pic once done. By the way….wish you can share more on bluework, blackwork and redwork 🙂
Thank you so much, now I can start my heirloom blanket for the arrival of my grand daughter in June. Will send photo when I finish, if I get stuck you are on my favourites list
Can you please tell me this flying stitch skill is available in what area of Pakistan?
Love your site, Sarah. So glad to find it.
Thank you, excellent range of stitches, clear instructions
Dish towels do u think the Portuguese stich is done right and do u feel I did a fair job

Dear Tommie,
First of all, sorry for being so late to respond.
The stitches in your work are not very clear, but from what I can see, it looks like a very beautiful one! It is neat and I can sort of figure out that the Portuguese stitch has come out well. Thanks for sharing. 🙂
THANK YOU, THANK YOU for showing the fly stitch in such a clear, concise way. I have never been about to figure this out with other turtorials I have looked at.
THANK YOU
sara
Here is my latest work in the blouse:

i have used whipped running stitch and zig zag chain stitch.
thanks for all the tutorials.
Hi Shami,
Thanks. As usual, simple, yet nice work. 🙂
Thank you so much for making this information available, love to embroidery just forgot how to make a lot of the stitches, Thanks again
I’m a beginner for embroidery. I found your website very useful and informative than other sites. I’m practising seeing the pictures. Kindly let of know how can I figure out that after selecting a pattern which stich should I make on that pattern. Kindly help me out as I’m in a confusion.
Hope that by replying I can get some useful instructions that I can save and refer to again.
Thank you! Love stitching and using the traditional styles. I appreciate the visual aid with pictures as well!
This is such a wonderful blog. Your instructions are fantastically easy to follow and the stitiches are beautiful. Thank you so much.
This is the best site ive seen on embroidery, thanks for such a wonderful and easy explanation of embroidery stitches.
Dear Sarah!

Thank you for this blog. I am learning and really enjoying myself 🙂
Dear Sarah,
Its a wonderful job done here…it helped me a lot…but i would like to leave a suggestion…
it would be more effective if tha backside of stitches will be there..
Preeti,
That is a very good suggestion. In fact I have done that for a few stitches. But, for some reason I had decided to discontinue it. I will try to add the reverse of the stitches whenever possible. 🙂
Thankyou Sarah for the wonderful tutorials!! u r an angel!! 🙂
Dear Sarah,
God bless you my dear for creating such a wonderful blog.i love embroidery and learnt it in school.i dint remember many of the stitches until i came across your blog.loved it.
you inspired me to embroider my t shirt.i will upload the picture once its done.
keep inspiring and best wishes.
Samanvitha
Embroidery Pattern
Embroidery Patterns

Embroidery Patterns

Embroidery Patterns

Thank you for all this. This is a lost art. My great grandma made us all sorts of things that I will always treasure. Now I can refer to this and teach myself!!
Dear Jody,
Hand embroidery is an art with not many takers here too, especially since newer hobbies are taking over. It is great that you have this interest and are reviving it. Thanks. 🙂
Thank you sooo much for your wonderful blog! I’ve purchased dozens of books in an attempt to find a real collection of stitches and here you are with stitches I’ve never seen!! Thank you!
Dear Michelle,
It feels nice to hear that you feel good about our stitch collection and lessons. I am glad that you are enjoying them. We are planning to come out with a book of our own. It might take a little time since we are expecting our baby within a month, but will surely inform when it is published. 🙂
CAN U PLZ ADD OTHER STITCHES LIKE TURKEY RUG STITCH…IT WILL B MUCH CLEAR IF YOU ILLUSTRATE IT WITH UR WORKS….
Dear Vandana,
Thanks 🙂
There are a lot many stitches to add and I will be doing it slowly but steadily. I appreciate asking me for some illustrations… it helps me to add them to the list. 🙂
SO BEAUTIFUL AND EASY TO UNDERSTAND…..
hi sarah

you’ve done such a nyc job
thumbs up 🙂
Dear Sadaf,
Thanks for uploading your work. Really, nice job done using the blanket stitch. 🙂
hola, me llamo nadir. tu blog ees muy lindo, y aprendi mucho. me encantan, y son muy utiles.
Olá Nadir,
Muito obrigado. 🙂
fly stitch horizontal is cute but how do we do the next lower line OR avoid it.