

Padded Satin Stitch is also known as
Puntada de satén acolchada [ES], Point de plumetis [FR], unterlegter Plattstich [DE], Punto piatto imbottito [IT], Ponto cheio com enchimento [PT].
About Padded Satin Stitch
This is a Satin Stitch variation with a slight embossed or dimensional look. This is because we first give the pattern a little padding at the base before doing the Satin Stitch. How much padding you want will determine how much padding you will provide on the bottom. Some prefer to fill the base entirely, while you can work with sporadic filling too. The thread used in work also matters. Perle Cotton is a rounded and a ‘plump’ thread which helps in a beautiful outcome. Regular embroidery floss will work great if you are using all the 6 strands. Working a thicker outline will also affect slightly. Working a Chain Stitch as I do in this lesson is probably much effective than working the outline in a Stem Stitch. I will illustrate this stitch using a leaf pattern.
How to do the Padded Satin Stitch
You need to know any basic straight line stitch like the Chain Stitch, Outline Stitch, or Back Stitch, to do the outlining. You also need to know the Satin Stitch.
 |
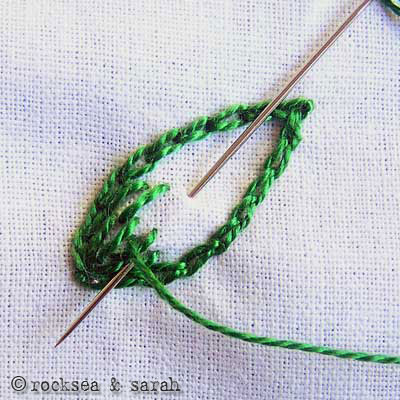 |
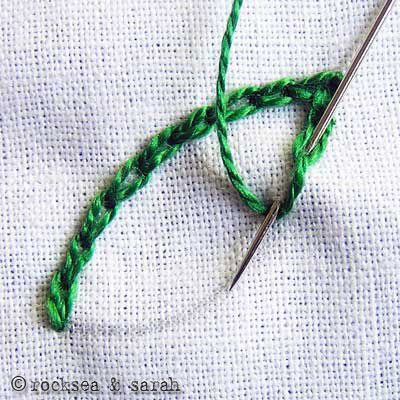
| Fig 1: First, stitch an outline of the pattern to be done. I have used Chain Stitch to outline, but you can use any straight stitch like the Back Stitch or the Outline Stitch. | Fig 2: Once the outline is done, fill the inside of the pattern with Straight Stitches. You can fill it up with chain stitch too. The idea is to give padding for the Satin Stitch that we will be doing, so we need not make this stitch to cover the pattern entirely. |
 |
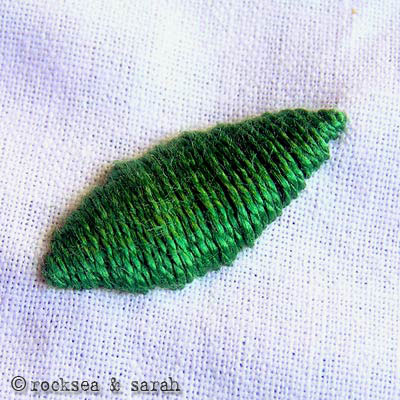 |
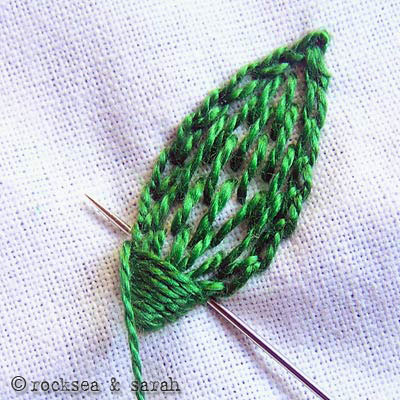
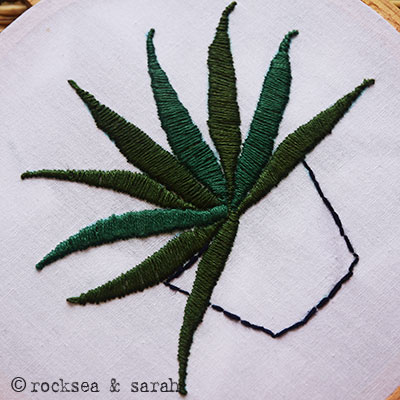
| Fig 3: Once that is done, do the satin stitch to cover the pattern. The needle needs to go in and out of the fabric from outside the Chain Stitch. | Fig 4: The completed pattern will look like this. |
Related Projects
Do you want to know where and how to use this stitch? Check out the projects below and know more. Make something beautiful today!
|
Leaf embroidery
|
Learn this stitch along with 305 other stitches from our 600-page eBook.

Other stitches from the Satin Stitch Family
|
Surface Satin
|
Back Stitched Satin
|
|
|
Trailing Stitch
|
Double Satin
|


450-page Hand Embroidery book.
 Sarah has been researching and sharing hand embroidery lessons for over 17 years, making it accessible to everyone around the globe.


Thank you so much, Sarah. I tried the technique you showed in your e-book and had a much nicer outcome. When I get a bit further along, I will upload another picture to show you. I realize that this is new territory for me but I’m really enjoying working through it. I feel it’s beginning to look as if I know what I’m doing as I go along. Experience is a good teacher. 😊 Thank you again.
Judith
Glad to hear, Judith! Enjoy the practice. Will wait for the pictures! 🙂
Hi Judith,
I know I’m a bit late to ‘the party’, but thought I’d add my thoughts on this small leaf satin stitch. I too have stitched this design, and I took the diagonal line that splits the leaf into two halves as being a directional stitch for the final satin stitch. I simply started the satin stitch in the middle, following the directional of that line, and then stitched either side of it, keeping the correct direction.
Hope this helps
Sally
Sara, I have a crewel embroidery kit that calls for padded couch stitching on some leaves. My first attempts have been unacceptable and the method the show is difficult to follow. I have done straight stitches and then tried to give the dimension they show but not having success. They have divided the leaf…and it is a small leaf…into two areas so that has complicated the thing for me. Each portion comes out far too thick. How can I send you a photograph of what I am doing?

Hi Judith,
You are doing a beautiful project! I see the leaf you are working on. If I am right, you are using wool (?) which makes it difficult to control the thickness of the thread. Judging by the picture, I feel the thickness is fine, but I understand that it can be difficult to stitch over a small area, especially when it tapers. One suggestion I can give is to not keep the Satin Stitches too close to each other and be comfortable with a little gap showing. This eases out the thickness and the task of stitching too. The straight stitches under it will cover for the little gaps that might show between the Satin Stitches. I hope this will help a bit. Please do update me if it did. I would love to see the finished work! 🙂 You can upload the pictures here in the website, just the way you uploaded this one.
Regards,
Sarah
Hello!
Im trying to make this model and i would like to know what do you think about this stich: wich technichque is it on the eye?
Thank you!
Saludos desde Chile!
Hi.
If I understand right, you want to know the stitches used in the eye.
The black outline is done using chain stitch. The red outline is done using back stitch. Orange and yellow have been used to do Pekinese stitch around the iris(looks like two layers). Then, the eye is filled in with french knots in green and black. Red french knots are used in the edges of the the eye.
I have to say I LOVE your tutorials! I had to give you a shout out on my little crafty blog (www.theothercat.com). This one was really helpful for a piece I recently did for a friend.

Thanks, Nichole. This is lovely!!!
i love this sarah!!!!!!!!!!great job…….
This is a current project I am working on, 6 x 7 inches. In this photo I am showing a close-up of nested stem-stitch and padded satin stitch (the eye of the Tiger). Perhaps six more hours of work and I will be finished with this one.
Thanks again, Sarah, for your amazing website.
Dear Val,
Whatever little of the bigger piece I see is beautiful. Your neatness and preciseness is really commendable. Thanks fro sharing an example of the padded satin stitch. 🙂
HI Sarah, here’s the finished work. I really enjoyed this one. It’s all nested stem stitch except for the eye.
hi sarah, eathu tread anu use cheyyunathu.
Hello Vini,
I have used peaerl cotton (anchor brand) here.
I just read today on a victorian embroidery website that women would lay little bits of cotton as they were sewing to provide the padding instead of adding stitches inside. Interesting. The method you show seems more practical I think.
🙂 Yes, this is a quicker and less messy method than laying cotton for padding.
hi sarah…
ur designs n tutorial were excellent…can u suggest which type of satin stitch will be apt for silk blouse
Dear Brinda,
🙂 Thanks.
For a silk blouse, I would suggest that you use the simple satin stitch. This will avoid too much tension on the fabric. Also, try using satin thread or only two strands of embroidery floss.
thanks sarah
nice video I am looking padded ( satin stitch ) work like this work in machine embroidery . I have attached this kind of embroidery do you have any video for this
I have attached the link;
https://www.embroidery.rocksea.org/images/embroidery/padded_satin_stitch_4.jpg
Hi Serish,
We don’t have any video tutorials, only picture ones.