Satin Stitch is also known as
Damask Stitch [EN], Puntos Plano [ES], Passé plat [FR], Plattstich / Flachstich [DE], Punto piatto [IT], Ponto cheio [PT], Plattsöm [SV].
How to do the Satin Stitch
Satin stitch has a very easy procedure. What is difficult in this stitch is to maintain the neatness, especially on the edges of the pattern that is being filled. So, very often, a satin stitch is outlined using one of the straight stitches like the Split Stitch, the Outline Stitch, Back Stitch, Chain Stitch, or any other similar stitches of your choice. This helps in containing the satin stitch within the parameters of the pattern or motif easily.
Also, when doing a satin stitch, we have to make sure the stitches are not pulled too tightly as it will distort the fabric. Keeping it too lose will sag the stitch. To avoid these two conditions, it will be advisable to use an embroidery hoop to hold the fabric tight. When the fabric is taut, the satin stitch will be easier to do.
Another thing to keep in mind is not to keep this stitch too long. If your pattern happens to be big, you can divide it into smaller sections and each section can be filled with shorter satin stitches. Else, opt for another stitch from the satin stitch family which will help you to fill larger areas or patterns. These include the brick stitch, encroaching satin stitch, and long and short stitch.
I will be demonstrating over an area between two stitch lines, without any outline stitch.
 |
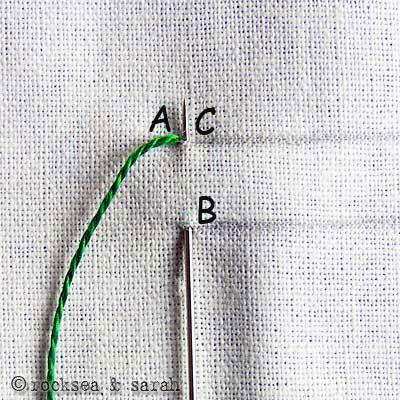 |
| Fig 1: Bring the needle out through A and put it in through B. So, that makes a stitch which covers a small area between the stitch lines. | Fig 2: Now, bring the needle back through C, a point very close to A. Continue this action over the two stitch lines. |
 |
|
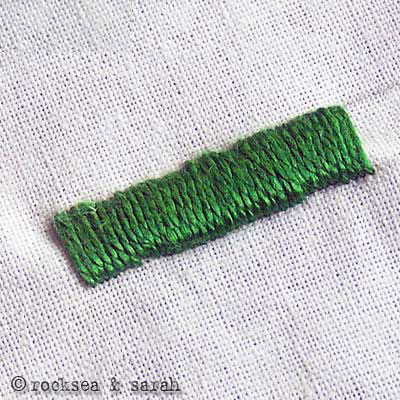
| Fig 3: Once finished, the area is filled as shown above. You will be spending as much thread on the reverse side as you do on the actual side of the fabric. |
Learn to do Satin Stitch in 2 minutes!
Satin Stitch Sample

Courtesy: Reshmi Jovita
Use this stitch on a pattern
Visit and Subscribe to Sarah’s YouTube Channel
Learn this stitch along with 305 other stitches from our 600-page eBook.

Other stitches from the Satin Stitch Family
|
Surface Satin
|
Back Stitched Satin
|
|
|
Trailing Stitch
|
Double Satin
|


 Sarah has been researching and sharing hand embroidery lessons for over 17 years, making it accessible to everyone around the globe.


Thank you so much for what you do, your videos are a good send! You are so clear and helpful, I will learn a lot with you, really thank you from Italy
Hi Marta. So glad that you are here and like our pages. 🥰
Thank you so much for what you do, your videos are a good send! You are so clear and helpful, I will learn a lot with you, really thank you from Italy
Hope you like my butterflies. Wishing you a GREAT DAY. Thank you for what you do * and for being th4re. ❤️

These are gorgeous, Sylvia!! Love them, absolutely. Thank you for sharing.
Very nice thanks for the share
Thank you. Always my pleasure ☺️
Nice one
Satin stitch and filling in big letters with a curve.
Is satin stitch a good stich to fill in a Large Monogrammed P? I’m having trouble with the curve part. Also, is there a better method I could have done differently on top of the P? I feel like I shouldn’t haven’t stopped at the top. 😞 What would you recommend? Thank you. I love your page!

Dear Tabatha,
Satin Stitch is excellent to do monograms, but it could be challenging to work with. Here are a few tips that I can suggest to you:
1. Always stitch the outline of your letter with an outline stitch- the Back Stitch is a good one. This will help in keeping the edges cleaner.
2. Decide the path of stitching before you pick the needle. The route we follow for writing the letter might not be the best while we stitch.
3. Now, the top of the alphabet. I would suggest that you start working the top narrow corner and go around the curve. Then, you could work the vertical leg of the alphabet. Finish it off by stitching the bottom horizontal base. Dividing any alphabet into different sections will make it easier to handle the monogram.
4. A recommended way to work the Satin Stitch is to divide each section into smaller chunks, especially the curves. This helps us in guiding and maintaining the angle of the stitch. In this case, the stitches falling in the inner curve will be much closer and more compact than the stitches on the outer curve. This will happen as there is a space difference between both curves. Use a pencil to divide this curve into various equal sections to guide us and stitch smoothly.
I hope these tips will help you. Enjoy stitching this monogram- it looks beautiful. You can share what you have finished here. We would love to see it!
Sarah!!! Thank you so much for your help! Your advice really helped! It’s looking so much better now.
Now I am practicing with the small flowers lol but I am thoroughly enjoying it!
Awesome! Glad that these tips helped. 🙂
Is satin stitch an embroidery stitch where you’ll be spending as much thread on the reverse side as you do on actual side of the fabric?
Yes, it is!
Is there a way to do the satin stitch using the index finger method; I mean without having to go all the way back; or moving the needle back and forth in the fabric. I hope I am clear and thanks in advance
Hi Gehad,
I am not sure if I am aware of the index finger method of doing a satin stitch. But I guess what you probably mean to ask is if there is a way to do the stitch without having to go all the way back at the back of the fabric. Well, that might not produce a Satin Stitch that is smooth and you desire. It will leave gaps and the stitch will not be stable. Satin Stitch will use as much thread under the fabric as it would on the front side. That is the best way to create a perfect Satin Stitch. I hope my answer helps.
Useful madam
thank you!
Please check this: https://www.embroidery.rocksea.org/stitch/satin-stitch/surface-satin-stitch/
Yes it right and astonish of hearing this
Is there any book or ebook available if so can you please share the name of he same.
Hi Amutha,
Our eBook is available online for purchase. Click here to go to the eBook page: https://www.embroidery.rocksea.org/embroidery-book/
Thank you for your interest! 🙂
You are welcome.
I am not very good with satin stitch, but I am trying. I have come upon a small 1/2″ wheel and I don’t know how to do it. I can’t get my stitches to radiate around the circle as they should. Any suggestions would be so appreciated.
Thank you,
Jan Achey
I’ve been wondering about how you go about outlining portions of satin stitch that are next to each other. Would you do the outline first, then work within that with satin stitch, or fill in with satin stitch then outline that section, covering the edge of where the satin stitch entered/exited the fabric? If I’m not being clear, feel free to email me. Thanks!
hcclds
Though either way might be ok, I would strongly suggest that you do the outlining first. This makes sure that the satin stitches sit neatly and held within the outlines. Also, you would not have to adjust your outlining according to the satin stitches, in case it spills over the pattern.
Hope this helps.
I sure wil
Thank u
By the way, should I post it here?
yes, you can post here. If you are having any trouble, you can email me too. 🙂
Dear Sarah,

Your reply made me gutsy coz I dared to share my work.
This is a cotton jacket where I have combined stem stich and satin stich.
Do let me knw what do you think.
Fingers crossed
Hi Koyel,
Sorry for not being prompt to reply. I am blown away with your embroidery! Honestly. It looks really wonderful. Thanks for sharing.
If you can, do a send a high resolution image of this jacket, and the close up of your embroidery. I just want to consider using it in our ebook with your name mentioned. 🙂
It’s beautiful ❤️.
Dear Sarah,
Your reply made me gutsy coz I dared to share my work.
This is a cotton jacket where I have combined stem stich and satin stich.
Do let me knw what do you think.
Fingers crossed
By the way, I think you have a real good hand and knack for embroidery. You can send some good images of your other embroideries too. 🙂
Sarah, I am a french embroiderer; i was 4 time in India. In new Delhi, I sewn beautiful Phulkary shawl (in Craf museum) And now I should learn this stitch (I am a good embroiderer!)
I should want “The phulkary embroidery- a work book” by surjeet husain. But I don’t find it (or the address of the author) So If you find it in India-or the address (I can buy it by visa card) I should be happy to find and buy the book or an excellent Net tutorial. Thanks for your answer and your great embroiderers country!
http://www.artisanne-textile.fr
I am readying to embark on my first big embroidery project – as you can see from the photo, I am a wee bit ambitious. I am going to embroider this coat of arms on to a stomacher, but having only ever done small projects and in cross stitch, I could use a little advice, or really any and all advice that you might have for me. I figure that I’ll be using mostly satin stitch and outline stitch for it, but I’m not certain how I would embroider the smaller details such as the stars on the shield.
is that .jpeg file ?can u send ur email id plz?then I can upload the pictures
Dear Debangana, you will be getting the reply of this comment as an email. You can use that email id to send the images. Check if your image file extension is among these:
bmp, gif, jpg, jpeg, png
If so, you should be able to upload it here itself!
hey sarah, I tried a lot.But it can’t be done.plz help me 4 uploading
hi sarah.I did it after learning from ur tutorial.how is it?
Dear Debangana,
Looks liek your upload did not work. Can you try uploading again?
When sokme one searches for his essential thing, thus
he/she wants to be available that in detail, so that thing is maintained over here.
Hi Sara,
Please find the bed Spread which I have done.
Appreciate your tutorials! It was neatly explained.
Its really a good job! can you please assist me on how to do kutch work?
Regards,

Reeba.
Hi Reeba.
Very pretty and neatly done. 🙂 Thanks a lot for sharing!
Hii Sarah,

I’ve got some shots of d embroideries im learning from u… gonna keep uploadin dem under each name.. chk dem out..!! 😀 😀 nd most of all tnx fo d greaaat work..!!
hi sarah,
my mother’s b’day is approaching.i’m planning her to give a hand towel with letter N on it here is the template.
http://www.needlenthread.com/2008/07/monogram-for-hand-embroidery-letter-n.html
could u plz suggest me the stitches tht i cud use.
EAGERLY WAITING FOR A FAST REPLY FOR MA MOM’S B’DAY IS ON MAY 11th
SRY ……….
i am planning to give her …. I by mistake typed i am planning her to give
Dear Vini,
You can use satin stitch, of course. Or try using chain stitch or split stitch to fill it up. It also depends on how big you will make this monogram.
wht abt the flower can i use the same satin stitch or go for laisy daisy?
PS ur site is really wonderful and being 14 it is quite easy to learn from your site
You can use the satin stitch again. If the flowers are small, you can try the lazy daisy.
Hi mam,
I am really benefitted by ur website.. all these days I did not know that there are so many stitches.. I always like neat presentation.. urs is really neat and very useful… thank you….
Hi Sarah,
your tutorial is really very very helpfull. i was looking for this for many days.
Thanks a lot for this.
Hi Please let me know if u conduct workshops or take classes to teach embroidery. I am a big fan of yours and want to learn a lot from you.
your online page stitch class is very useful to me and my friends.
hope u will do many stitch like this in 1derful way
thank you mam for Ur comments….i will improve myself and do it better than this next time…:):)
regards..
Sweety.
hi Sarah madam,

Thanks for being my inspiration towards embroidery…i just tried satin stitch along with back stitch here… this is my first time embroidery in satin stitch..:)
regards..
Sweety.
Dear Sweety,
Your work looks nice. The stitch is embossed giving it a nice feel. Yes, you need to work a bit on making the sides neater, but you are only a beginner and it will take more practice. I am proud that you did this so well! 🙂
Hi Sarah,
I was married last year and our guest book was actually comprised of quilt squares that everyone wrote on/drew on. We have since decided that we want to embroider over the messages to make sure they really last. After looking at your fantastic website, it appears that the satin stitch is the perfect option to do this! Would you agree that it can be catered to different widths and shapes?
Also, reading through the other comments, it appears that the pearle cotton thread looks like the best choice. However, I wanted your opinion of the weight I should use for cotton quilting fabric; it’s the traditional fabric weight used for quilts.
Thanks so much!
– Tara
Hi Tara,
Sorry for not being able to reply sooner. I was on vacation sans laptop and returned only a couple of days back.
Satin stitch is a good idea to stitch over the writings. But, it might not be a good idea to use satin stitch if the width is more than say 1/2 an inch. Try checking other stitches like the basket stitch for thicker lines.
Also, I would look at how much writing is there. Satin stitch can become strenuous if you have lots to do. You can also check other stitches like chain stitch or again, basket stitch for variety and easy stitching.
I would suggest perle cotton. Since you might not want the stitch to be very ’embossed’ over the quilt fabric, try using perle cotton number 12 or 16 for thinner effect.
Hope this information helps. Let me know how it is coming out. 🙂
Hey Sarah
I am making a stole in which i want to do satin stitch. Can you please suggest me the fabric which i should use for the stole but there is a condition to it that is it should be dyeable?
and please suggest me one more thing that i am planning to make a sort of paisley design in it so would satin stitch look good on it or i should try for some other stitch??
please reply me as soon as possible.. really in a great dilemma..
Thanks
Ananya
Dear Ananya,
Try using silk or soft cotton for the stole, but a tightly woven one. When doing satin stitch, use a thin needle with one or two strands of threads over these fabrics.
Satin stitch is good for paisley designs…especialy, if you are lookin for a filled effect. You can also fill in using chain stitch too.
Is this the type of stitching that is used for monograms on purses & diaper bags that is so popular now?
I have been searching for about two days on how to do this stitching and I had no way of knowing the correct sewing term. I am so excited about this, I can’t wait to get started. I have a practice piece that I am doing until I can get my fabric ring tomorrow and needles that I need. I didn’t realize just how much I enjoy doing this. I bought a beginner sewing machine from Big Lots for $15, its a cute little small one. I wanted to make sure I wouldn’t get tired, bored, or angry and just give up before I spent the money to buy a nice machine. I am addicted now, I can’t hardly do anything else but sew. I want the bigger and better machine, and I have asked for that for my birthday/Christmas present this year from my husband and my other family members, and the stuff to get me started on embroidery. I don’t have the right things, but i am still learning how to do each thing with what i do have. I love embroidery because I can sit on the bed with hubby and watch TV and spend time with him, while I get to to enjoy my sewing as well. I have looked and looked all over the internet and read so many tutorials, but yours are the only that I can actually understand. You have photo by photo directions and that is what makes this so easy. I don’t have the right kind of needs, or thread because i don’t have the money, but I am still learning the stitches and still practicing with the needles and threat that I do have. I am looking forward to seeing how much better I will be one day, and I have you to thank for it. I am sure you get this all of the time though, but your work is just beautiful, and I enjoy reading everything you write. Thank you again for helping me, a beginner, enter the world of sewing and embroidery/monogramming!
Thanks,
Ashley Bozeman-Poole
“I sew because, I want to feel like I belong. I have found my place in the world. Sewing. One stitch at a time”.
Dear Ashley,
Thanks for writing. It is nice to know how you are enjoying sewing and trying to do embroidery work. Hand embroidery is truly a very beautiful hobby to have. 🙂
Yes, this is one kind of stitch you would use for monograms. This stitch might take a few practice and some patience before you get it neatly.
I hope you enjoy needle work more and you get a better sewing machine by this christmas. 🙂 Do share a few pictures of your embroidery work here. It will be nice.
Sorry for a late response. With a small kid and a baby at home, it becomes difficult to be on time.
Best wishes.
ur tutorial is awesome………as a beginner its helping me a lot…………thks a lot…….
Thank you, this website is amazing and I got an A for my homework!!!!! Thank you so much Sarah!!!
Thanks again 😀 😛 xxxxx
i used this website again and got another A, thank you sarah you are amazing!! 🙂 😀 😛 😉 :O 😛 😀 🙂 😉
🙂 Naryana,
I am really glad that you are getting A’s. Please upload some of your works and share it with us as well.
Hai Sarah, Good Evening…
I started doing embroideries few months before.. i was searching for a tutorials your website is very useful to me.. thanks for this and keep up your works…
Can u teach me how to stitch small mirrors in the fabric…
thanks and regards,
Ramya Sundar
Hello Ramya,
Thanks 🙂
Mirror work is in my list of embroideries and I will try to put it up soon. For now, there might be a delay as I am busy with my new born daughter and other related chores.
Sara,
My trial for the satin stitch along with blanket stitch, stem stitch, granitos stitch(learned from stitchschool.com) goes here.
Do have a look. Thanks for being an inspiration to me in learning more in embroidery.

The buds inside the flower has been done using satin stitch and the buds outside the flower has been done using granitos stitch.
Shami Immanuel.
Wow, you have been really into stitching these days. 🙂 So happy that you are able to share this with us. Really nicely done. What are you using this fabric for?
Sarah,
I started embroidering recently. Your site is the most comprehensive I have seen. And your pictures are just what I need for learning the stitches properly. You should publish a book! Thank you so much for taking your time to make these tutorials.
Cheryl
Dear Cheryl,
Very happy that you liked our pages. We are trying to do a book…might take some time with our wait for our second baby drawing closer. 😀
I am a true beginner. I want to make an embroidered dishcloth for each holiday in each month (12). I will cut out various holiday fabric (Christmas, Halloween, Easter, etc.) in the shape of the letter “P”. I plan on using an adhesive to apply the letter to the dish cloth to hold it in place. Then I want to embroider the outline with either a satin stitch or a split backstitch. Which would be easier for a beginner and are there different types/weights/etc for certain projects? Am I supposed to untwist the embroidery thread? Or use it as is? These are not very thick clothes but they aren’t thin, either. Any advice? Will this work?
Dear Kathleen,
Sorry for not being able to respond earlier. I hope my reply would come to be of some help to you anyway.
As for your query, I personally feel the split back stitch will be easier and less strenuous for you, since you are a total beginner. But, I must tell you that the satin stitch would look better if done with care. 🙂
The thread I have used in this page is pearl cotton, and it is non divisible. It comes in various weights and you can choose it according to the thickness of your fabric. That is, do not choose a thread thicker than your fabric as not only it will become difficult to stitch, but might also damage the fabric. This thread is not used for split back stitch, but is good for satin stitch.
If you want to use the divisible cotton floss, it is absolutely fine too. Take about four strands of the thread for split back stitch. Three or four strands would do fine for the satin stitch.
Please do share your projects with us. 🙂 We would love to see them. Hope this information has helped.
Can you give some help or advice on stitching the lips on a facial profile?
I’m thinking it should use a satin stitch but would like to read what you or others would advise
Dear Pat,
I too would suggest satin stitch, and further still, you can try the padded satin stitch too. 🙂
Dear sara
Once again thanks for the excellent tutorials. I am taking the printouts of your pages for my reference. Tried most of the stitches and the samples i have done turned out beautifully. Doing kasuthi in my saree and will try to post my work as soon as it is over. Please give the tutorials for Long and short stitch and button hole stitches. Expecting for a long time in your pages. Hope I will see the tutorials soon. have a look of one of my sampler using buttin hole and a stitch for leaf.
Dear Shami,
Thank you so much for sharign your lovely piece of work. 🙂 It is indeed nice and we hope to see your kasuti work soon.
Yes, I will be putting up the long and short stitch along with the buttonhole family of stitches as early as possible. Since I had been working on other requests from the students, it got delayed.
Hey Sarah,
Loved your tutorials. It would be really great if you could tell me which one is the stitch that is used in the traditional embroidery of Punjab i.e. Phulkari.
I googled, it says that the stitch is darning stitch and does not show on the wrong side of the fabric at all. It would be really great if you can tell me the steps in short.
Thanks a lot 🙂
Dear Ishita,
Thanks for the interest shown. You are right, Phulkari is done using darning stitch with silk thread over coarse fabric like hand woven cotton, or Khadi. The reason why the reverse side does not show is because there is a layer or two of fabric put behind the ground fabric. The stitches on the ground fabric are not allowed to run into the other fabrics below.
I hope this gives you an idea.
No words to appreciate your works. Amazing dear … your hands are blessed.. i will try all your stitches and show u soonn. great job continue.
Dear Lakshmi,
Thanks a lot. 🙂 Will be waiting for pictures of your works.
As a beginner your tutorials are just what I was looking for! Thank you 🙂
🙂 Happy that you liked our pages, Evelina.
hi Sarah, i have been going through a lot of sites lately where they can teach the simple tech of embroidary stitching, i must tell u that ur work is indeed very very appreciable. u have made the tuffest one look so easy, i wish u keep up the good work going and i really loved it thank u a ton dear…
Thanks for your words Sapna. It is very nice to know that you have liked and been enjoying our pages. 🙂
Hi Sarah…
thansk a lot… really appreciate ur quick reply 🙂
once more question though… “Perle” is a brand? Also is it available in India (in bangalore?)…?
Soumya
Dear Soumya,
Perle or pearl cotton is a type of embroidery thread, not a brand. You can get it in ‘anchor’ brand (the popular one) in India, and of course, that includes Bangalore too. 🙂
thanks a million … I am definitely gonna use the Perle kind in one of my works…..
U r the best 🙂
hi Sarah,
your tutorials are most amazing …I have a doubt though… the thread u have used here, is it one strand of tghe regular ‘anchor’ thread?
this one looks thicker and much better. is it another kind of floss alltogether? or does it just look a little different in the pic?
would really love to hear ur answer….
Soumya
Hello Soumya,
Thanks. 🙂
I have used perle cotton thread, which is a non divisible embroidery thread. It comes in various thickness.
Anchor floss are divisible and does not have as much sheen.
OH MY DEAR FELLOW SARAH.
IT LOOK LIKE I LOVE YOUR BASIC STICHES JUST FOR MY COUSINS CHILD I MAKE YOUR TUTORIAL FOR HER PROJECT IN TLE- EPP SO THEN HER PROJECT MAKE HER FIRST IN CONTEST OF PROJECT THAKS SARAH YOUR FRIEND YUHAZUMA
Wow, Yuhazuma! Congratulations! I am beaming with pride. So glad that our tutorials helped your cousin. Thank you so much for letting me know. 🙂