

About the Bonnet Stitch
This stitch is very decorative and easy to do. The Bonnet Stitch is worked from right to left. I will work between two straight parallel lines to show this stitch.
How to do the Bonnet Stitch
 |  |
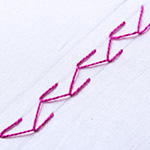
| Fig 1: Start by bringing out the needle from point A in the lower stitch line. Then, Take the needle in through B and out through C, both slightly angled from A, as shown. | Fig 2: Now, take the needle from under the the stitch A-B, without plucking the fabric beneath, as shown. |
 |  |
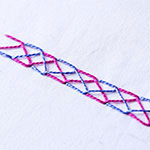
| Fig 3: Pull out the needle and see a twisted effect happening. Next, put the needle in through A and out through D, a point directly below C. Loop the thread under the needle and pull out the needle. | Fig 4: Begin the next stitch, by taking the needle in through E and out through F. There is a slight gap between C and E. |
 |  |
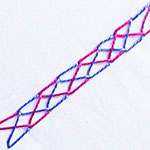
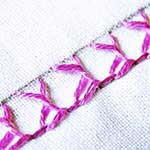
| Fig 5: Observe how the needle goes out of the stitch near D before going in through the fabric at G. Keep on with this procedure. | Fig 6: A finished row looks like this. |
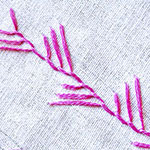
Other Stitches from the Feather Stitch Family


Learn this stitch and 300 more from our 600-page eBook.


wow…. your simply amazing ma’am…. I just love your website… I know basic freestyle hand embroidery… but I can learn more from your website… thank you for sharing your knowledge to us…
hi sarah,
its neha again sorry to say this but the link says”the xml file doesn’t have any style information associated with it ” then its shows some document tree:)
hi neha, the link is for adding it to a feed reader like feedly, feedreader, or even MS Outlook.
i loved it very interesting easy to follow and jssss creative but want some knowledge for zardoshi, stitching bead or other sequences and crochet too and thanx a lot for this site for housewives like us who dont go out for sch tuitions thnx dear
thankyou rocksea
thankyou Radhika
Hi Sarah,
Firstly I would like to congratulate you on creating this treasure trove of embroidery. I absolutely love it and I am going to start doing some basic stitches for practise before getting into designs. I just wanted to know how does one trace designs on to the cloth? Also if we use a pencil to draw on the cloth, will the pencil marks go away after washing? Pls help
Many thanks
Stuti – Mumbai
sorry sarah i don’t know how to upload my embroidery images.
hi vijayalakshmi, just like you uploaded the doc file, you can clikc on the choose file below the comment box, and select the photo of your embroidery, one at a time. That will put a link here in the text box, and then you can press submit. Try once again 🙂
cheers,