
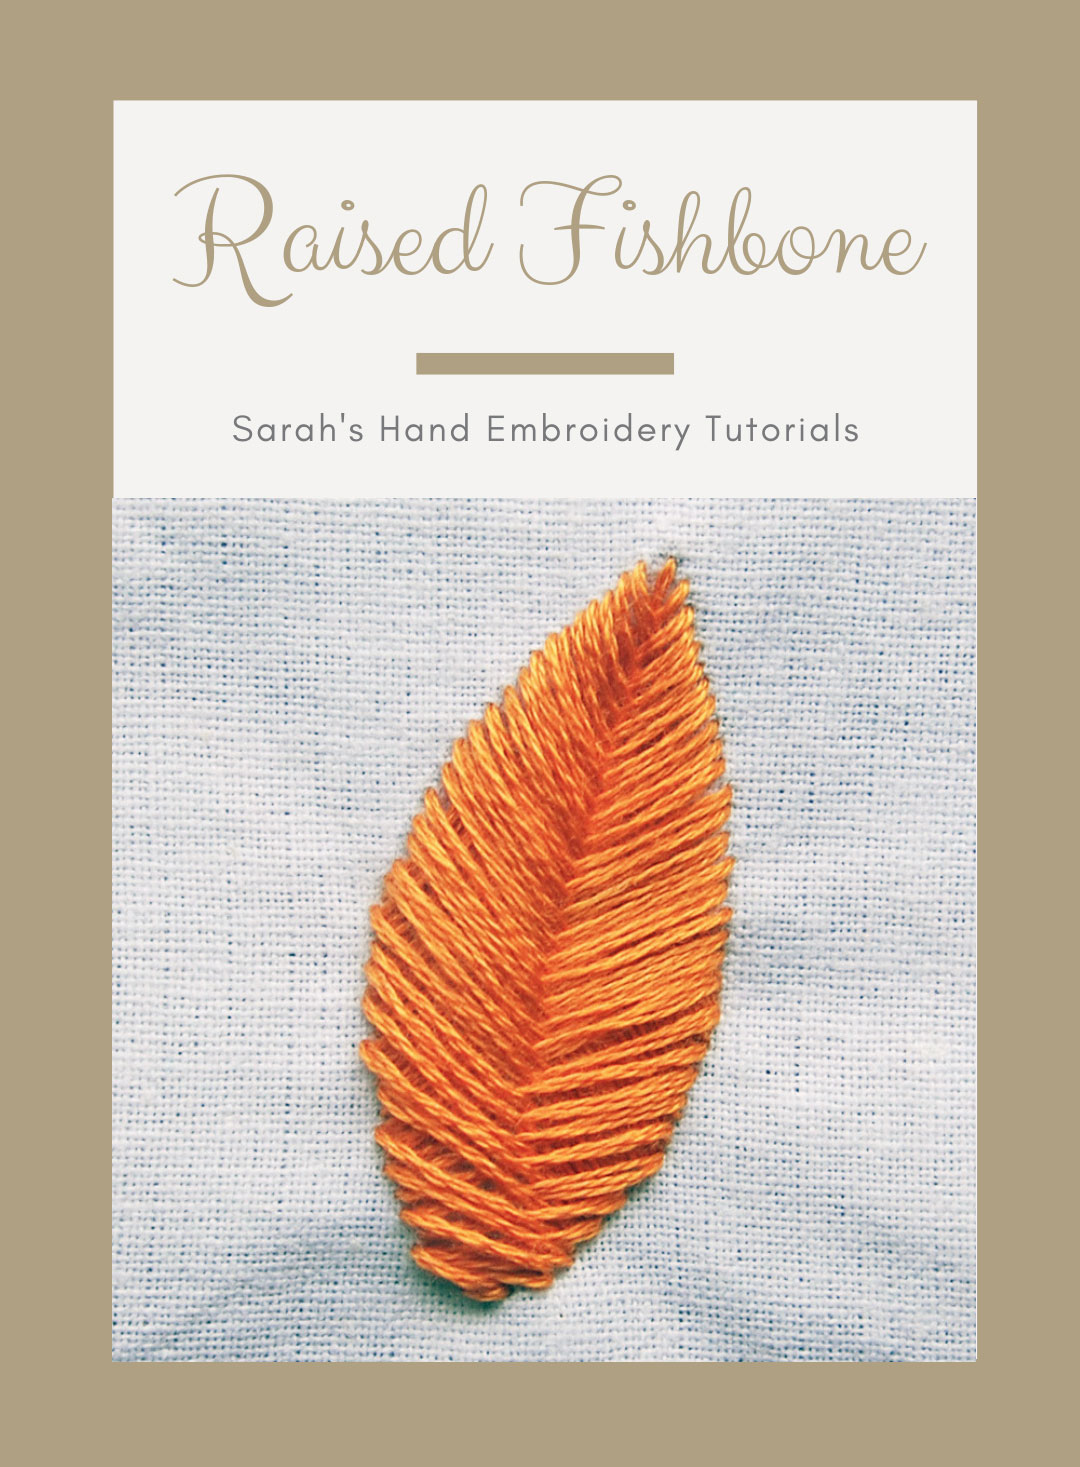
Raised Fishbone Stitch is also known as
Punto Pasado Encontrado [ES], Gehöhter Grätenstich [DE]
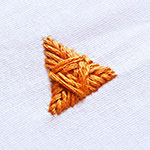
About the Raised Fishbone Stitch
The Raised Fishbone Stitch is typically used for leaf patterns. It throws out a padded effect on the motif. The stitch looks a bit difficult but has no complications when you start to stitch. In fact, you will enjoy it as you see a beautiful, richly filled leaf emerging as you go along.
How to do the Raised Fishbone Stitch
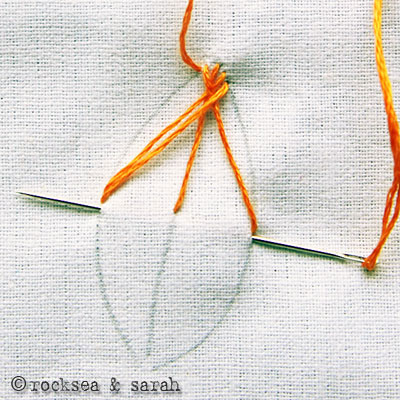
I have used a leaf pattern to illustrate. It is divided into three lines, namely, A, B and C, which will act as the respective stitch lines.
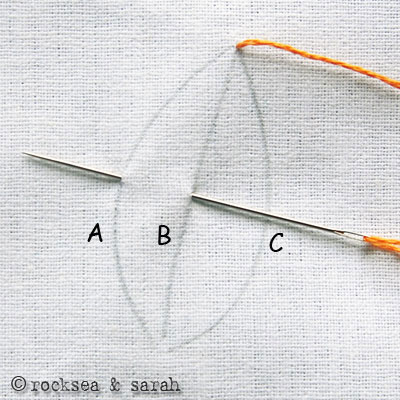 |  |
| Fig 1: Bring the needle out through the topmost tip of the leaf. Now, take the needle in through B at a point that lies halfway in the stitch line. Bring the needle out through A at a point that lies horizontally parallel to the point on B. | Fig 2: After pulling the needle out, take the needle through C and out through A, as shown in the picture. Pull the needle out. |
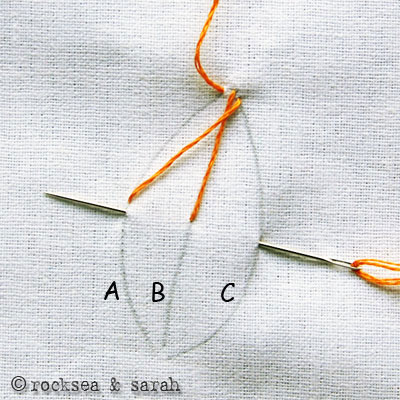 | 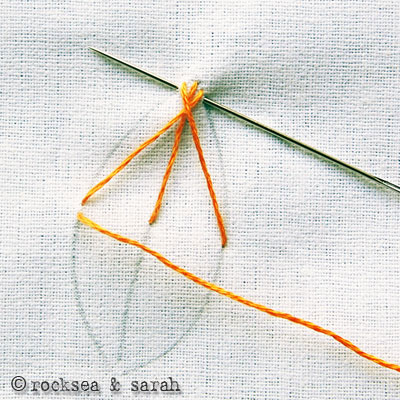 |
| Fig 3: We again put the needle through C and pull it out through A, only this time from the bottom of the stitch on B. | Fig 4: Continue this process of stitching. Each new stitch between C-A falls right under the previous stitch. |
 | 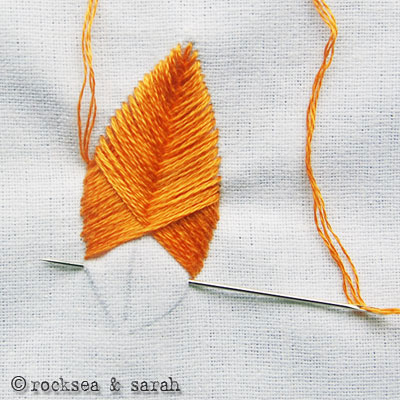 |
| Fig 5: The padding effect takes place as we keep stitching. | Fig 6: Halfway through, our stitch would look like this. Continue the process to finish the leaf. The stitches done over the other half of the leaf would fall over the existing threads from previous stitches. This adds to the raised effect of the leaf. |
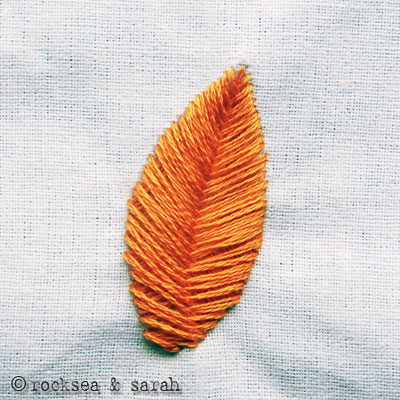 | |
| Fig 7: Your finished leaf looks more or less like this. |
Learn to do Raised Fishbone Stitch in 2 minutes!
Learn this stitch along with 305 other stitches from our 600-page eBook.

Learn more stitches from the Fishbone Stitch Family
Sprat’s Head |
Crow’s Foot | |


Perfect stitch to cover a stain on my favorite jeans!
Absolutely! I love the stitches in this family for visible mending.
Lovely work
Thank you, Annie.
Can you only do this with straight items or with letters like S?
Hi Kali,
As far as my experience goes, this stitch can be done only with straight items. It might be challenging or impossible to get a satisfactory result on very curved patterns like an ‘S’.
beautiful ! thanks a lot.
Hi, I have tried it and the result is beautiful. Thanks
Awesome, Miri. Happy to know! ☺️
Quisiera si es posible que me mandas algunas enseñanzas de kas hermosas que realizas.muchas gracias
Me encanta que compartas el talento didactico que posees….gracias!!!
Sarah, I love the raised fishbone stitch. It loves so easy that I will b trying it soon. Thanks Eloisa
Solo quería darte las gracias por tus tutoria de bordado que me han servido mucho.
Hi, what kind of thread and needle should I use for this technique? I’m new to stitching and embroidery : )
Steph, you can use a simple embroidery needle. Embroidery needles are just like the normal stitching needles…just that they have a slightly longer eye to accommodate embroidery threads. Hope this helped! 🙂
I just love this blog. Nice work. Keep it up! Learning a lot from you 🙂
Very nice tutorials and lovely needle work. I have been doing some macrame that I have not done in years. After looking at this I want to embroider next!
thank you E need noar Elik
look at this:
this blog stole your idea.
http://meetmeatmikes.com/2012/04/one-about-embroidering-leaves-and-bill/
Thank you Mariana! We have notified them and asked them to take down the web page as soon as possible.
I am so excited to discover this wonderful site. Bless you for providing it. I have not embroidered for quite some time but I would like to do a few projects a year. So I will be stopping by often.
Hey…. THRILLED to find this site!!…great one!…i have never picked a thread or needle in my life but have been wanting to learn embroidery for so long now.with a baby at hime its impossible to go out n learn…ur site is the answer to all my problems!!its so simple and inspiring…just one doubt..if i want to do a name embroiry,which stitch is the most ideal?
Dear Shyna,
I am happy to know that these pages have inspired you. Since I know how life could be with a baby, I am only glad that you will be able to learn from us. 🙂
I can suggest you start out with either chain stitch or some simple straight stitch like the back stitch for writing names. If you want a thicker and embossed look, try the satin stitch.
Hi Sarah,
Thank you soo much for these tutorials… My mom and I regularly check different stitches and keep trying them out!!
I tried the ‘raised fishbone stitch’ but none of them turned out… well.. decent! The midline was twisted to the right side.. is there any trick to finish this stitch well? If you could please share!
Thank you.
Hassy.
Dear Hassy,
This problem is not new to me either. If you check the illustration, you would find the midline turned to the right slightly!
Try making the middle stitch line straight as possible. Keep checking each time (towards the bottom half) , if your leaf is intending towards the right. If so, try to space the stitches in the outer stitch lines, so that you will get a straight midriff. I hope this helps. Let me know! 🙂
Hi Sarah. Thank you for the most fantastic tutorials. I’ve been having so much fun learning new stitches. Incredibly inspiring.
Wow! What wonderful little ‘heart work’ you have done. 🙂
Nice to see those little hearts in your blog. Thanks for sharing.
Hi Imogen,
We are working on an E book with illustrated tutorials of 200 and more stitches. We want to feature some samples from our readers as well. Your work and picture looks really nice. If it is okay with you, we would like to consider using the image you have uploaded in this page to feature in our E book. All due credits will be given. Please let us know.
Best regards,
Sarah
Hi Sarah, thank you for asking. What an honour, I’d love to have my work included.
Thanks again, Imogen.
raised fishbone stitch is beautiful.thanks for showing different ways for a single stitch.
I don’t often post comments, but I had to tell you what a wonderful site you have here. Your instructions are so clear and the pictures are really lovely. This definitely has me inspired!
Julie
Thanks Julie. 🙂 Feels really nice to hear this from you.
Sarah,
ur tutorials are really encouraging…..
what is the diff b/w fishbone and raised fishbone stitch actually??? latter have a rich filling effect????
rajis.
Dear Raji,
Apart from having a rich filling effect, a raised fishbone stitch also gives a more ‘raised’ or embossed look. 🙂
Wow, these pictures are fantastic! I’ve always wanted to learn to embroider, but at the moment I can’t really sew much at all.
🙂 Thanks Jen.
I hope our pages will encourage you to learn to embroider.
Hello,
I just want to say thank you so much for your great tutorial. Its clear, concise, and very easy to follow! I belong to a quilt guild, and we are currently working on crazy quilt squares. All of the embellishment techniques have been so fun to learn; including Brazilian embroidery, dimensional embroidery, beading, and applique to name a few. That being said I seem to have a problem with the leaves I make, even the ones that look like a picture just look odd to me on my blocks…This stitch however, is lovely and easy to do once you get the hang of it. Now I just need to find a few other “leaf making techniques”; or just have all of my motifs have the raised herringbone leaf!..LOL
Regards,
K
Dear Kan,
Good to hear that you have been enjoying stitching and the various embroidery techniques. 🙂
Raised herringbone leaf is indeed an attractive stitch and makes me happy to know that you picked it up from our tutorial. If possible do share some pictures of your embroideries with us for inspiration. 🙂
uau! What a nice blog! 🙂
I’m glad that i find your blog, because it´s very organized and interesting. I didn’t knew this stitch exists, so i’ll try it for sure
I think you’ll like to take a look on my work, because there’s a lot of portuguese and traditional embroidery stuff.
Dear Joana,
Thanks. 🙂
It is interesting to go through your blog. Your creations are imaginative and refreshing. It is always nice to share ideas.
It was nice to see some pictures from Portugal. 🙂 Almost two years back we were in Porto, Portugal on a 1-2 days visit and turned out to be one of the places we liked the most.
I would love to learn more about portugese embroidery and will refer to your blog for more information. 🙂
Wow! I’ve been doing embroidery for years but this stitch intimidates me a little. I think I’m just going to have to jump in and try it!
🙂 So did you try this stitch? Not as difficult as it looks like.
Hi Sarah,
I am attempting to embroider my wedding veil with a simple floral and vine design. What kind of stitches should I use so that it looks good on both sides of the fabric? Please direct me, your lessons are so easy to understand!
Dear Sre,
First, let me aplogize for not responding sooner, as I was away for my brotherin-law’s wedding.
Congatulations and all hearty wishes for your wedding. 🙂
It is nice to know that you will be embroidering your own wedding veil. I suppose it is netted. So, you can use the Holbein stitch for almost the same look on either side of the veil. But, I would still, better suggest you the stem stitch, outline stitch, back stitch, or even the chain stitch to work out well on the veil. These stitches are less time consuming, less complicated, and easy to follow, and would look good on both sides of the veil.
Hope this helps, and let me know how your work has come out. 🙂
Hi Sarah,
In running-stitch family, u have shown the back side view of stiches. Same way u show for rest of the stiches. This may help us to check our correctness while making stitches.
Sonali
Dear Sonali,
Your suggestion is welcome.
Due to certain considerations, I had opted not to show the backside of the stitches, but I will rethink about it and try to implement what you said. 🙂
hi! your site is the best every for embroidery! your tutorial are so clear and easy to follow! thank you!
just this one leaves me with the leaf half away.. because i don’t know how to do once i reached the point where you stop the tutorial o.O
“Once you reach here, continue the process without confusion” this one sentence is the less clear of your website ^__^
thank you anyway for this wonderful website!
Dear Fran,
I am glad that you enjoy learning from our pages.
Clearing your doubt, once you reach half way on the leaf, you proceed the same way as you were till then. There is no change in the procedure. The stitches you will do will fall over the existing threads below for the remaining half of the leaf. This is what gives a ‘raised’ effect.
I put : “Once you reach here, continue the process without confusion” : so that learners don’t feel stuck after reaching half way since the threads below might confuse them. I guess it did not work, so I will try to change the sentence there. 🙂
I hope it is clear now. Do let me kow if not, I will check if I have any pictures that I can include to make it clearer.
Thanks 🙂
Well, crochet is something I want to learn as soon as I get a good chance.
I learnt crochet and cross stitch and then some more embroidery from books, by looking at pictures like this!! Now reading this post makes me want to embroider again after years!!!