
Zalakdozi uses concentric rings to fill a pattern. There are a lot many styles in which a pattern can be filled, like using various shades of the same color for the various rings. I have used darker shades to do the outline and lighted and paler shades to fill the inside. The only time a concentric ring is not used is when there is no space to go roundabout and allows you a journey of chain stitch only one way.
 |
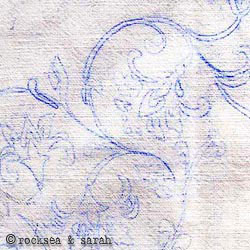 |
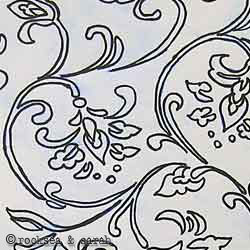
| Fig 1: First, I traced out a floral design onto a linen cloth, using carbon paper. | |
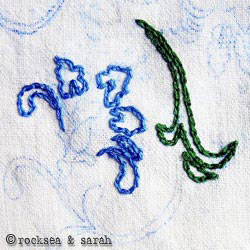 |
Fig 2: Start by doing the outline using the Chain Stitch. I have used deeper colors for the outlining. |
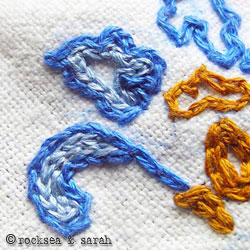 |
Fig 3: Once the outline is done, I start to fill in the inside using a paler or lighter colors/shades. The filling is done in concentric rings following the shape of the motif. Do not leave any visible space between each ring. At the same time, do not make it too tightly packed. The chain stitch must lay relaxed to give it a ‘Zalakdozi’ effect. |
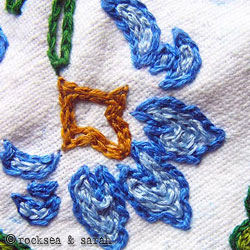 |
Fig 4: While some parts of the pattern get filled with just one ring of the paler color, some others might require more rings to get filled. Some patterns might require just a single Lazy Daisy stitch to get filled. |
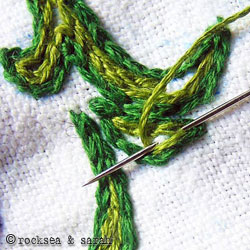 |
Fig 5: The Zig-Zag Chain stitch can be used to make sharp turns while filling a motif. |
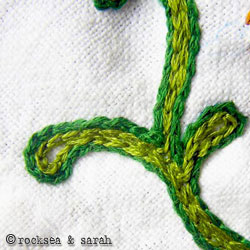 |
Fig 6: Some parts of the pattern might be left with spaces in the center. You can either leave the spaces or fill it in. Here, I chose to leave in the space. |
 |
Fig 7: It is not always necessary to use a concentric ring(s) to fill a pattern. If you see the illustration, you will see that some patterns can be filled with chain stitch done just one way, as there is no room for a return stitch. |
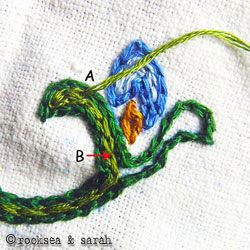 |
Fig 8: While stitching, you might encounter places where you get ‘bottlenecked’, as in the illustration. I stitched one way and while turning around to stitch my way back, I encountered a ‘bottleneck’, marked between A and B. This is an area where I cannot accommodate another stitch. In such a case, I end the journey at A and come up again at B to resume the journey. |
 |
 |
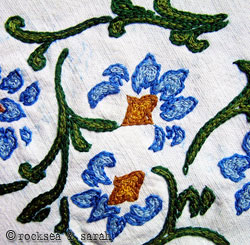
| Fig 9/10: The close-up and whole finished design using Zalakdozi. | |
Do you want to know more about Zalakdozi – its origin, history, and other details? Click below.

 Sarah has been researching and sharing hand embroidery lessons for over 18 years, making it accessible to everyone around the globe.


Dear Sarah,
Here is my zalakdozi work. I would lyk your opinion on it.
DO REPLY
Did I mention I absolutely adore your tutorial?
Dear Koyel,
It is absolutely great! I think you have done a beautiful work. AM happy to see it.
What do you think of your own work?
Thanks for sharing this…I wanted to see someone who had followed and used Zalakdozi.
Hi,
Very good mam,
And this is a very good service to society
May GOD bless you.
Vijayalakshmi Pothiraj
Hi sarah,
I am very glad to see this website. Its very useful n u have explained it very nicely. Thanks sarah thsnks a lot
This is so pretty!!! 🙂 Thankyou for sharing!! 🙂 Awesome idea!!
woah!!! 🙂 I am working on piillow cases these days… I had an imagination to use letters on my stitch with some creepers over it…
I had no idea how I was gonna do it… I was about to paint them instead of stitch…
I guess this might help me out… i’l try….
thank you so much
hey sarah, the information you have provided is worth it..
your website has really helped me a lot..i have 2-3 questions in my mind, would be pleased if you answer them..
Is zalakdozi/ aari work and kashida are same or have different meanings?
Whats the exact meaning of “Zalak” and “dozi”?
Which place in kashmir is famous for this art and where all it is marketed?
i would be glad if you help me with these questions.. Thanks a lot..
keep doing the great work..
Dear Jyoti,
Please read through this for information : https://www.embroidery.rocksea.org/hand-embroidery/zalakdozi/
As per my knowledge, kashida means ’embroidery’ , so some casually called like that too.
how can i join your site i tried
Where do you find the patterns/designs? Do you also design them or have a ready to use pattern?
Hi Sarah,
I like your stitches very much , they are so much user friendly. I was actually finding a embroidery website for my friend who was learning it and while doing that found your website and found such easy explanations that i thought even i can do it easily . From then i have started learning the stitches and just love to see the outcome.. they are beautiful… thank you for your hardwork and making the things simple for us.
Deepa.
Hi,
I am so glad to come across this site. Its amazing and I am so excited to try this out. Do we have instructions with complete design and how to fill it up?
Thanks a ton.
Hi sarah,
i new to hand embroidery…
i want to do Embroidery on my top ,but i am not getting any neck patterns for my Kurtis…
could you help me on this issue ….
hi sarah you are 2 good
I have an idea to work for a stitched dress. Where can i get the neck design for my kids dress size? So that i can start the embroidery. Suggest me your ideas. Thanks for your help in advance.
Thanks
Madumathi
Hi sarah
do u teach gold spring work? ( i dnt no d real name of work, may b zardosy) 🙂
Thank u very much!!!
i was looking for such a tutorial from many days. i learn’t a lot from your tutorial,thanks a ton. Hope I will succeed in this. In case if I have doubts, can I send you a mail.
Dear Lakshmi,
Thanks. 🙂
If you have any doubts, you can just post a comment. I will receive it in my email box and can reply to you. This will help other readers to clear similar doubts too.
hai sarah i like your works
i have small interest in hand embroidery but i have no time .anyway congratulations
dear sarah,
Your work and this website is really great and the way you have presented everything here makes it so easy for people like me(who do not know anything about hand embroidery but are willing to learn it) to learn hand embroidery without even spending a single penny 😀
you are doing great.
Thanks 🙂
Hi Sarah,
I found your site very appealing and informative.
I have used many of your stitches for my work.
Could you provide me a tutorial for Jali Work used in Chikan Embroidery?
Thanks
Anindita
Dear Anindita,
I am yet to prepare tutorials for chikan work. I am hoping to do so some time soon, so, please bear with the time taken. 🙂
Dear Sarah
thank you so much for giving us this wonderful and very very useful site. I spent almost 2000 to 2500 rupees to learn basic stitches.. After that only I came to know about ur site.. it is so useful for me to refresh my stitches.. I am interested in learning Kantha and Kasuthi.. Do u have any plans of posting or publishing a book in that .. I would love to buy a book if u are going to publish…. let us know and keep up the good work.. Prayers and wishes for your work..
theresa
Dear Theresa,
🙂 Thanks.
If you want tutorials on Kasuti, you can check this link: https://www.embroidery.rocksea.org/hand-embroidery/kasuti/
We are working on a book, so will let you know once it is out.
I want to learn aari embroidery. Can you suggest some websites to learn from the basics
Dear Sasi,
To learn aari work, you need the tools. This website might help you to learn the art, if you have the tools : artisticfingers.blogspot.in/search/label/Aari%20embroidery
My tutorial helps you to do aari work (or replicate it) with the help of simple embroidery needle. It is more work, but you can do it without the need of big tools.
This is amazing work and very helpful! Thanks for sharing!
Dear Lakshmi, Jyoti
Thank you very much. Yes, it is nice to share knowledge and we feel great when it is received with enthusiasm and appreciation. 🙂
Hi Sarah,
You are incredibily awesome!!!! Your website is very informative and easy to understand. I am very passionate about embroidery. All your tutorials are too good and easy. Hope you keep posting new stitches. God Bless You.
You are great. You have made hard work easier. The joy in sharing experience is wonderful no?
Dear Sarah,
What a beautiful site you have and so very informative! I have been embroidering since I was 7 years old and feel inspired to hand-stitch something!
Thank you for sharing and inspiring others to be creative- it is my life mission to spread art through the world and I see that you are doing just that!! 🙂
Dear Leslie,
Thanks for your nice comment. I am glad that you have loved our pages, making the effort all the more worthwhile. 🙂
Hi thank you for the wonderfully informative site that you have. It is simply amazing and I have spent quite a number of hours looking through this.
thank you
Dear Aliza,
It is nice to know that you have been going through our pages. 🙂 Thanks.
Hello Sarah,
This work is so beautiful..you are doing a great job..this is an awesome tutorial website..i am a beginner and am really interested in learning french knots especially roses by Bullion knots..could you please help me to learn that with Figures??
Thanu
Dear Thanu,
Thanks. 🙂
If you check the right hand panel, you can find a section called the ‘knots family’. You will find tutorial for french knots and bullion knots under it. You can also take the option of searching for whichever stitch you want in the search bar on the right hand side.
I have no tutorial ready for making roses using bullion knots yet, but will try to add one upon your demand.
Best wishes.
Check this website …… when i saw this picture it seemed to me like your work .
anyways you are doing a great job . Keep it up
http://ethnicwearofindia.com/EWOI/kashida_embroidery4.asp
Dear Royce,
Thanks 🙂
Also, thanks for letting us know about the unauthorised copying of our work and content that happened in the other website. We should be getting in touch with the author of this website for an explanation.
Dear Royce,
Thank you very much for notifying us about this issue! We have asked the ethnicwear website to take down those pages. Otherwise we may file a case for copyright violation.
Cheers,
Hi !!!
As I know that ‘cashmere stitch’ ia actually the revers side of ‘cross stitch’, Is it correct? Please show some revers side of cross stitch work.
Dear Leeta,
Cashmere stitch is not exactly the reverse side of cross stitch. In fact, it can be said that it is only ‘half’ the cross stitch, ie. it uses only one diagonal leg of the cross stitch. I will try to post some more cross stitch family members as soon as possible. Thanks for the interest shown. 🙂
An excellent tutorial for a naive learner. Thanks for bringing this in public domain.
🙂 Thanks Mallika.
Just marvellous !!
What stuff is the fabric you used here.
Thanks Sreedevi. I have used cotton fabric.
Hi Sara
Thank you for the detailed information on Zalakdozi work I could do it with some beads too…
I am trying some Smocking now, do you have any pattern of it? I have seen one top with Smocking on it, and wanted to make one for me. Once I finish I will share it with you. One again thanks for your good work, which inspires people like me. More than that get to know verity if stitches
Wow! It is nice to know that you worked on this and that too with beads. 🙂 I would love to see your smocking work. I do not have any smocking patterns as of now, but will try to share once I get hold of it sometime.
Truly amazing and beautiful. I love to do embroidery. I got to know about your site very recently. Its really very helpful. Even the beginner can do well with your instructions. However it would be even better when have videos for advanced stitches.
Nandhini
Thanks Nandhini. 🙂
What is this Zardozi Aari Embroidery?
Dear Anju,
This is not Zardozi, but Zalakdozi work. Zalakdozi essentially means ‘chain stitch’. Aari is a type of needle used in making this kind of embroidery, and so it is also known as ‘aari work’. However, here, I have only reproduced this embroidery using an ordinary embroidery needle instead of an aari. This lesson deals with how you can use a simple needle to create brief patterns in this type of embroidery.
If you need more information, please check: https://www.embroidery.rocksea.org/hand-embroidery/zalakdozi/
Thanks 🙂
Dear Sara,
I love doing emb.There is a lot to learn from your tutorials.I never knew the names of some stiches though I was doing them.So thanks a lot for such wonderful lessons.I will like the demo of kachchhi stich,if possible.I will be thank ful,if you can provide it.
Chhaya
Dear Chhaya,
We are delighted that you are enjoying our pages. I am planning out preparing a Kutch Embroidery tutorial. But, I have to admit that it might take some time.
i was surfing for some good sites for embroidery classes. instead i stumbled upon your site by chance. i am happy i did so. this is a very good site for novice and those who want to improve their stitches. i am learning a lot from your site. you have made the stitches so easy that i earlier thought was very difficult. thank you for uploading such a good site. hoping to see the tutorial on kutch embroidery as well.
Dear Parimalaharish,
We are happy to know that you have learnt from our pages and that you are finding it interesting. 🙂
I am on the course of preparing Kutch lessons, but before which I have to complete a couple of projects.
hi,
superb tutorial with good pics and explanation.pl keep up the good work
Thanks Sumathi
Your lessons are so well done and illustrated, I am very impressed as I know that the hardest part is figuring out how to explain what you know so well to others so they will learn and enjoy the new skill. I have been doing embroidery and crewel work as well as cross stitch and petit point for may years and I am also a student of Medieval and Rennaisance fiber arts. It is very thrilling to see designs that are so obviously middle eastern and asian in origin and if you have historical information on the dates and origins of these stitches and types of designs I would so love to see this information on your web site as well. If it is already there then sorry I missed it as I have not fully explored the site.
Dear Traci,
I am delighted to get a comment from a student of fiber arts and an embroidery enthusiast. 🙂 Thanks for showing interest in our pages. We are happy that you found them good.
Some of my stitches (especially the earlier ones) have some historical information. Check, split stitch, for instance.
The purpose of this tutorial is also to provide a historical background for each stitch. It helps us appreciate the stitch even more.
But, I realized the difficulty to provide historical data due to lack of information and reliable resources. Also, I have slowed down on the historical research part ever since we became parents a year and a half ago. It is one of those phases in life where you wished there were more than 24 hrs in a day! I would, however, want to start researching more and provide more historical information whenever possible.
🙂
Sarah,
I came across your website looking for some embroidery instruction for a doll’s outfit. I think what you have done here is absolutely incredible. The explanations and photos are excellent. Moreover, the way you have organized everything really makes sense and helps me feel that embroidery is very approachable. I have already incorporated the palestrina knot as an edging in the doll’s outfit and I look forward to trying other stitches. Thank you and please don’t stop!!
Margaret
Dear Margaret,
I feel happy everytime an enthusiast finds our pages easy to follow and execute a stitch. 🙂 It is the same reading your comment too.
We had been away spending a few months on travels, and visitng families and friends. But now, back home, we settling back in and soon will be posting more stitch lessons.
Hey Sarah,
Thank you so much for the information that you have put in here. I really am glad to have found it. I am so passionate about this art form and you wont believe how happy I am to stumble across it.
Do you also run embroidery classes in Pune? Just curious to know.
Wish you a very happy New year!!!
Dear Sanjh,
So glad that stumbling into our tutorial has made you happy. 🙂
No, at the moment I am not running any stitching classes in Pune. Would love to though…maybe once we are done with our various travels.
Wishing you all nice things for the new year and always!!
oky..r u settled in italy?
Nope…back to India…in Pune.
is that zardhozi work??
No Navya, this is not zardozi work.
Dear Sarah!
You are doing wonderful work! I have been following your website from long time. I am practising all the stitches mentioned in your website. It is a nice idea to group the stitches, it is very easy to remember.
Do you have any idea of posting Kutch Work and Kantha Work? I would love to learn.
Thanks
Viji
Dear Viji,
Thanks a lot. 🙂 I do have kutch and kantha lined up amongst my tutorial. But right now, I am working on kasuti tutorial.
hey I have seen my mother do it. I would always wonder how she did it. now I can see for myself clearly. thank you dear. great to know so many things.
Dear Sandhya,
Thank you for all your comments and appreciation. 🙂
I am happy to know that your mother used to practice Zalakdozi. Hope you enjoy learnign from our pages.
P.S: I had tried replying earlier, but for some reason I guess it never showed up. 🙁
This looks awesome… I am going to try it out as soon as I can.
I love the way you share embroidery stitches with detailed instructions and clear photos. And your finished stitches are all beautiful and inspiring.
Do you know block printing on fabrics… If so, please share information on how to do it and what paints to use for it.
Dear Iniyaal,
Thanks! 🙂
I don’t do block printing…though I would love to try it sometime. Sadly, I won’t be able to help you with it as of now.
Hi Sarah,
Your collection and documentation of stitches are amazing.. Have been follwoing ur blog for a while now but this happens to be my first comment 🙂
I loved the idea of Zalakdozi work.. but can u suggest where I could find patterns for Zalakdozi? Searched the web, but of not much use.
Soumya
Dear Soumya,
It feels nice that you had been learning from our pages. 🙂
As of now, I don’t have any patterns that to share in the webpage. I am looking at uploading some patterns for pratice, but might take a while before that.
For now, I would suggest that you look for any ‘paisley pattern’ over the net to get pattern ideas for Zalakdozi. You may also try making some floral patterns with curves and twirls,in your own idea. Just make sure that the floral patterns gives you a chance to fill-in using chain stitch.
I hope this helps for now. 🙂
Dear Sarah,
I want to learn kasuti and kutch. Where can I find tutorials in your web site. Kindly give me your web site address.
Thx
R Sudha
Dear Sudha,
You are in my embroidery page. All the stitches are given on the right hand side. 🙂
Kutch and Kasuti tutorials are in line and will take a month or two to be uploaded.
gracias por este curso tan completo pues tengo muchas puntadas y siempre encuentro nuevas y parecen faciles pero tengo que regresar a estudiarlas porque algunos detalles se me van y estoy haciendo mi muestrario , este lugar es maravilloso felicidades hacen felices a muchas personas como yo que hacemos bordado y nunca terminamos de aprender hasta pronto.
Estimada Virginia,
siento realmente feliz con sus aprecios. 🙂 Hay mucho más lecciones de la puntada que se cargarán, pero estoy en una pequeña rotura debido a nuestro bebé.
México o España tiene sus los propios un poco bordado, como algo especial a sà mismo? Apenas curioso saber. :)¡Recuerdos!
P.S: excúseme para cualquier error en español
Translated:
Dear Virginia,
I feel really happy with your appreciations. 🙂 There are a lot more stitch lessons to be uploaded, but I am on a small break due to our baby.
Does Mexico or Spain have its own kind of embroidery, like something special to itself? Just curious to know. 🙂
Best wishes!
P.S: excuse me for any mistakes in spanish
explanation with photos are really good and easy to understand.thanks for your work.what type of threads should be taken , any specific number?
Dear Sangamithra,
You can use anchor thread or perle cotton for any normal embroidery practice. 🙂 The anchor cotton thread has 6 strands, and I have used 3 to 4 strands for the illustration. Perle cotton thread cannot be separated, but comes in different thicknesses. You can choose how many strands or what thickness to use based on your embroidery style/ stitch , and the thickness of the cloth.
In this Zalakdozi tutorial, I have used 3 strands of anchor cotton thread.
In my stitch tutorials, I have preferred to use perle cotton for some chain stitch members and the satin stitch family. Hope this helps in some way.
Your work is just beautiful. Thank you for making these gorgeous stitches available to the public. I find some of them challenging, but eager to use them :^).
Would you consider making videos? ;^)
Hey LiLo,
Thanks for your appreciation. Videos are not in my mind right now. I might consider it in future though. 🙂