
This is a simple form of woven stitch technique. It is used in drawn or pulled thread embroideries commonly. Woven bar consists of weaving between two sets of laid threads.
 |  |
| Fig 1: Make straight stitches horizontally. | Fig 2: Bring the needle out through A, a point on the side, to begin the weaving. Now, take the needle over and under three laid threads at a time, as shown. Then, turn around and repeat the process. Do not pluck the fabric underneath. The only time the needle goes through the fabric is at the strat and end of the whole process. |
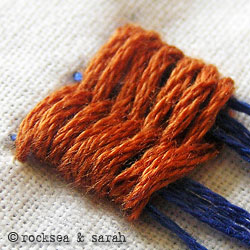 | |
| Fig 3: A finished portion of woven bar loks like this. |


Hurry with the e-book or traditional book. Please and thank you. Your dedication and explicit instructions are so appreciated.
Dear Srilata,
Thanks for sharing your kutch work. Looks very nice.
Hi,like your site a lot.read about it in the times of India ,today. I am putting up a picture of kutch work that I did.thank you.
It seems that there is something wrong with subscribing link for tutorial provided in this website.. Really good work, and I have downloaded few of the images for the stitches for my references… I hope you don’t mind about that…
Thanks and God Bless both of you!!!
Hi Sarah,
I’ve gotten started on the project…using a woven stitch for the leaves…it’s coming out really nice!

Wow, this looks really nice! 🙂
Thanks, Sarah…I’ll post the finished product when I am done…also using the whipped spider stitch for the blossoms on the tree.
i love emb. your stitches r so easy and beautiful. thanks for shearing these with us.
Thanks Ritika 🙂
Hi
Your site was very clear with every details for each type. I learnt a lot. In fact i started trying some combinations.
Thanks a lot.
T.Lakshmi
🙂 So glad to read your comment Lakshmi. Do share some of your creations with us. You can load pictures of your stitches using the section below the comment box.
Thank you so much for your tutorials! Your instructions are so clear and I am excited to learn some new stitches. I know tutorials like these are time consuming, but the effort is very much appreciated!
Dear Rebekah,
Thanks. 🙂 Your appreciations encourage us to make this effort worthwhile.
Thanks, Sarah! What a useful resource you are! The internet is truly an amazing thing.
Dear Alison,
We are glad that you found Kasuti to be the kind of embroidery you wre looking for. 🙂 The patterns in Kasuti are geometrical and can be easily created by oneself.
I can also suggest you the reversible pattern darning, which is ideal as double sided embroidery. Check : https://www.embroidery.rocksea.org/hand-embroidery/pattern-darning/pattern-darning-lesson-2/
Best wishes with your project. 🙂
Hello Sarah
I have just found your site in my search for some simple double-sided embroidery designs to embellish a cloth book I am making for my nephew. Your Kasuti tutorials look like they might be the answer for me! (I just want some interesting shapes to sew in a few places – around the words – that will look good on the back as well as the front.) Thank you so much for putting such useful and clear assistance online … and if you have any other suggestions that I can use in my book, please let me know! Thank you!
hi,
thanks for giving such a lessons.. it will be very useful for every beginners of embroidery
🙂 Happy to know that you find our lessons good Sindhu.
dear sara
This site is very useful to learn lessons….Pictures are very nice and attractive…..Thank you so much…Please create more handworks….
with regards
meka
🙂 Thanks Meka
Just found your site – awesome with such clear directions and your photos are the best I have ever seen of these stitches
Dear Nancy,
So happy to hear that you found our pages good to learn from. 🙂
I find your blog only now but I love immediately!
The pictures are so perfect and your tuto are perfect! Thanks for sharing whit us!
Have a nice week-end Monica
Dear Monica,
I am delighted that you are enjoying our pages. 🙂
Here’s one http://www.flickr.com/groups/341081@N20/
and here’s another one http://www.flickr.com/groups/hooplove/
I hope you like it!
Thank you yuritalinda for sharing the links. 🙂
Hi,
Does anyone out there know where I can find vintage redwork hand embroidery patterns. I am looking for children of the 1920’s or 30’3 with lots of detail, not the simple ones that were on the old pillowcases, etc. I don’t want machine embroidery designs as I have lots of them.
Thanks.
Read my comment