

Ray Stitch is also known as
Fan stitch / Fancy fan / Straight Fan[EN], Puntada de abanico [ES], Fächerstich [DE].
How to do the Ray Stitch
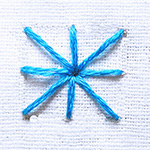
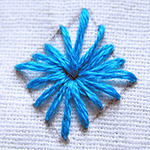
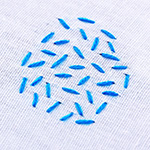
This tutorial is an illustration, of many, of how a few straight stitches can be combined to form patterns to use for embroidery. The Ray Stitch uses eight straight stitches to form a fan-like pattern.
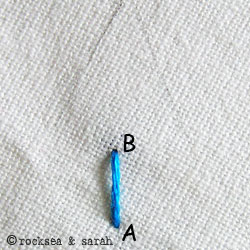 | 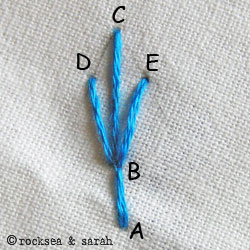 |
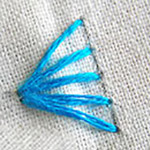
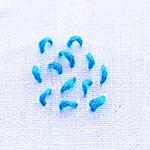
| Fig 1: Begin by making the leg of the ‘fan’, by doing a Straight Stitch A-B. | Fig 2: Now, make the stitches C-B, D-B, E-B, as shown. |
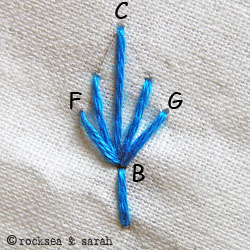 |  |
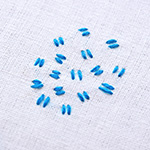
| Fig 3: Continue making these straight stitches in a slanting manner with B as the center point. The ray or fan effect begins to take shape. | Fig 4: A completed ray stitch would look like this. |
Learn to do Ray Stitch in 2 minutes!
Use this stitch on a pattern
Visit and Subscribe to Sarah’s YouTube Channel
More stitches from the Straight Stitch Family
|


Learn the Ray Stitch along with 305 other stitches from our 600-page eBook.


Oh ME TOO. I discovered a new passion that is making me extremely happy… I am a sewist for so long, clothes, etc.. over the years you ALL know just how much fabric, do-dads, trim, buttons, embroidery floss and yarn and things…. the things we say Oh sure it’s only four inches of this pretty trim, but I can’t toss it out, I’ll use it someday… YES YES oh yes. I’m in glee over the “stuff” I have to make a crazy quilt now. I popped in here to learn newer, fancier stitching than ever! What fun.
Hi sarah
I love your contribution in hand embroidery. From last three four days I visited websites for better stitches and tips and your website is fabulous. Keep it up for our betterment than:-)
Hi Sarah
Thanks for such a wonderful and easy comprahendable tutorial. Really inspiring. Also i wish you lot of success and growth in your career. Do you also have tutorial for croshet ? Please let me know
Regards
Rani
你好,我是一个热爱美好事物的中国姑娘,我也喜欢刺绣,平时会做些东西。我想问一下你们的绣花线用的什么线?为什么看着粗一些?还有画图案的笔,是铅笔么?我用的是水性笔。过几个小时就会消失的那种,用铅笔画的图可以洗掉么?期待你的更多作品

你好:)
我很高兴收到你的评论。既然是中国人,我想谷歌翻译,并有一个想法,你可能会说什么。
谢谢你分享你的可爱的刺绣作品,它看起来真的色彩艳丽,明亮,漂亮。 🙂
我想你是问我怎么画我的刺绣吗?我一般都用铅笔画的插图我的十字绣线。它很容易洗掉,但不褪色,而缝合。对于更大的模式,我跟踪使用碳纸。
期待看到你更多的刺绣。 🙂
附:你的名字翻译为“素食”。我不太确定它的名字一样,所以,这将是很好,如果你可以输入你的名字在英语,如果可能的话。 🙂
Hi 🙂
I am glad to receive a comment from you. Since it is chinese, I tried google translate and got an idea of what you might be saying.
Thank you for sharing your lovely embroidery work, it looks really colorful, bright and nice. 🙂
I think you are asking about how I draw my embroideries? I generally use pencil to draw my stitch lines for the illustrations here. It washes off easily, but does not fade while stitching. For bigger patterns, I trace using a carbon paper.
Looking forward to see more embroideries from you. 🙂
P.S. Your name translates to ‘Vegetarian’. I am not quite sure how it sounds like, so, it will be nice if you could type your name in English if possible. 🙂
thanks Sarah, for replying. I will try a sample and let you know how it works out! Love your blog – all the very best!
Hey, stumbled upon ur blog today ! totally loved it.. i havnt come across such detailed description of all stitches anywhere till date . Its really impressive.. ur work is so neat and creative ! kudos !
Hello Sarah
First off, congrats on a super blog!
Second, could you share your ideas about this design I have uploaded?
It is a printed design on a bedsheet – I want to embroider it on a table runner. Could you suggest some suitable stitches?
Note that most of the lines are not closed loops!. They simply go on from one part of the design to another. There are in fact very few closed areas.
Waiting eagerly for your thoughts!
Warm wishes

Amie
Dear Amie,
I would suggest you do something simple and easy considering it is for a table runner. The purpose is not to get too exhausted working on a simple design, and also to keep the thread work neat.
I think back stitch or outline stitch would be simple and great. But, I can suggest rope stitch (chain stitch family) which will add richness to it. You can fill the leaves in with raised fishbone stitch or the flat stitch (fishbone stitch family).
Hope this helped. 🙂
I am so happy to have found your site. I just got back into Embroidery from years ago as a young girl. I love your stitch guide. This will come in handy to refresh my mind and take me to a whole new level!!
Here is my most recent finished piece. I hand drew the image and made this for a good friend of mine who loves her Slot Games…
This piece has the most diverse stitches I know: Chain Stitch, Stem Stitch, French Knot, Satin Stitch, Back Stitch, Threaded Back Stitch & Running Stitch.
I look forward to your posts and learning from you. <3
Dear Jennifer,
Thanks for sharing a picture of yoru work. I think it is really nicely done. 🙂
I have a lot more posts coming up and hoep you enjoy them all. Do keep sharing with us…it will always be an inspiration to many other learners.
ciao e grazie per questa bellissima rassegna di punti!
io sto imparando e mi è utilissima.
grazie ancora
Dear Sarah,
You have done really great job… i am too impress the way u have explained every stitch. Love the color co-ordination. i am very much into hand embroidery n i have learnt by my own, but with your this blog , i will learn many more stitches. will upload my creation when i complete it.
Thanx a tone for such a wonderful sharing.
love always,
vaijayanti
Hi Sarah,
First, thank you for the lovely tutorial you have put in your blog.. This is not a tutorial – ENCYCLOPEDIA for novice like me.
Pl guide me as to where do I get patterns with what stitches to be used so that I can try initially and then expand on creativity!
Tks
yes i subscribed to your feed and was able to follow your posts..thanks sarah..
Sarah, thank you for your tutorials and posts! I am learning sooooooo much from you! Lisa
iam a great fan of your blog from where once i learnt some new stitches..sarah i would like to follow you but doesnt see the followers coloumn..
Dear Leela,
What you can do to follow our posts is subscribe to our feed (https://www.embroidery.rocksea.org/feed ) through google reader or feedburner.
Hi Sarah,
This is a drawing of my next project. I am wanting to do something different with it…the diamond shapes are leaves, and I was considering a woven stitch for them, or some other unique, closed stitch (something that will fill it in, but not satin stitch). The circles are representative of blossoms, and my intention is to use the whipped spider wheel for these in various colors. The trunk will more than likely be done in my customary nested stem stitch.
I was wondering if you might suggest a stitch for the leaves that would look nice? The diamond shapes are approximately 1/2″ long and about 3/8″ wide, and I am looking for seomthing that will fill them in well, but I think they are too big for satin stitch (and I would really prefer to do something more unique).
Thanks for your advice!
Val

Dear Val,
It is a really lovely looking design, and I especially liked the trunk of the tree! 🙂
If you want to cover up the leaves completely, I can suggest a few stitches:
1. The flat stitch ( it will take the diamond shape well, and also, give the leave its ridge).
2. The woven trellis stitch ( it will match with the woven stitch you are planning for the blooms). I prefer this.
3. Closed cretan stitch (it will cover the leaves completely with a broad ridge)
Check the picture dictionary for to compare the stitches.
We would be waiting for the finished pattern! 🙂
Thanks, Sarah…I’ll look at all these and post my progress!
Hi could you please show how a phulkari is done.
thank you
Hi Sarah,
A lovely blog and a treasure chest of great embroidery tutorials. Great work!
I have started a new blog http://createwittyunleashed.blogspot.in/
Please visit and share your feedback.
Wow, your blog looks really pretty. I will be dropping by to check on some of your creativities. 🙂
The only thing is that each page is taking a very long time to load.
Best wishes.
Oh ok! then I need to work on reducing image file size on my posts. I am a new blogger, need to take guidance from long time bloggers like you. Thank you Sarah.
Not sure, if you are interested in crochet too, I have just added a new post on it.
Dear Preeti,
Your blog seems to be loading fast enough now. Maybe it was a temporary problem from my end.
Oh sure, I am interested in crochet. Since I could not find the time to learn ( with two kids and lot many other projects in hand), it is still a pending desire to lay my hands on it. Trust me, I have all the materials ready…including needles from size 0 to 14! If you could add some basic crochet lessons, it will be great to learn.
Dear Sarah,
Sorry I could not reply to your crochet query. Although I know crocheting, but writing tutorials is still a far fetched dream and I do not have that much patience 🙂
There are many crochet sites with basic tutorials, but sometimes I feel they are cluttered and boring. I have found one clean site couple of days back and would like to share with you.
http://Www.mypicot.com
They have free patterns and ebooks also. Seems it is a crochet club. I am planning to join. Just check if that helps.
Dear Preeti,
Thanks for sharing this link on crochet. It is really nice and the images of the crochet works is in itself a visual feast! 🙂
I do have a booklet on how to start crochet, but I am a learner with too many doubts sometimes! So, I will try to see if this link will help me. Eager to work on some. Thanks a lot! 🙂
I love this website! I still new in embroidery, and this site really help a lot! I really glad I found this site early. Thanks for the good work! 🙂
Hello Sarah:
I have not done any embroidery for years–my speciality was blackwork embroidery–but I needed to revive my skills for a particular art project. Thank you for such a clear and informative site. All the instructions and illustrations are so easy to follow!!
An excellent resource, which is very beneficial for GCSE students. Thank you.
Nice name…Nice stitch…
thank you so much for the beautiful tutorials!