

Eyelet Stitch is also known as
Eyelet hole [EN], Point d’œillet [FR], Blindlochstich [DE], Punto inglese [IT], Ponto ingles [PT].
How to do the Eyelet Stitch
This stitch resembles a small eye on a doll. Eyelet Stitch is particularly nice when done in the same color as the fabric, like white on white. This stitch helps to create a small hole in the fabric with a work around it. You can work with this technique, no matter how big the hole.
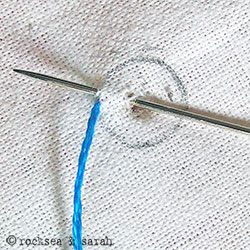 | 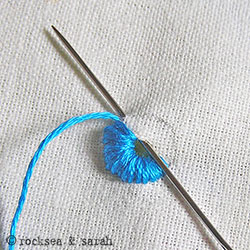 |
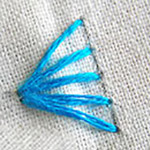
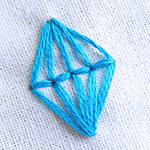
| Fig 1: To begin with, puncture a hole in the fabric. I used a nail to do that. Now, draw a stitch line around it. The area between the drawn line and the hole will be filled with stitches. Bring out the needle from one end of the stitch line as shown. Take the needle in through the hole and bring it out again from the stitch line, as near as possible to the previous point. | Fig 2: Keep up with this simple procedure. Work all around the hole. To make the hole more visible, just pull the thread out tighter. Instead of a circled stitch line around the hole, you can also experiment with any other shapes, like a square or an oval. |
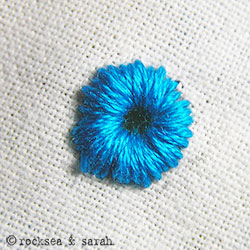 | |
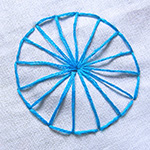
| Fig 3: A finished eyelet stitch looks like this. |
More stitches from the Straight Stitch Family
|


Learn the Eyelet Stitch along with 305 other stitches from our 600-page eBook.


Your descriptions are so crisp and understandable… Thank you so much!!!! Wish I could meet you once!!!
Thank you, Navya!:)
oops just realised my previous msg was delivered. ..thanx ..il try it out & get back 2u..
hi sarah, thank you for your incredible stitch guide theyv really helped me.. i wanted to asked thou, iv been trying to do the eyelet stitch as illustrated but mine turns out kind of flat …where could i be going wrong?
hey..thankyou so much for your stitches. .i just wanted to ask you when i do the eyelet stitch it comes out kind of flat…what could i be doing wrong?
Do you mean to say that it is not giving a raised look, or do you mean to say that the center is not being shown enough?
If the stitch is not coming out raised, it is okay. You can work with a slightly thicker thread for a raised effect. Try the stitches closer to each other too.
If the center is not showing enough, you can pierce the cloth with a thicker object to create a bigger hole, and work around it.
Hope this helps.
Thank you so much for visiting my blog and teaching me a new stitch 🙂
hi Sara,
Nalla website 🙂 I was looking for embroidery tutorial for a very long time and I couldn’t find anything better than yours 🙂
Thanks for the good work 🙂
Hi Sara,
your website is very good and useful thanks.
we are running a textile business in abroad.
currently we are having some good orders on eyelet stitch work. If you know any people working on it please refer me.
Thank you,
sara,
I realy liked your site. This is very helpful. I started learning. Thank u very much. Am very happy about this.
How is ur little champ?
hey,
i have a question…. is this stitch is also called as ‘buttonhole stitch’? plz clear my doubt…
This is not buttonhole stitch. You can check the right hand side for lists of other stitches, which also includes the actual buttonhole stitch.
super sarah sis thax a lot i m so happy . i was searching for classes to learn this stitching but so luckily i got this site thax so much wonderful. i m so happpyyyyyyyyyyyyyyyyyy
Sarah, you are so kind to share all of these wonderful tutorials, what an extremelely valuable site this is, thanks so much
hearts,
Mia
Thats great!
Vry nice…… (^_^)
Sarah, thank you for your generous gift. I couldn´t subscribe me to your blog, can you help me? Receive a big hug
Wow… 😀