
Split Stitch is also known as
Punto partido[ES], Point de tige fendu [FR], Spaltstich [DE], Punto diviso / Punto spaccato [IT], Ponto partido / Ponto corrente [PT], Klyvsöm [SV].
Split Stitch a very old stitch used for outlining and filling in colors for patterns.
Looking back into history, the Split stitch has its popularity placed at a high during the medieval ages in England. The needlework of this time was called Opus Anglicanum.This medieval English needlework comprised of the generous use of split stitch for fillings in a motif along with the ‘underside couching’ method of embroidery. It covers the whole cloth on which it is worked and leaves negligible space for a background. So, we can say that the history of the Split stitch is akin to the history of Opus Anglicanum.
Origins
Opus Anglicanum was done mainly for the purpose of the rich and powerful churches of the medieval ages. Though it was used otherwise too, only a very few of its kind has survived. The information has it that they were mainly done by nuns or anyone with seven years of apprenticeship in a secular workshop. It was also popularly done among the Anglo-Norman ladies. This was a time when embroidery work was viewed as a highly-skilled artwork at par with other art forms like stained glass work, sculpture, architecture and, silver and gold metalwork. In fact, it was considered to be of higher esteem than fine art.
Popularity
This embroidery was done with fine silk and gold threads. Not only was it done with expensive materials, but it was labor-intensive as well. This made the garments very expensive, so much so, that it went on to become a status symbol for the religious leaders and royalties. From the mid-1200s to mid-1300s, the fine embroidery of England was exported all over Europe and Opus Anglicanum was at its height. Great profits were made by the merchants who hired laborers for this expensive embroidery work. However, the great value of these garments also led to its destruction. When the older garments wore out or were no longer in use, the gold threads and other expensive embellishments would be pulled out and used in new creations. Opus Anglicanism used exceptionally high-quality materials and was done by highly skilled artisans.
Decline
The decline of Opus Anglicanum was seen from 1348, after the Black Death. The country saw general unrest with a high decline in population. The time was ripe for newer techniques and materials to invade the textile and embroidery scene. Materials from Italy were used and embroidery work reduced to just borders or applied pieces. Weaving took more importance than embroidery. Cheaper and quicker ways of stitching embroidery came into being. Satin stitch, brick stitch, long and short stitch, surface couching and stem stitch slowly replaced the tiny and laborious split stitch.
How to do the Split Stitch
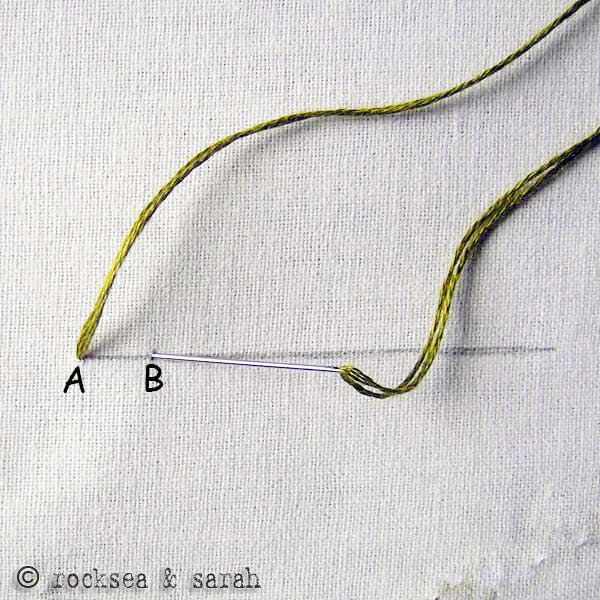 |  |
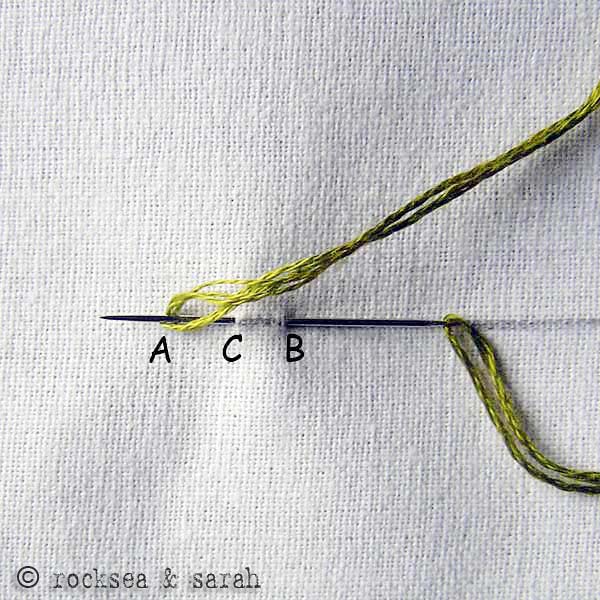
| Fig 1: Bring out the thread through A and put it in through B | Fig 2: Take the needle backward to bring it out through C. Note that C lies halfway between A and B. |
 |  |
| Fig 3: While bringing out the thread through C, take it in between the thread, splitting it into two. | Fig 4: Again, put the needle in through D to bring it out through B, splitting the thread. |
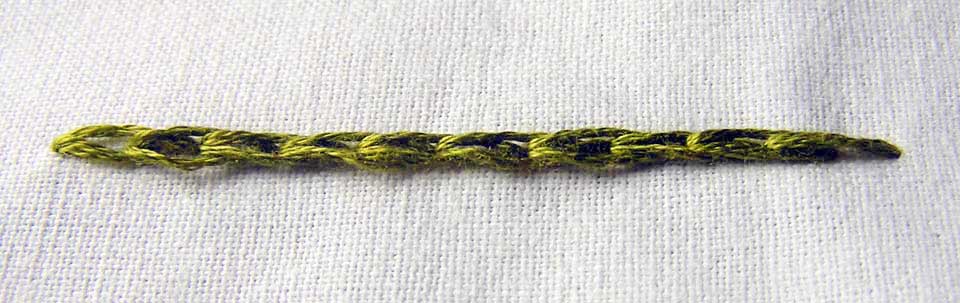 | |
| Fig 5: Continue this procedure to finish the stitch. The only thing to keep in mind is to split the thread when bringing the needle out. In some way, it will give you a visual feel of chain stitch. | |
 | |
| Fig 6: The reverse of the fabric will give you a back stitch pattern. | |
Learn to do Split Stitch in 2 minutes!
Use this stitch on a pattern.
Visit and Subscribe to Sarah’s YouTube Channel
Related Projects
Do you want to know where and how to use this stitch? Check out the projects below and learn more. Make something beautiful!


I was wondering if I am doing a split stitch or not. I come up through A. Go (all the way) down through B. Then I come (all the way) up 1/2 way between A and B. I am splitting the stitch. Not always equally. I am still a beginner, so if I need to change my ways; now would be a good time. On the attached photo, I was doing 5 slips, then crossing the 5th to keep it tight. Yes I am still using knots to start.

Hi Kandace,
Yes, you are doing the Split Stitch. You are using the stab method, passing the needle down through B, while my instructions show the sewing method. Scroll down and check the 2-minute video to see how you work the Stab method. It is not necessary to come out exactly halfway through or even split the stitch into exact halves. So, long story short, you are doing it the correct way!
I am trying this in for my assignment but I feel like I’m doing something wrong. The back gives me Running stitch than back stitch.
Hi Angelo,
You might not be getting a perfect Back Stitch because you are not taking in the needle through the same point that you came out from earlier while splitting the stitch. And that is okay! I won’t sweat on it. 🙂
Thank you! Is it possible to remove the thread and remake it?
You can try to remove the stitch, but there is a possibility that it gets messy because you have to pull the thread back through the split stitches. If the splitting is done neatly, you can carefully pull out each stitch from the back of the fabric. I don’t know how much have you stitched, but if it is not a lot, it might be better to just cut off the stitch and redo them.
This was a fantastic website for my homework for sowing.Defiently a highly recommended site.
I would mostly recommend this site for students because it taught me a lot about sowing and split stitches.But i would say that if there was different options of stitching tutorials at the top of the page so you you don’t have to search each stitch individually.Overall a fantastic site.Thank you Sarah!!!
As usual, the best site to learn stitches. Thank you
very helpful.l am also greatful to you that l have learnt about the background history.
Awesome site, your tutorials are spectacular. Thank-you!
Your tutorial website is superb. Thank you for all of the hard work you’ve put into the photos and explanations. A gem!
Thank you! I am starting to embroider some tea towels. I appreciate that you share this lesson here. Wishing you a good week ahead.
thank you to learn this stitch
hi split stitch is a fabulous idea for filling