

This variation of stem stitch family looks like the satin stitch. The technique used is that of outline stitch, the only difference being that every successive stitch is made within a short gap difference. The tutorial will make it clearer to you.
I will work on an open space to demonstrate this stitch. This stitch cannot be carried out like the other stem stitch varieties, in a straight line. Japanese stitch can be used for simple fillings of geometrical nature. It is generally used to depict larger areas of a landscape like water.
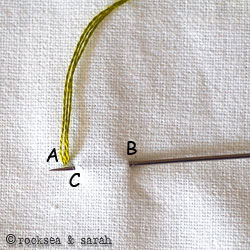 | 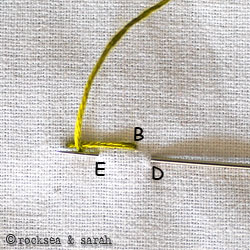 |
| Fig 1: Bring the needle out through A. Now, put the needle in through B and bring it out through C.This process is similar to outline stitch. Only, make sure that C lies at a closer distance to A, and not exactly between A-B like it would in outline stitch. | Fig 2: Continue this process of stitching. |
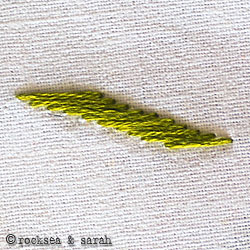 | |
| Fig 3: A finished series of this stitch would look like this. You will see that though it uses the outline stitch process, it looks like satin stitch. |


Hello Sarah,
I have always found embroidery interesting and amusing..but never learnt it. I always wanted to learn..but could not find any turorial that would help me begin from the basics, with clear, step by step instructions. I find it easy to follow. This makes me want to learn more, I just found your blog. Really helpful. I am starting right away..i am sure embroidery is going to be a great hobby of mine from now on. Thank u soooo much.
one question on this. how many mm apart should i make a and b. i’m running a doubled over strand of #10 lace with a 2.5 x 65 mm needle….if that helps.
Well, that partially depends on how big your canvas is and how soon you want to finish it.
It is better to keep each stitch at not more than 2 cms. With longer stitches the thread tends to droop (or loose its tautness), so the shorter the stitches, the better the quality.
1.5 cm would be ideal.
Hope this tip helps.
Hi Sarah,
I loved ur embroidery site.I m also doing some bed shits,pillows sarees,dresses with threadwork and zari work also.so ur tutorial also very helpful to me for doing my work better.thanks for this.
i m new in embroidery. i want to buy embroidery stitch thread online. suggest me some site from where i can buy the embroidery kit online at reasonable prices.
Hi Nitya, Thanks for the step by step detailed instruction. I will definitely try it.
Hi Ritu, here is the link of book for more embroidery designs
https://www.etsy.com/listing/190647723/
excelent , excelente blog, lo amo, he aprendido mucho en el felicidades y gracias
THANK YOU SO MUCH 😀
Good Site to learn Thank You …Good Job ..keep on posting new stitches
Hi Sarah, i just got introduced to the art of hand embroidery by your blog, you helped me fall in love with it !!! and thank you for making it so comprehensive
Hi Dear ur Tutarial good and very Easy to learn to all uramazin
Hello! Nitya,
It’s so nice and so easy to stich. will try it today itself. Thank you very much for teaching it so nicely.
Hi Sarah,
your tutorial is too good and its very easy to learn from it also. I want to make a hand embroidery design on a blank shirt for my nephew. Can you please tell me which stitches should I use? The design which I want to make goes like this:
Hi
lil’
star (for star, I would like to make a star design and not just write)
It would be very nice of you, if you can tell what stitches I should use.
Thanks,
Nitya
Dear Nitya,
Sorry for a late response as I was busy with my newborn daughter and some travels.
I guess you must have already embroidered for your nephew. Yet, just to help you with, in case you have not, you can use simple straight stitches like the holbein stitch to write ‘ HI LI’L’ and use chain stitch or even magic chain stitch to make and fill in the star.
Dear Sarah,
You did good job, got to learn many types of embroidery stiches, and it is very helpful to every one. Loved your hand embroidery stich tutorial…and i upload my stitches very soon to u……thanks a lot….:)
Dear Rizna,
Thankyou. We will be waiting for your uploads. 🙂
Hello Sarah
I have no words to describe your effort to preserve the art of stitching. We live in Albany NY and organizing summer stitching classes to second generation American Indian kids and with your permission I would like to use your material as my syllabus and any thoughts to teach kids 9 and above is really appreciated. If you are interested we can correspond through mail.
Thanks a ton
Neelima.
Dear Neelima,
We are honoured in more than one way to know that you want to use our material for the summer stitching classes. You may certainly use our information to teach these young kids, but, with the due credits given. 🙂
We really appreciate your thought to introduce this art to young learners from a generation that sees handembroidery as a ‘grandmother’ and a passe hobby.
I have myself had a few 9-12 year olds as students for this summer and I will be glad to mail you some suggestions.
Best wishes.
Miss Sarah,
Your blog is by far the most comprehensive embroidery site I have seen. I just love everything in it. I’m still starting and I really appreciate all the information you share on this blog. 🙂
Keep up the good work! :3
Hello Kim,
Thank you :). We are always delighted when we know that our tutorial has helped and inspired someone.
dear sarah,
This stich is very easy to make…and is also new…..keep on posting new ways of stiching…..and good job!!!!
Thanks Asfiya 🙂
Dear Friends,
I am looking some hand embroidery designs. please send me some designs for stitches like chain stitch, stem stitch, herringbone stitch, long and short stitch, button hole stitch, etc.,
My email id :-srianandhikannan@gmail.com