

Palestrina Stitch is also known as
Double knot stitch, Tied coral stitch, Old English knot stitch, Twilling stitch, Purl stitch [EN], Punto de Palestrina [ES], Point de Palestrina [FR], Palestrinastich [DE], Punto Palestrina [IT], Ponto de Palestrina [PT].
About the Palestrina Stitch
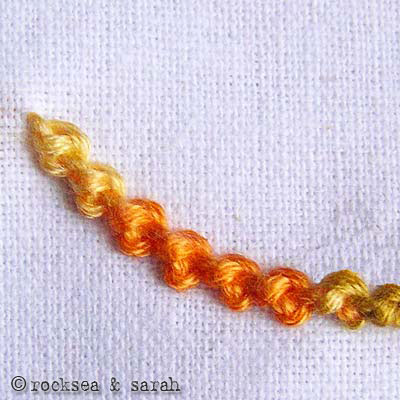
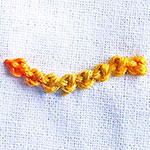
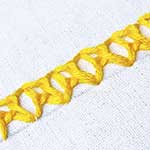
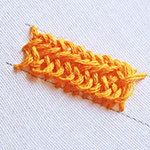
Palestrina stitch has its origin in the village of Palestrina in Italy and was initially called Praeneste, an Etruscan town near Rome that was built upon the ruins of the ancient Temple of Fortuna. This temple was revealed during the Second World War when Allied bombing destroyed Palestrina’s city center. Many embroidery styles from Italy have Palestrina stitch and there is even an embroidery style called the Palestrina. This style of embroidery uses thick threads, usually white or natural-colored thread on dark linen or dark red, russet, or blue thread on white or light-colored linen. The village women still stitch and sell this type of embroidery. This stitch is usually used for outlining or bordering purposes with a few additional stitches such as the Stem Stitch, French Knot, and Bokhara couching. Today, this stitch is popular in surface embroidery, Crewel Work and Crazy Quilting. Filling an area with the Palestrina Stitch can give a beautiful bumpy texture. This stitch can be used over edges and adding a bead between the stitches adds a certain richness to it!
How to do the Palestrina Stitch
There are two variations of Palestrina stitch: The long-armed Palestrina stitch and the long-legged Palestrina stitch, both of which I have shown below.
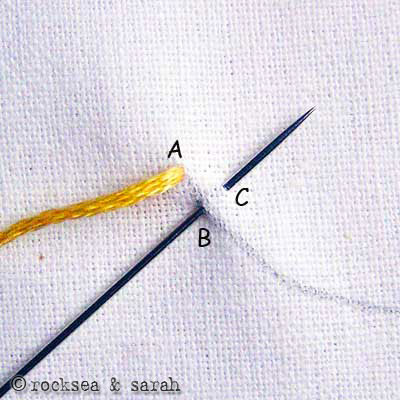 | 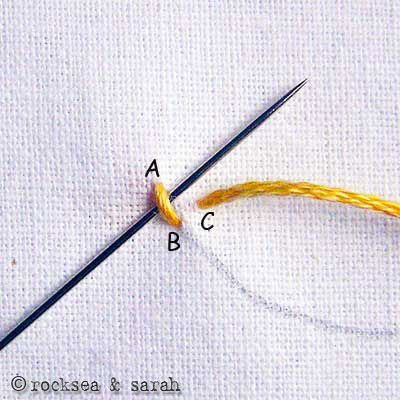 |
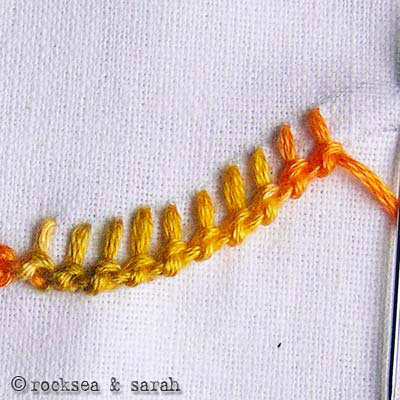
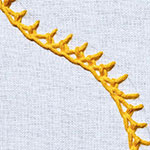
| Fig 1: Bring the needle out through point A, which lies on the stitch line. Then, take the needle in through B, which lies on the stitch line too. Bring out the needle through C, a point straight above and not too far from B. | Fig 2: Now, take the needle below the stitch A-B, without plucking the fabric underneath, as shown. The needle will be angled above or towards the left of the point C. |
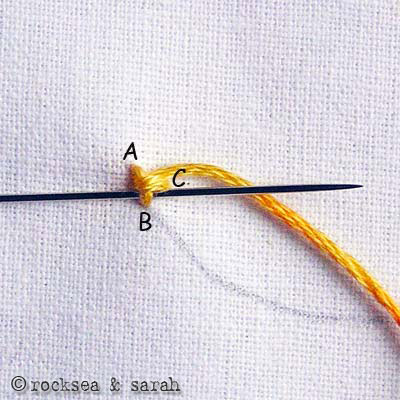 | 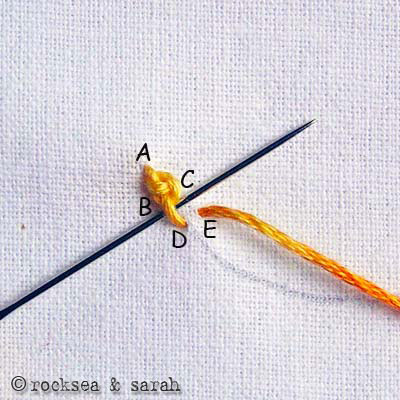 |
| Fig 3: Again, take the needle under the stitch A-B. Only, this time, the needle is angled below or towards the right side of point C. Then, loop the thread around the needle as shown in the illustration. | Fig 4: When you pull out the needle, the first Palestrina knot is formed. Start for the next knot by putting in the needle through D on the stitch line and bringing it out from E, just above the point D. Continue with the procedure as we did for the first knot. |
 | |
| Fig 5: The finished portion of the Palestrina knot would look like this. | |
 | 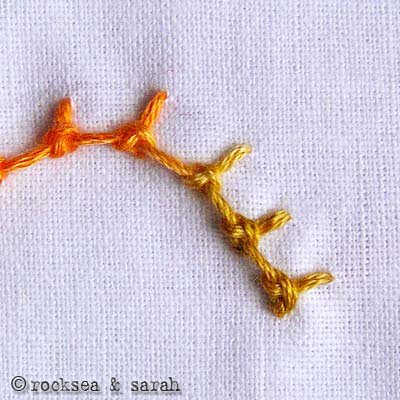 |
| Fig 6: This is a variation of the Palestrina stitch. The technique followed is the same. The only difference is that stitch B-C (Fig 1) is taken a bit longer to give it a long ‘arm.’ And so this variation is called the ‘long-armed Palestrina.’ | Fig 7: Another variation is when the stitch A-B (Fig 1) is extended, giving the stitch a long ‘leg’. Such variation is called a ‘long-legged Palestrina’. It would look like the Coral Stitch with bolder knots. This illustration shows a long-legged and long-armed Palestrina. |
Learn to do Palestrina Stitch in 2 minutes!
Use this stitch on a pattern
Visit and Subscribe to Sarah’s YouTube Channel
Related Stitches in the Palestrina Stitch Family
Mountmellick |
Eastern Stitch |


Learn this stitch and 305 other stitches from our 600-page eBook.


I love your instructions. Ive recently started embroidery and the simple clear instructions have made it easy and given me confidence to try new stitches and more complex projects.
Thank you, Deb. I am so happy to hear that you are enjoying embroidery through our pages! XO
Hi Sarah!

I just wanted to share my cloud glyph with you using the palestrina stitch! You’ve been such a help in everything I’ve been doing. Thank you!
Hi Joshua! I love the way the Palestrina stitch has turned out. It looks beautiful! Thank you for sharing. 🙂
Merci, ce point de broderie est très joli. Bonne soirée.
Thank you, Marijo! 🙂
Are you keeping single thread or making it double?
Hi Priya,
I am not doubling the thread, but I have used all the 6 strands of the embroidery thread.
It’s brilliant how easy you made it look. I gathered my courage and here are the results

Thank you!
Beautiful! Thank you for sharing. Me, happy! 🙂
Thanks for illustration of Palestrina stitch. With help of this I revived my old lessons and am going to embroider a saree. Was hesitant in starting as I was unsure of Mosul opera day. Thanks for the help. Great work.
i was always good with needle and thread but never got time to do. Now that i have retire your site is such a great help. I have made so many small items and even sell them to raise money for an old age home in my area. Thank you and God bless you.
hai sarah chechi….
njn ee stich padikkan vendiyanu sites nokkiyath…. ente oru churidharil kanditt… e site valare nallathanu….. thanxxxxxxxxxxxx………. thanxxxxx alottttttt…………
And yeah.. I loved ur Palestrina stitch and wud love to try it soon…
Hi dear,
Was delighted to visit here. I follow a hectic work schedule still extract time to rejuvenate me by doing some art work. Now i know where to move to in case i need help….. Thanks a lot for ur efforts….
Thank you so much. I was taught to embroider as soon as could hold a hoop. But, as so many things, if you don’t use it you lose it. You have inspired me to begin again.
You have made a very clear description of Palestrina stitch. Thank you.
Hey Sarah,
I am a complete beginner at hand embroidery. But even someone like is learning lots from ur superb tutorials…great job so far…..
Can u post some patterns for selwar kamiz, baby dress and tablecloths,…or recommend a site where i can view beautiful patterns??
It wud be great help…
Hello Kimia,
I am glad that you find our pages good. 🙂
I might not be able to help you much with a particular site for good patterns, but you can do a google search for the kind of desired patterns. There are plenty of them out there.
thanks a lot ……………. its very clear to understand
🙂 Thanks Vish.
hello! sarah.this is really cool website,i had been trying to do this stitch since long but coudnt get it and with the help of this illustration I DID IT!!!my sample looks good.thanx alot.
Dear Hina,
So nice to hear about your success with this stitch. 🙂 Best wishes.
hey hina nice to see a mauritian interested in stitch works
Hi Sarah,
Your site is very nice. I used to stitch when in school but had forgotten all the stitches over the years. Have been looking for a site to learn the stitches and your site is the perfect one. It’s really very helpful. Please do upload some designs that you have worked on so that we can learn and do it for ourself.
Thanks,
Nivedita
Hello Nivedita,
So glad that our pages helped us revive what you forgot in school. I will try to put up my own designs and work as soon as get a chance to. 🙂
very nice of you thax a lot to teach me theses stiches
Dear Tasnim,
Glad that you enjoy learnign from these pages.
Hey..,
thanks for these lessons. I got lot through this.
Sanju, 🙂
HI,
You have the best site with regard to the various stitches… each stitch is so well described.. And i am learning a lot from the tutorials… Thanks so much for them…
Hey Chethana,
Thanks! Good to know that you are enjoying the stitches. 🙂
Hello Sarah…. I completed my kerchief… I feel I have done justice your tutorials… 🙂
I will try to take a pic and email you the same…
wow LJ, looks like you are very happy with what you have done. 🙂 I feel eager to see it too. Yes, do send me a picture to my email when possible.
Saramme……..
…chumma vilichatha…
🙂
oh hehe.. 😀
Good one! I will be trying this on my hand kerchief that i plan to create this weekend. 🙂
Hey LJ,
Do let me know when you are finished. Would like to know how it came out to be. 🙂