
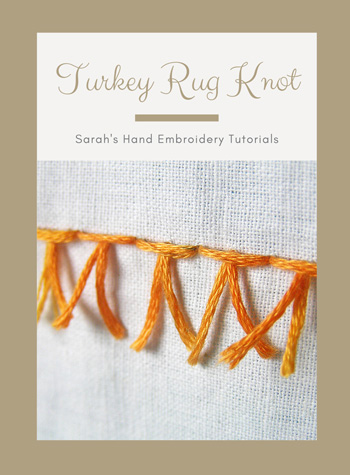
Turkey Rug Knot is also known as
Turkey stitch / Ghiordes knot / Velvet stitch / Rya stitch / Rya knot [EN], Punto de bolonia [ES], Point de franges [FR], Fransenstickerei / Türkischer Knoten [DE], Ponto em tufos [PT].
How to do the Turkey Rug Knot
This is a very interesting stitch that can be used in many ways to create different effects, like making ‘hairy’ fillings or a rug like edgings. It is especially great to create a velvety texture. I would work over a straight stitch line. You can also try the edge of a fabric to create this stitch.
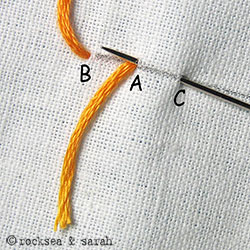 |  |
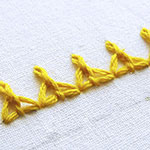
| Fig 1: To begin, do not knot the thread ending as we would normally. Like in the illustration, put the needle in through A. Leave a length of thread. Now, bring out the needle through B, in through C and again out through A. The point A lies in the middle of B-C. | Fig 2: Now, take the needle in through D and out through C. The point C lies in the middle of A-D. Make sure you do not pull the thread looping between A-D is pulled through completely but left as a loop. |
 |  |
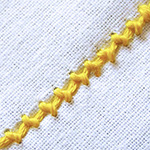
| Fig 3: Now, continue this process, each time leaving a loop of thread. Try to keep all the loops of the same length. | Fig 4: A finished row of this stitch would look like this. This adds nice finishing touch when the loops fall free out of the edgings. |
 | |
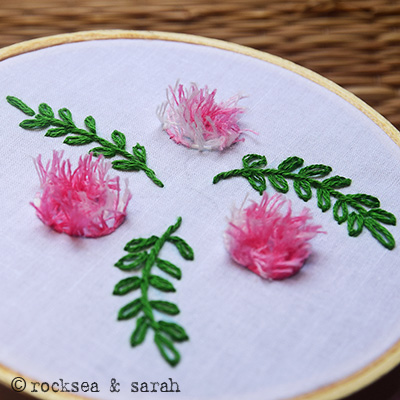
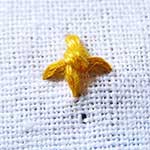
| Fig 5: You can bring out a different effect by cutting these loops in the middle, leaving the threads to hang open. The closer the stitches, the denser it will look. You can also do fillings by doing rows of closely stitched Turkey Rug Knots to cover the inside of the pattern. Later, cut the loops and trim them to the desired length. This gives a ‘velvety’ or hairy effect to the pattern fillings. |
Learn to do Turkey Rug Knots in 2 minutes!
Related Projects
Do you want to know where and how to use this stitch? Check out the projects below and learn more. Make something beautiful!
Learn this stitch and 305 other stitches from our 600-page eBook.

Related Stitches from the Knot Stitch Family


Have just received my first e mail from you and love the first three stiches I am new to embroidery and I think I will make a sampler to help me learn and perfect ass I learn thank you so very much your directions are so good to follow
Hi Gail, it’s a great idea to make a sampler. Do share photos of it now and then – would love to see it. ☺️ Just use the comment section to upload the photos of your work!
Hi! I am teaching a tutorial tomorrow, and my kit has a little bit of turkey rug stitch. I was just sitting down to write instructions for it when I found your lovely simple tutorial. Other people manage to make a real mess of explaining turkey rug stitch, and you have done it clearly and easily. I think I will just direct my students to your page rather than reinvent the wheel! thank you x
That’s awesome, Emma! Thank you. :X
Hello Sarah,
I wish to use the turkey rug knot to embroider furry kittens onto my daughter’s jeans. When the loop is cut, what can be done to prevent the threads from pulling out during washing?
Thank you for the wonderful instructions on your website!!
Kristyne
Hi Kristyne,
I consider Turkey Rug knots to be great on samples that do not need washing. But, if you want to stitch it on items that go into washing, I would suggest the Surrey Stitch which, like the Turkey Rug Knot, is great to create fuzzy texture. Surrey Stitch has better knots at the base which prevents it from coming out during washing. Here is the link:
https://www.embroidery.rocksea.org/stitch/knots/surrey-stitch/
I have no words to thank you sarah…
I was not a big liker on stitches…. once I came acroos ur site,I just got stuck to it…. thank you so much…
everyone out here get a lot of benefit out of u…. their happiness will make ur family blessed ….
This is wonderful to know, Shabra!! I hope you are still enjoying hand embroidery. Thank you for writing to us. 🙂
Yesterday I learned and used the turkey rug knot for my newest mixed media doll. Thanks for your great tutorial!
(I’m writing from El Salvador in Central America, but my flag is not displayin properly)
Maria, great dolls – would love to see more! I’ve corrected the flag, it was an error due to a plugin. Sarah will reply to your comments.
Thanks, Rocksea. Now I see my country flag.
You can take a look at my dolls here:
http://gineceoblog.wordpress.com
Dear Maria,
I cannot tell you how wonderful your dolls are. What lovely creations and such nice way to use embrodiery. It is nice to know that you have used our tutorials to learn some of the stitches and thanks for sharing them as it makes great examples and inspires many other craft enthusisats.
Thank you, Sarah, for your tutorials and for keeping this website. And thanks for visiting my blog and leaving a comment there. I’m glad you like my dolls.
🙂
I just recently started embroidery. I have completed a few projects using a handful of basic stitches my grandmother taught me when I was young.
After searching many sites for stitch guides and tutorials I stumbled across your page. I’m so happy I did. Your tutorials are by far the most informative and your step by step photos are great. Thank you so much for sharing this information and your work is beautiful.
I believe my next project will be a series of samplers using your stitch families as a guide. Now I just need to sketch out my idea and start stitching.
Hello,
I can’t thank you enough for your website. It is the site I’ve been looking for. So many beautiful stitches so beautifully and thoughtfully photographed and easy to understand. This is a very valuable resource for me.
Please don’t think me greedy and ungrateful if I ask you for help in understanding the steps to embroidery using a tambour hook. I’m interested in doing it as it’s done in the east. Right side up. Not from underneath, I want to work with the needle on top and thread and or beads and sequins on the surface of the piece not with the beads and stitching being attached from under the work.
Do you have instructions for this or can you direct me to a tutorial?
Thank-you again,
Cheryl