
Peking Knot is also known as
Chinese Knot / Forbidden Stitch / Blind Knot [EN], Nudo de Pekín [ES], Point de noeud de Pékin [FR], Peking-Knotenstich [DE], Ponto de nó de Pequim [PT].
How to do the Peking Knot
This type of knot is particular to the rich Chinese silk embroidery where patterns were filled with rows of such fine knots. The name ‘Forbidden Stitch’ took shape probably because of the knots’ association to China’s Forbidden City, the home to the Emperor. This stitch was used to decorate the royal wears, so pretty much forbidden to be used outside the city. It could also be that to avoid ordinary people from using it, a ‘belief’ was floated that it could cause blindness, due to which is also called the Blind Knot.
This stitch can be done in two variations. The first one is where the knot is left loose to look like a ring. These were used in close succession to fill motifs. The second variation is where a tight knot is made. It looks like the french knot, but flatter, since we wrap the thread around the needle only once instead of twice as in the french knot. In fact, there is a slight difference in the way the knot is made too, which will be shown in the tutorial below. These knots are also used to fill in motifs and can be pretty tasking to the eyes. But the effect it leaves, especially when shadings occur, is splendid.
I will work on both variations. The first four steps of both variations are the same and differ only towards the end.
| Variation 1: the ring | |
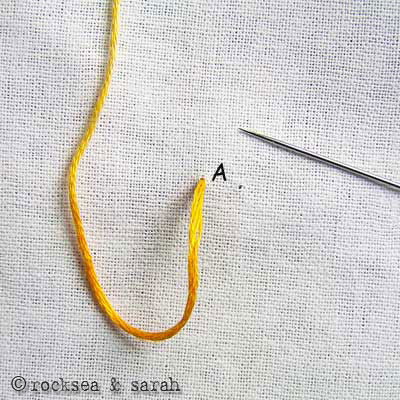 |  |
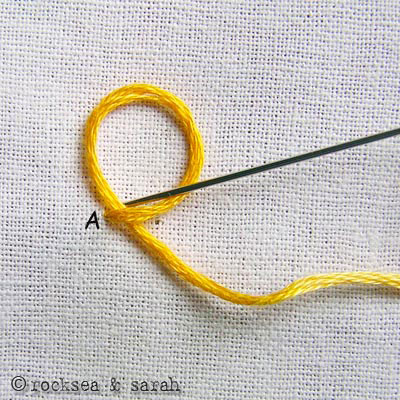
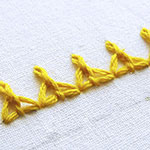
| Fig 1: Bring the needle out through A. Leave the thread towards the left side as shown. | Fig 2: Now, using your left index finger, wrap the thread around and twist it to make a loop and place it above the point A, as shown. |
 |  |
| Fig 3: Keeping the loop as it is, put in the needle at a point inside the loop, as close as possible to A, but not A. You may use your left-hand thumb to hold the loop down when you do this. Do not pull out the needle yet. | Fig 4: Now, pull the loose end of the thread to tighten the loop to the desired size. |
 | |
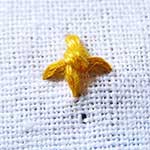
| Fig 5: Now, pull down the needle completely. You will get a ring sitting on a knot as shown in this picture. | |
| Variation 2: the knot | |
 |  |
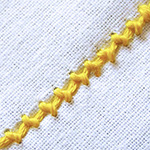
| Fig 6: Keep pulling the loose end of the thread till it holds tight around the needle. | Fig 7: Now, pull down the needle completely to get a knot like this. |
Learn to do Peking Knots/ Chinese Knots in 2 minutes!
Use this stitch on a pattern
Visit and Subscribe to Sarah’s YouTube Channel
Learn this stitch and 305 other stitches from our 600-page eBook.

Related Stitches from the Knot Stitch Family


Can you do ring knot and how it is different from French knot
Hi Simy, from what I understand, the technique in wrapping the thread to do both the knots is the same, but in the French knot, the knot is tighter and in the ring knot, we leave the wraps loose to create a small ring. I do not have a tutorial for the ring knot yet, but I can try to make one as soon as I can!
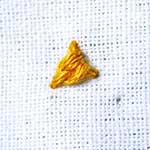
Hello Sarah—How do you do multiple loops? Do you just repeat the knot and stitch over in the same place? I believe that is what I am seeing in the top photo but would love clarification. Not having any trouble with the single loop but having trouble doing multiple loops.
Thanks for asking, Edie. I have never really tried multiple loops until you asked now! So, if I wanted to do multiple rings as in variation 1, I would do one ring and come out just outside the ring (as if I was anchoring it down), then do another ring over it, and repeat the process. The knot or the anchor might just keep growing bigger due to multiple layers.
If you want to do a knot as in variation 2 using multiple loops, it seemed like a challenge. When I tried making many loops, after pulling down the needle completely, only the first loop was making the knot while all the other loops just unfolded. If I figure it out ever, I will certainly add to the post here.
Thank you—Glad it wasn’t just me for whom that was difficult!
Hi again, Edie.
So, here is what I did (and why did I not do it earlier, duh!) – I wrapped the thread around my left index finger multiple times, instead of just once, and twisted it (as instructed in Fig 2.), then I slipped in the needle in gently and slipped out my finger, while placing the thread over the fabric. I pull the open end of the thread till all the wrappings sit tight against the needle (as instructed in Fig 6.). Finish it off by pulling down the needle completely (as in Fig 7.). You get a big knot. If you are making just a ring, use the same technique of wrapping multiple times, but it was a bit tricky for me to keep it neat and all the rings consistent once I pulled down the needle. But, I am sure with a few more practice, it should work.
hi sarah,
thank you so much for making such an helpful website.
through this site i learned different types of embroidery stitches without the help of any tutor.now iam making my own designs.
thank you so much dear
Hi Mahima, thank you so much! You should share a few designs here- we would love to see it!
Dear Sarah,
I am an experienced embroiderer who has the habit of using the same few stitches in my work. Thank you for encouraging me to use more new ones. You have obviously put a lot of time and effort into this easy to follow site. I am sure many embroiderers, both beginners and experienced, are most appreciative of your generosity in sharing this.
Kind regards,
Mary
Thank you very much Mary. It is always encouraging to receive such comments. 🙂
Dear Sarah, Thank you for taking the effort and care that you invested in creating this wonderful sampler tutorial. I have been searching for such an item. It is well presented and the instructions are facile for any level of handcrafter. I will try to find you on other media sites such as youtube, etc… I consider my self a moderate beginner (I am on my 5th piece) and look forward to using every single one of these stitches in some fadhion over the next year. Sincerely, Dr Carla
Hi Carla,
Thank you for dropping a comment. It has been long since I have posted anything, but I have to get hooked back on. So, there are many more stitch tutorials coming up. Hope you enjoy them. If you like, you might also share some of your works on our website for others to see. 🙂
Very very very helpful site..thanks for sharing this interesting and helpful tips and techniques
I have been struggling really hard to understand this stitch which was done on one of my sarees. Thanks a ton for this tutorial. One of the best tutorials i’ve ever seen on internet. Thanks again!!!
Excellent site! What a great resource! Thank you!
hi saraaahh…
this stitch is my favorite stitch..so simple n sweet
i love your web n tutorial
i hope can contribute my hand embroidery to your web soon
thank a lot dear 🙂
Sarah!
Your are simply best among all. Please also add some applique work tutorial. Im happy to see your web as I was searching this type of tutorial web from many months and finally I found you.
Thanks alot dear.
dear sarah,i am from algeria. thank you very much.iam learning a lot about these stitches.your way of explaining is very easy to follow.thank you
dear sarah,thanks for ur wonderful tutorials.i would like to know whether this ring knot and chinese knot are same.
Dear Jilu,
I am not too sure if ring knot and peking knot are the same. It does sound like it could be similar, though. If I can ever confirm on it, I will let you know.
This site has been invaluable! I taught myself how to embroider a few weeks ago and am trying to broaden my available stitches!! Thank you so much!! You are amazingly talented!!!
Megan
Dear Sarah I am so happy I found this site of yours I am learning a lot ,the instructions are easy to follow.Thank you so much.I was wondering if you could put up instructions for Smocking and Sashiko please ,the ones I found on the net do not have illustrated instructions…once again thank you.
Dear Preetha,
Thanks! We are glad that you found our website good to learn from. The tutorials for Sashiko is under way. 🙂
Dear Sarah! Thank you so much for such a generous gift is a precious find for rukodelnits.Ya really want to learn how to embroider Sashiko.Podskazhite pozhaluysta.Spasibo.
Hello
thx this site is indeed very helpfu l as i can learn many new stiches sitting back home thx
Dear Gurpreet,
Thanks for visiting our pages. We are happy that you found it useful. 🙂