
This stitch is a very simple stitch worked from right to left. Make these stitches close enough to see it look like like a string of pearls, which explains the name.
I will be working over a single stitch line.
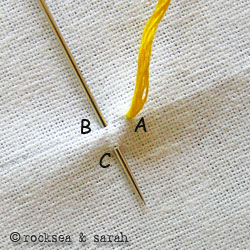 | 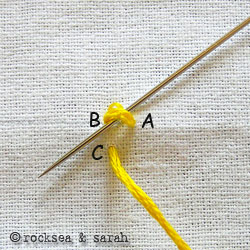 |
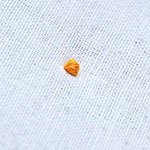
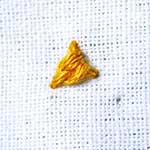
| Fig 1: Begin by bringing out the needle at the right end on the stitch line, at a point A. Then, take the needle through B, which lies on the stitch line and bring it out from C, a point right below B. | Fig 2: Now, before pulling the stitch A-B tight, take the needle under it as shown. Do not pluck the fabric underneath. |
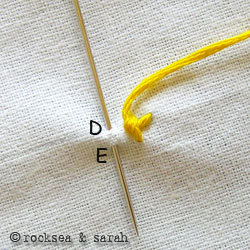 | 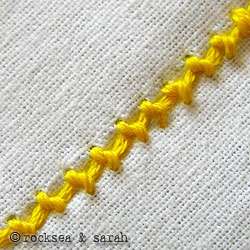 |
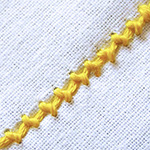
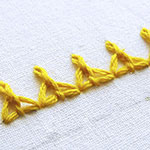
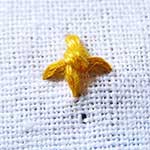
| Fig 3: Pull the needle out completely to get the first knot. Then, again, take the needle in through D, which lies on the stitch line and bring it out through E, a point right below D. The shorter this stitch, the more ’round’ and ‘pearled’ the look. Continue the procedure for the entire length of the stitch line. | Fig 4: A completed row of pearl stitch would look like this. |
Learn this stitch and 305 other stitches from our 600-page eBook.

Related Stitches from the Knot Stitch Family


Dear Sarah
My Pearl Knot and Coral Stitch both look the same on finishing. The wavy pattern that you have got in Pearl Knot I’m not getting. I did the same way as you have shown.
Hi Mahalakshmi. The Coral knot should have a small knot. Make the stitch between B and C (Fig 1) of the Pearl Knot slightly longer to see a change. Once you see the difference, try reducing that stitch bit by bit each time till you get your desired result. The Pearl knot stitch does not have a proper knot as such.
I hope this helps. Let me know!
Try as I might I am not able to follow your diagram and not getting the stitch right
Like Mr. Murphy commented earlier, despite following your instructions, my stitch does not look anything like the pretty stitch you have shown
Please help me. Radha Nair/ Cannanore
Dear Radha,
I am not able to figure why it is not working for you. How about you send me a photo of your stitch and it will help me guide you better? You can upload it here.
In the mean while, I can suggest to keep the stitches real small and not big. Maybe it can help?
Dear Rocksea and Sarah,
Try as I may, my “loop Stitch” looks nothing like yours in Photo Step 4. Also, could you clarify the name of this stitch: I don’t see anything like it anywhere else. Thanks!
C. Murphy
Hi
First of all, thank you so much for your comment. It helped me figure out a BIG mistake!
This is a tutorial for the pearl knot stitch. I am not too sure how it was put under the ‘Loop Stitch’ title! I have corrected the title of this page.
Loop stitch is slightly different.
Pearl knot stitch is a simple stitch, so I am not very sure where could you be going wrong (if you are going wrong at all).
Just make sure that the stitches you make while going in and out of the fabric are parallel to each other.
And, check Fig 2., you will notice the needle passes under the stitch, and is pulled out from above the point C. If you take the needle from below the point C, and follow the same same pattern subsequently, you might end up with the Loop stitch!
I hope this does not confuse you further! It is challenging when I have to explain without any pictures to show.
Sarah
P.S: Thanks again! 🙂
Hello Sarah and thank you for your very helpful page. I have been using your page for months now and l just love it. However, l feel this tutorial is either a bit incomplete or just confusing in relation to your other clearly stated tutorials. I would have to side with C. Murphy as in after your Fig 3 how is one supposed to have the criss cross pearls shown in your Fig 4. I think and addition foto and explanation on how to continue the next (2nd) stitch could help all of us who still haven’t gotten this “simple stitch”. Once again thank you for this page and sharing all your knowledge.
Doris
Well, thank you, Sarah! I’ve looked at both stitches now and for a lion, I’d be more likely to choose the surrey stitch. Both of these stitches make great loops but the primary difference – maybe the only difference is how orderly they are. From watching a YouTube of the surrey knot, it is a pretty unpredictable, chaotic finish – perfect, I think, for a lion! It isn’t like any stitch I’ve ever done before but I believe it is just about perfect!
We’ll have to see how he ends up – I believe he’ll be look his best with the loops intact. It’s a judgement call I’ll have to make as I go. FUN!
Thank you so much, Sarah. I predict the finished product – the entire lion – will look great! I’ll see if I can get a decent photo of the unstitched lion now. I plan to use this stitch for his mane, the end of his tail, and any other areas I see with longer fur. Be back soon.
Thank you again,
Bev
PS The lion transfer is too faint to show you.
Dear Sarah,
WOW! I just learned about the existence of this site, then just now sat down to my computer and took a peek. OH. MY. GOD! This is wonderful! Thank you!
Now, don’t laugh. After such a rave review, here I am writing to you because I’m still looking a stitch I used to know and have stitched into several projects. It’s been a very long time, though, since I’ve done any embroidery at all and I’ve forgotten. (New and indeed first(!) grandbaby is bringing my embroidery sewing out of deep storage.) You might have it in your exhaustive presentation of stitches (wonderful!) but I didn’t see it.
It is a loop stitch, I think, but it stands up off the fabric – ie the loop isn’t tacked down as it is in the lazy daisy stitch. I’m embroidering a lion and I want his mane to stand up off the fabric, 3-D style. I’ve done this before – with a lion, even, and show-off tails, and eyelashes, too! – but for the life of me, I can’t recall how I did it. Any ideas? I didn’t see it in what you present in your (wonderful!) site here but maybe it sneaked by me.
Thank you for sharing so much information and so many exciting stitches with everyone. I am tickled pink to know about your site and will be here plenty from here on out.
Sincerely,
Beverley Davis
Dear Beverley,
Thanks for writing, and congratulations as you become a grandparent! 🙂
Well, I think the stitch you are looking for is either the turkey rug knot or the surrey stitch.
Turkey rug knot: https://www.embroidery.rocksea.org/stitch/knots/turkey-rug-knot/
Surrey stitch: I have the tutorial ready, but have not posted it yet. So, try googling this stitch if I have not posted it by the time you receive this email.
Please try to upload a picture of the lion if possible. It would be great to see it.
Warm wishes.
i saw this website first and that is marvellous
What an easy way of showing the pearl knott stitch.I have a new pattern showing how to do it and boy what a hard thing to follow.This is a wonderful way.Many thanks
So glad Rosemary, you were able to learn this stitch easily from our page. 🙂