
This a very pretty looking stitch with a lot of scope to experiment with. I suppose this stitch is used extensively in certain kind of Indian embroidery, the reason why it has its name. It can be combined with embellishments like beads and sequins to get fabulous outcomes.
 | 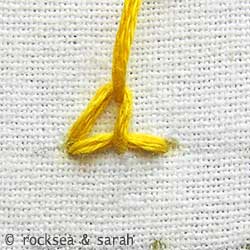 |
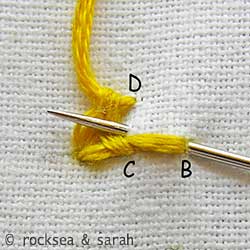
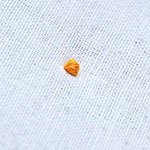
| Fig 1: Make a stitch A-B. Come out from C, a point in between A-B, but comes out under the stitch A-B . Go in through A and come out from D, a point straight above C. Loop the thread as shown. | Fig 2: Pull out the needle to get the above result. |
 | 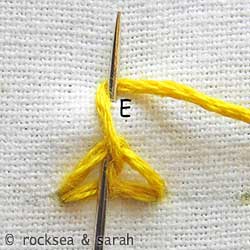 |
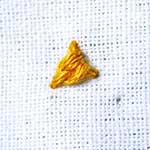
| Fig 3: Now, take the needle in through B, and come out through a point just next to C. This point lies above the stitch A-B. | Fig 4: Take the needle in through D and come out from E, a point straight above D. Loop the thread as shown. |
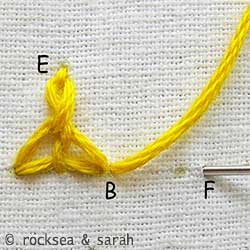 |  |
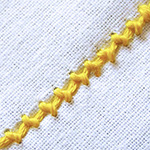
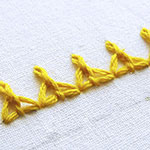
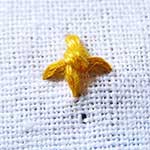
| Fig 5: Pull out the needle out and make a small stitch at E to pin down the loop as you would in a Lazy Daisy stitch. You can come out from B and in through F to keep continuing with making more stitches in a row. | Fig 6: A finished line of Indian edging stitch would look like this. |
Learn this stitch and 305 other stitches from our 600-page eBook.

Related Stitches from the Knot Stitch Family


I just came across your site on Pinterest. I just started working with some buttons that I inherited many years ago. Looking at some ideas I saw that some were combined with embroidery. When I was a child 40 + yrs a ago I had a wonderful elderly lady across the street that taught me how to embroider. My love of the needle & thread have continued. But 2 children kept me busy but now I have time on my hands. Your stitches send waves of nostalgia through me. Thanks for your tutorials; some of the basics I remember but you have so many I have never seen! I will get some material & new thread soon! Right now I am beginning a baby quilt for my first born (& prob only one) grandson! I know better than to start on one until I finish the other! Sorry this so long, thanks again!
Hello Sarah! Surrey stitch was a nightmare for me. But now I know how to make them..thanks to you. After looking your photos on surrey stitches I really hope I can manage these stitches nicely. Always a fond of your instructions. Thanks for your meaningful and helpful instructions.
Regards😊
Hi.. Sarah😊 it’s my first message. I have learnt so much from you. In fact I always returns to your site whenever in trouble. I was sure that you have a solution for my queries. I learned so many stitches from you. I love your instructions and photos. They are very reader friendly. So please keep doing what you do and keep waking interest in embroidery for girls like me. Regards
Kindly help me with jaali stitch in chikankari. I will be so obliged 😊
Thanks for such a great site! I’m very much a beginner at embroidery, so I haven’t given this stitch a spin yet, but your tutorials have been very helpful. Once I get something done I am willing to show strangers (haha), I’ll post it.
Hello Sarah,

I came across your site when i was searching for embroidery tutorials and I have got hooked on to it since then! I truly appreciate the amount of effort and dedication you have taken. The tutorials are crisp, to the point and very organised for beginners like me. Thank you so much and keep up the good work.
Could you pls help me point out the stitches in the picture (knots, branches and name) I have uploaded. I am expecting my 2 nd baby in 2 weeks and am eager to make this for my kid’s room! I would really appreciate your help.Thank you again/
Hi Preethi,
The flowers- french knots and satin stitch
The stem/ leaves- outline stitch or stem stitch and lazy daisy
The little roses- looks like woven spider wheel to me
The names- stem or outline stitch
I wish you a safe delivery and happy motherhood with your 2nd child!
Warm regards,
Sarah
Dear Sarah, thank you so much for such a prompt reply and warm wishes. I will definitely send you the picture of my completed work. Lots of love and best wishes, preethi
Hi Sarah, love your site,
its like a encyclopedia of stitches, very helpful.
i keep it open whenever i sit to stitch.
Thank you !
keep adding new stitches.
Marvelous this site I`m a beginner so the instructions are
clear tku vm
Thanks from Colombia, I Love stiching ……you’re great
I have just found your blog and am blown away by the details and photography. Thank you for making learning enjpyable.
I am just learning hand embroidery and haven’t found on your blog what all I need to purchase to get started. Is there a blog that you have written that shares what type of fabric to use, which needles, what type of thread (brand, thickness)? I saw the post where you have the beautiful couching method example to the right side. That just says each stitch will give that information but I haven’t seen what types of fabric and thread I generally need to begin with. Could you direct me to the right place please? I’m looking forward to getting started. Thank you again!
Thank you for your great tutorials. I have been using them for a year or so as I have become enthralled with wool applique. I am teaching a small free demo at my quilt guild for 20 people in the future and I was hoping to use the images from your instructions on the blanket stitch. I have written my own sewing instructions but would like you use your images. I wanted to check with you to make sure you were comfortable with this. Please contact me through my email with your response or any questions.
thanks
Shirley
Sarammee…
Long time…how are you?
Oh my! It looks like pretty complicated but your tutorial makes it easy enough to try 😉
BEST site EVER. Thank you!
How do I subscribe to your ebook? When I click on the link, I get programming language. Thanks
Dear Mary,
Our Ebook is only under making. The link you clicked is not actually a link, but just a meter to show how much we have progressed in our awaited Ebook.
Once it is done, we will be announcing it and will be made available for purchase.
Thank you for the interest shown. 🙂
Sarah
Hi!
Just wanted to say that I’m so happy you are keeping up with this website. I find it an indispensable resource as I learn to embroider. Such wonderfully clear instructions and a beautiful array of stitches from around the world. I love it!
Thank you so much!
I love embroidery very much and have done many embroideries in dresses I stitch for my family. This I did with very simple stitches. Mostly chain stitch.

Hi Mahalakshmi,
Thanks for sharing this gorgeous embroidery work. It is hard to believe that it is done by hands. Wonderful! 🙂
I knew this stitch by an English magazine, some years ago.
After I learn it to elizabeth (Quitermoments blog, (closed since 2009) and Elizabeth made very many variations (and cite me) ; they are always visible on her site.
Beautiful stitch!!
Thanks!,
Hi, Anne and Sarah. Here I found the link with the variations and distortions of the indian edging stitch:
https://quietermoments.wordpress.com/2008/01/10/indian-edging-stitch-variation/
Learning indian edging stitch in my recent doll.
Thanks for your tutorials.
This is so cute!
Oh my goodness what an incredibly informative website. Your techniques and explanations are really easy to understand. You are a gem!! I do have a question though, I am a newbie, a beginner. How are you able to keep each stitch equal? Do you have any techniques for insuring proper spacing between each stitch? Unless I physically place pen or marker dots to where exactly my next needle has to go, my stitches look like they are about to get seasick. Wibblely, wobblely, all over the place. Again, thank you for your beautiful website!!
Dear Raine,
As a beginner, don’t worry if you find it difficult to space the stitches equally.
I generally suggest to draw a line or parallel lines over/ between which the stitches will be made. This maintains the size of the stitches.
Similarly, it is perfectly fine if you want to mark dots for spacing the stitches.
With more practice, you find yourself wanting to mark the dots lesser.
Aloha!
I’ve always been fascinated by the artistry that a simple needle and some thread can create. Over the years, I’ve taught myself how to knit, crochet, weave, loom knit, and even make jewelry out of beads and whatnots, and have fallen headfirst into origami, wire-working, painting…you name it! However, I have ALWAYS found myself intimidated by sewing and embroidery. My past attempts were short-lived bouts of frustration, confusion, and disappointment, (not-so-neatly) tied up in a tangle of knots and tears. I thought I had given up and resigned myself to a life devoid of threaded artistry…
…and then I stumbled upon your website. Oh, the beautiful, clear pictures! Lo, the simple, easy-to-follow instructions! Behold! Diagrams that actually make sense! If I had come across your website ages ago, it would have saved me from so many discouraging moments. I especially like how you’ve grouped the individual stitches into “families.” It’s fun to start with the “basic” stitch of the family, then branch off into its variants. It’s like a built in confidence booster! And the layout of the website just enhances the content.
So, thank you, Sarah! Thank you for giving me the confidence to finally delve into embroidery and emerge from my project with a smile and a sense of accomplishment! Keep on doing what you do, because I love it!
Aloha!
I am sorry that my response is coming a bit late. We are just so delighted to read your comment. We find a special joy when our tutorials encourage and inspire learners to take up this art. Thank you for all your appreciations. It makes all our efforts worthwhile. Please enjoy all our tutorials. There are many more to come! And, any suggestions are always welcome. 🙂
Sarah
Hi, Sarah, long time no see!
I am so glad to see this new stitch. I will learn it and show the results to you. I keep stitching dolls, so I will use this stitch on them.
Cheers!
Hi Maria,
Long time indeed!
Time just flies with so many other things in life… sometimes, I don’t realize how long it has been since the last post!
Your dolls are adorable, and I am so happy that you still refer us to stitch on them. 🙂 Please keep posting pictures of your dolls with the stitches now and then.
I am here for the first time – and I am so glad I found your site. I was looking for a good description of Palestrina stitch and I found so much more. Thank you for the good tutorials.
Nice tutorial. This reminds me of someone sitting in a Yoga pose.