
Four-Legged Knot is also known as
Puntada de Nudo de Cuatro Patas [ES]
About the Four-Legged Knot
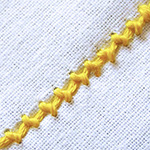
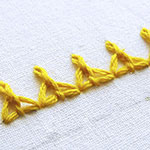
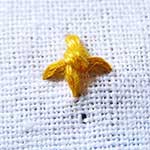
The Four-Legged Knot Stitch is a very easy stand-alone single knot stitch. It looks like a knot in the center of a cross. The legs of the cross can be made short or long, depending on how you want the effect to be. This stitch can be used as a stand-alone stitch or can be used in multiples as a filling stitch.
How to do the Four-Legged Knot
 |  |
| Fig 1: As shown, Bring the needle out from A, in through B, and out through C. Point C is at the right angle to A and B. | Fig 2: Now, take the needle under A-B without plucking the fabric beneath. Twist the thread from C under the needle as shown. When you would pull out the needle, you would get a knot over A-B. |
 | |
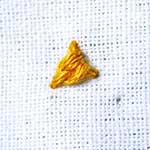
| Fig 3: To finish off, take the needle in through a point right-angled to A and B, and in a straight line to C. You get a knot with four legs. The length of the legs can be adjusted by adjusting the distance of the stitch between A, B, and C. |
Related Projects
Do you want to know where and how to use this stitch? Check out the projects below and learn more. Let’s make something beautiful today❤️

Learn the Straight Stitch along with 305 other stitches from our 600-page eBook.

Related Stitches from the Knot Stitch Family


Please give video I did not understand how you are doing
Hi Sarita. I wish I had a video for this stitch. Let me see if I can add some more pictures to make it clearer.
ilove you sarah you are very helpful .thank you so much
Hi Sara
I have tried many stitches from your site and they are all awesome. I am now embroidering a doll picture and was looking for a stitch that looks like a small dot, for the eyes. That is when i hit upon this knot. will try it out for my work. There are many people who ask me where i learnt the stitches from and I have referred your site to them. Thanks not only for sharing your knowledge with us, but also for sharing it in a very structured website with index and history. It makes it easy to refer 🙂
Congrats and do keep adding stitches as and when you innovate one or come across one.
Regards,
Dhivya
Awesome, Dhivya!
very nyc nd to easyyyyyyy..thxxxxxxx
To assist in threading a needle for hand stitching, hold the end of the thread you are about to insert in the needle about 1/4″ from the end. This stiffens the end of the thread and makes it easier to poke into the eye of the needle. If you hold the thread too far from the end, the end becomes limp and won’t go where you want it to.
Hi,
Your site is very helpful for us.
Thank u so much……..
Hi Sarah,
Your site is very helpful for me.
Thank u so much……..
Hi,
I have a blog related to sewing and other arts and crafts. I love your blog so much. It is just like a big dictionary where you can find all kinds of stitches.
I have linked to your blog several times for readers’ reference. It is grateful if you could link to my blog, too.
But no matter you link to my blog or not, I will continue to use it as my as well as readers’ reference. ^^
Hi Sarah – Your site is a wealth of information for me.
Thank you so much for sharing your skill. I was looking to sign up for a newsletter. Do you have one?If so, you can use the email address I supplied to send it – I would appreciate it so very much.
Blessings to you!!
Just located this site as I was looking for teaching stitches as I am very rusty an want to teach my grandaughter. Love your site . Thank you for putting this out there for us.
expecting a tutorial in ring knot embroidery
ME ENCANTARIA RECIBIR NOTIFICACIONES DE USTEDES GRACIAS
Wow..!! Excellent… 😀
wonderful knot…
what a simple, easy nd wonderful knot yaar ! thanks dear.