
Coral Stitch is also known as
German knot / Snail trail / Short knot stitch [EN], Puntada coral [ES], Point de corail [FR], Korallenstich [DE], Korall stygn [SV].
How to do the Coral Stitch
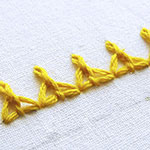
This stitch is done from right to left. The knots fall in between a trail of straight stitch. This stitch can be used for various different types of embroideries, especially in making stem patterns. I will be working on a curved stitch line to show the flexibility of the stitch.
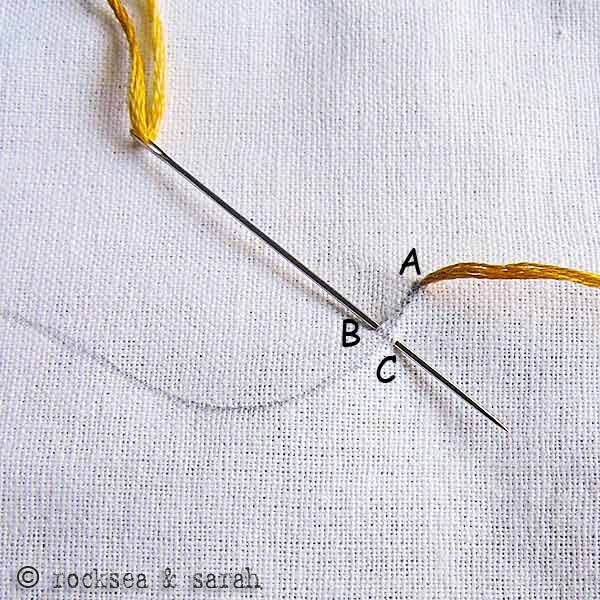 |  |
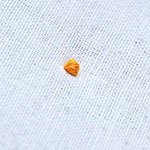
| Fig 1: Bring out the needle out from A. Put in the needle through B and bring it out from C, both which lie on either side of the stitch line. | Fig 2: Loop the thread around the needle as shown. |
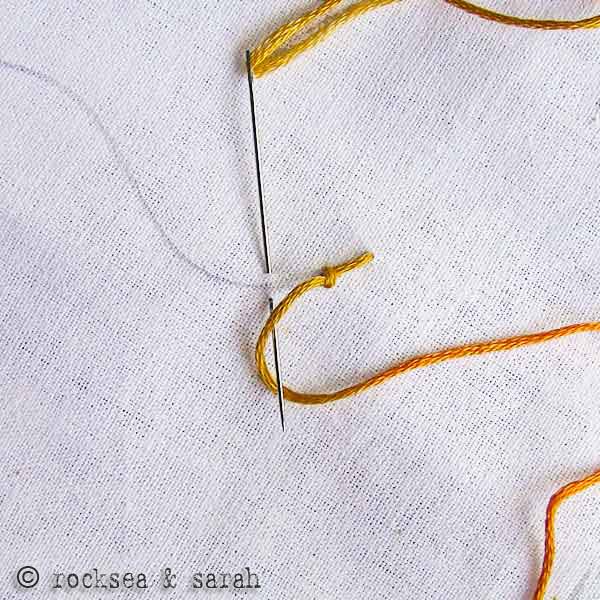 | |
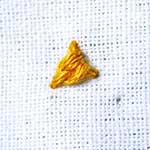
| Fig 3: Pull out the needle and you will see a knot formed. continue with the procedure of making knots. | |
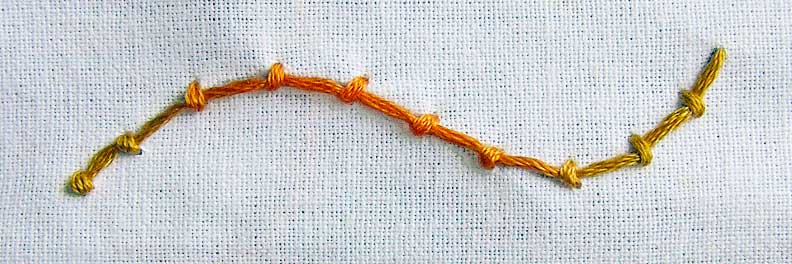 | |
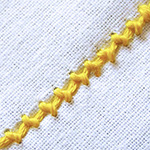
| Fig 4: A completed line of coral stitch would look like this. It gives a feeling of a thread docked down with tiny stitches. | |
Learn to do Coral Stitch in 2 minutes!
Related Projects
Do you want to know where and how to use this stitch? Check out the projects below and learn more. Make something beautiful!

Use this stitch on a pattern
Visit and Subscribe to Sarah’s YouTube Channel
Learn 306 stitches and find many more guided patterns in 600-page eBook!

Related Stitches from the Knot Stitch Family


Deer Sarah,
I am picking up embroidery again after many years of being away from it. It’s so enjoyable and almost meditative for me. I wanted to thank you for your site and for being so generous with your knowledge. There are many I remember but also many new ones that are exciting to learn and put into a piece of embroidery. I have looked at a few other sites but I always end up coming back to yours because your instructions are so clear and easy to follow, so a HUGE THANK YOU for that. It really makes a difference to one’s mental state, it creates positivity and a knowledge that you can do it, even if it seems complicated!!
I was wondering if, anywhere on your site, you talk about the various threads. I only have floss at the moment but have bought some DMC Perle 5 online as I notice that many tutorials are done with this thicker, single thread. So, what I’m wondering is how to know when to use which type of thread? Also, if using floss, when to use all 6 strands and when to use less and how many?
Lastly, have you said anywhere how to compose a design. Learning all the stretches is wonderful and satisfying but it would be made even more so to be able to design and stitch something of my own. I’ve seen many with wreathes and some with writing etc and have tried to do the odd one or two but the spacing never seems to be right because stitches always seem to take more space than you think they will. Although that probably also has to do with how many strands of floss is being used? Sorry I’ve asked so many questions but I get like that when I’m excited, which is rare as I have depression, something that stitching seems to help. A massive thanks to you from a very grateful follower.
Apologies for the typo’s (Dear, stitches etc). It would be so good if one could edit one’s comments 😬
Dear Angela,
What a delight to read your message! I am so happy to know that you are rediscovering the joy of hand embroidery after being away from it for a long time. I feel honored that you come back to our pages at the end of the day!
Threads:
About threads, yes, I do briefly talk about the different kinds of threads. Check this link and I hope they help:
Types of embroidery threads: https://www.embroidery.rocksea.org/reference/glossary/embroidery-threads/
The thickness of threads: https://www.embroidery.rocksea.org/reference/for-hand-embroidery-beginners/how-many-strands-to-use/
I keep updating the pages with new information now and then. I might update the one on the thickness of threads sometime later.
Designs:
Making designs and patterns can be challenging for some. So, I encourage my learners to dare to take the marking tool and go for that first stroke. The 3 Stitches At a Time project aims at that. It encourages you to draw simple patterns and stitch using the guide and videos.
Here is the page: https://www.embroidery.rocksea.org/projects/3sat-patterns/
Of course, they are very simple patterns, but I hope they will lead you to create more ornate ones.
Do not shy away from asking your questions. I would only be happy to answer them! Do share some of your works here, and maybe I can look at them and suggest improvements if required. 🙂
Keep stitching and enjoy the process. Always here to guide you!
This is a lovely place to learn – your instructions are much clearer than any I have found. One question (well for the moment anyway) – is it possible to do this coral stitch on a hoop or only if you don’t have the fabric in tension?
Thank you for you time in advance – much appreciated.
All best,
Sandra
Hi Sandra,
Thank you so much! 🙂
Of course, you can do the Coral Stitch with and without a hoop. The amount of fabric you pluck with the needle is just a little (stitch B-C). Even if the fabric is in tension, it should not be uncomfortable for you to do that little plucking. I hope this answered your question. 🙂
It’s fantastic to embroider, very good! Thank you
Thank you, Maria. 🙂
When I was in 5th grade my teacher taught us, students, how to embroider a few stitches. This was one of them but she called it the short knot stitch. I have been looking for instructions for it for a long long time. I am glad that I have run on to this tutorial. I plan on getting the ebook as soon as I possibly can. Now that I know what it is also called I can pass on the instruction to some young girls that I am going to start teaching them how to embroider. I want to broaden their horizons…, Man that was many many moons ago that I did this. Thanks again, I needed the refresher. I wish I had a picture of the project, but that has been so long ago and all of the stitchings are in storage somewhere…
Dear Sandra,
I am so glad that you found the tutorial to this stitch. And, I found a new alternate name to this stitch, thanks to you! 🙂 I hope you are keeping fine. Are you still teaching embroidery to young girls?
Warmly,
Sarah
P.S. How awfully late can I be sometimes to respond!
Sarah,
Thank you for posting such amazing tutorials! I have been looking for this stitch for quite some time now, and I was able to find it though your picture reference guide! Keep up the awesome work!
Olivia
Awesome! So nice to know, Olivia! 🙂
Dear Sarah,
I really loved your tutorial alot, it has inspired me to start my stitching again as i had learned few stitches before but here i get to learn many more which is interesting and wonderful and i have tried on my rida too which gives an awesome look 🙂
Thanks for such an easily understandable tutorial 🙂
Thank you, Mubaraka. I invite you to share some of your hand embroidery work here for everyone to see and get inspired! 🙂
Dear Sarah
I had been doing stitching as an amateur since last 5 yrs. However recently I have decided to gift my husband a “Panjabi” (as I’m bengali) on our first wedding anniversary.
for the same I started searching the web and came through ur site. its awesome. I really appreciate the work done by you.
However could you pls help me to complete the work? I have purchased silk as the fabric.
Please help
Thank you for your words, Saswati! Silk threads work great on Silk fabric. You can also try 2 or 3 strands of stranded cotton floss. I hope this helps!
this tutorial is much easier to folow than another I tried! thank you, this is such a wonderful site.
Awesome! Thank you, Laura! 🙂
muy lindo, so nice!
Thank you. 🙂
I’m an embroidery beginner, am just starting out.
Your blog is so interesting, but it would be very helpful to have examples of where/why you would use a specific stitch/knot, because some of them are so similar. It’s very informative to know all the stitches/knots, but I don’t know what difference it would make to use a specific one!
Dear Karen,
I can understand your need for examples to know how to use certain stitches. Most of my stitch pages give an introduction on how and what type of embroidery/where could each stitch be used for.
I am working on providing examples for each stitch too, but it will take time…I hope you bear with that. In the meanwhile, I can suggest you to refer other sources/websites to provide you with an idea and example for these stitches.
As you stitch more, you will understand how each knot can make slight visual differences and the different ways it can be used in for a variety of embroidery.
tQ..this tutorial helps me a alot 😀
Glad to hear Echa 🙂
Dear Sarah ,
i am a beginner and passionate to use needle and colourful threads . i am so thrilled to follow your pages to make my hobby more enjoying . I am from India . Today i studied that fern like stich and coral stitch. thank you so much for your tutor style. thanks Sarah ! May God be with you and your precious ones .
love
cincy
Dear Cincy,
I am delighted to know that you are finding our pages nice to follow and learn, more since you are a beginner. 🙂
If you ever use the stitches learnt here on any creation of yours, feel free to upload them on our website using the function given below the comment box. This will inspire many other beginners.
this is really wonderful and much easier to create on my dresses.i’ve been appreciated for this simple stitch which i just used as a collar design.all the credit goes to you.thanks a lot and please do keep giving us such wonderful tutorials.
Wow Brinda,
It really makes us happy to know that you have been appreciated for your work that you learnt from our pages. Thanks!
If possible, you can take a picture of it and upload it using the option below the comment box. It will not only serve as a sample, but also inspire many others who learn this stitch. We would also love to see it. 🙂
thanks for the tutorial..it got me started. i will need some practice to get to your level though…thanks again
Dear Durga,
We are happy to know that you are finding our pages good. 🙂
There are some embrodiery lessons (more to be shared) too, so that you can learn how to use these stitches and find them more interesting to use. Using these stitches in embroideries will bring you up to a good skill level. So, best wishes!
🙂
Nice embroidery
this reminds me of the knots i used to make out of dry twigs…good one!
snail trail indeed!