

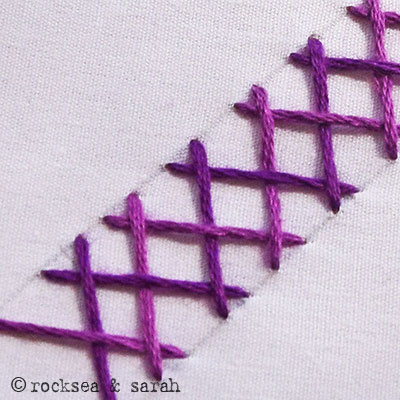
This stitch is beautiful, made by weaving over the Double Herringbone stitch with another thread of same or different color. Interlaced Herringbone Stitch forms one of the main stitches for two traditional embroideries called the Kutch Work and the Armenian Marash Work.
You need to know the Double Herringbone Stitch Variation 2 to be able to continue with this tutorial. This tutorial is best understood by following the illustrations, without much dependence on the description.
 | |
| Double Herringbone Stitch Variation 2: First, make a row of the Double Herringbone Stitch- Variation 2 as the base. | |
 |  |
| Fig 1: Bring the needle out with a contrasting colored thread from the left corner of the double herringbone stitch row. Take the thread over and then under the Herringbone Stitch as shown. | Fig 2: Go around the intersection as shown. |
 | 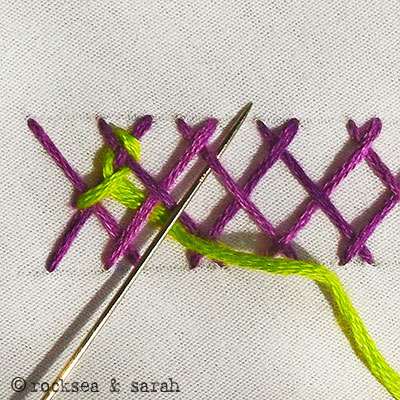 |
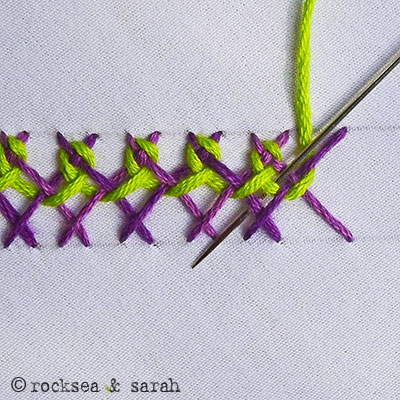
| Fig 3: Make a note that the needle has been going over and under the herringbone stitches alternately. When you reach this step, you have to go under both the working thread and the herringbone base. | Fig 4: You turn and repeat the process. Go over and under the herringbone base threads alternately. |
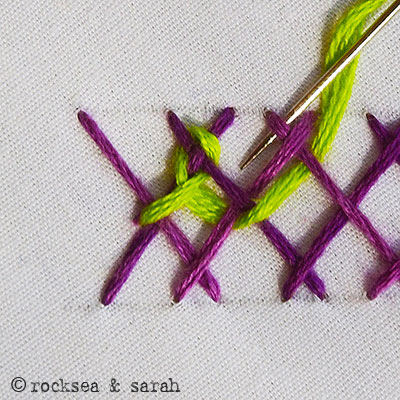 |  |
| Fig 5: Turn around and keep with the weaving motion. | Fig 6: Again, pass the needle under the working thread and the base. |
 |  |
| Fig 7: Keep up with this process until you reach the end of the row. You have been filling the top of the row so far. Now, you will be turning around and weaving around the bottom. | Fig 8: To turn around, pass the needle over and under the herringbone base stitches as shown. |
 |  |
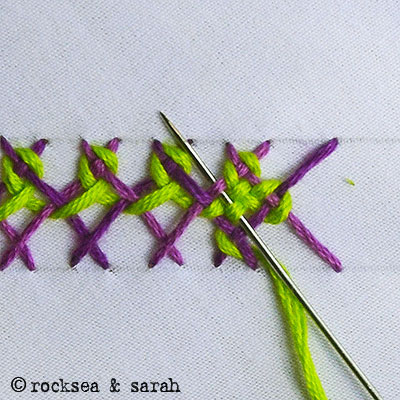
| Fig 9: Now, note that you will pass the needle over the herringbone base stitch, and then under both the working thread and the base stitch. | Fig 10: Next, turn around taking the needle over and under the intersection as shown. |
 | 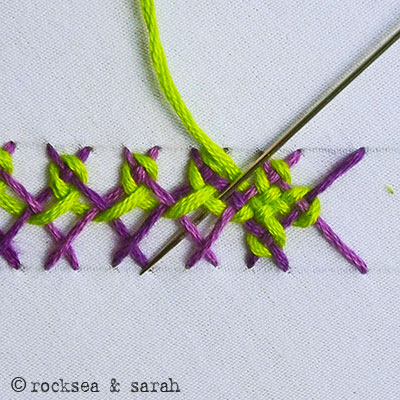 |
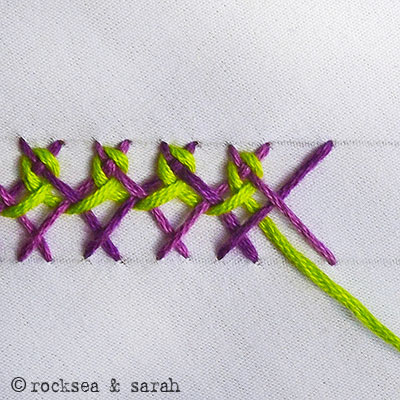
| Fig 11: At this point, you will simply take the needle over and under all the stitches along the path to complete the weave for that small section, before moving on. | Fig 12: Repeat the process by taking the needle over the herringbone base, and then passing under the working thread and the herringbone base stitch. |
 |  |
| Fig 13: Keep repeating the process until the row is all woven. When you reach the end, you pass the needle into the same point from where you began and knot it up on the reverse of the fabric. | Fig 14: The weavings will look like this. |
 | |
| Fig 15: This stitch might take some patience at first, but it is totally worth it! |


Hi. Have you used three strands for both colours or is it six?
Hi Lola. I have used 6 strands for both.
What a lovely tutorial. I very much enjoyed reading this looking at and analysing the pictures. I intend to use this stitch along the center line of a St Birgitta Cap. however, I think I will cheat a little with the construction and add this central embroidery stitched as a seperate piece and then hand sew it into place, as I fear doing the embroidery along 2 curved pieces of fabric might just be a challenge too much for my skills presently, especially as counting threads between stitches wouldn’t be an option.
Thank you for providing this very detailed source, this is so very much appreciated.
Hi Renata,
I am so glad that you liked this tutorial page. I think this is one of the more difficult stitches to explain successfully. So, your comment does mean a lot. ❤️ You are welcome to share a picture of your work here after it is done.
hey.. can i join u on fb?
Hi,I would like to request you to post some more designs of interlaced herringbone stitch.I am heartily waiting for it.Thank you so much.Love you and your inspiring work.
Hi ..I have learnt some stitches from your tutorials.These are really nice and beautiful. Hand embroidery is one of my hobbies and your tutorials made it more intersting.Thanks a lot.
Sure, you can join me on FB , Sarah! Thank you very much!
merci beacoup pour tous vos explications à ses jolies points je ne sais pas l anglais c est pour cela j ai ecris en francais
Thank you for this wonderful tutorial, it’s exactly what I was looking for. What do you use to mark your lines on the fabric? I’m having trouble finding the right type of soluble fabric pen. Thank you again! -Megan
Dear Megan,
I have used pencil to mark my fabric. It gets washed easily. 🙂
Dear, Sarah
Thanks
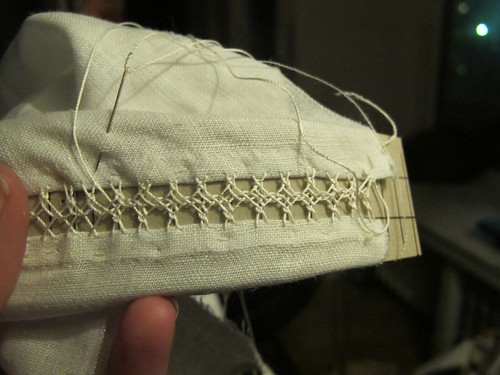
I tried this stitch and after couple of my mistake it came out really very well.I think it needs a lot of patience to complete the stitch. Well once again the pics of the kurti for your opinion.

Dear Gurmeet,
I think the interlaced herringbone stitch has come out real perfect! 🙂 The color combination is nice and I appreciate your patience.
This stitch indeed requires some patience and effort to learn. So, if you feel the tutorial I have put up can be simplified in any way, I woudl welcome any suggestions.
Dear Gurmeet,
We are working on an E book with illustrated tutorials of 200 and more stitches. We want to feature some samples from our readers as well. Your work looks really nice. If it is okay with you, we would like to consider using the image you have uploaded in this page to feature in our E book. All due credits will be given. Please let us know.
It will be great if you could retake the picture of this work and send it again to us on high resolution. This picture looks a bit smudged.
Best regards,
Sarah
Dear Sarah,
Waiting eagerly for the E-book.
I will surely resend the pics.
this would look really nice at the front of a top to reat a waterfall effect over a large tummy like mine. I hope i can do this ill give it a go. you make it look easy. i bet its not though.
Dor
this would look really nie at the front of a top to reat a waterfall effect over a large tummy like mine. I hope i can do this ill give it a go. you make it look easy. i bet its not though.
Dor
me encanta el arte de bordar…tejer….mover las manos…
In Pakistan this stich is called Sindi Tanka
Love it you have describes it so well
Very useful site. I’m learning many things from here. Thank you for such wonderful tutorials.
🙂 Glad to know Ivy. Thanks.
Just discovered your fabulous website! What wonderful tutorials – you make them look so simple. Can’t wait to have a try!
🙂 Thanks Jane. Happy that you liked our pages.
Sara
Again thanks for your tutorials. I have tried Redwork with the design you have given for the blue work tutorials. The result was wonderful. Since my internet connection is very slow i was not able to upload it in your site. I have uploaded my redwork embroidery in my blog in the following link. Please have a look.
http://shamiatcraft.blogspot.com/2011_09_01_archive.html
I have tried herringbone and fly stitches too. The samples are uploaded in my blog.
Shami Immanuel.
wow! Shami, your red work using the blue work pattern is really neat and has come out well. 🙂 It is really nice to see it and wished if you could share it with others on our website.
I also liked the other embroidery work you have been trying out. 🙂 Do keep stitching and sharing with us.
I wish I could know if the tutorials helped you in this stitch! 🙂