
Herringbone Stitch is also known as
Mossoul stitch, Plaited stitch, Catch stitch, Witch stitch [EN], Punto de escapulario [ES], Point de chausson [FR], Hexenstich [DE], Ponto espinha [PT], Flätsöm [SV].
How to do the Herringbone Stitch
This is the basic Herringbone Stitch made of crosses not cut exactly in the middle but in quarters. The Herringbone forms the base for many embroideries across the word. It can also be easily incorporated onto aida fabric. I will be working between two parallel stitch lines.
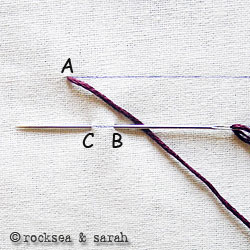 | 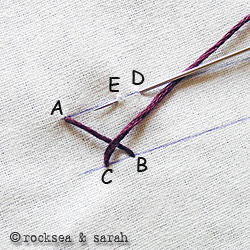 |
| Fig 1: Bring the needle through the first stitch line at A. Take the needle in through B, which lies diagonally across A on the second stitch line. Then, take the needle back through C, which lies near B. | Fig 2: The same procedure will be worked on the first stitch line. Take the needle diagonally across to D and bring the needle back out through E. |
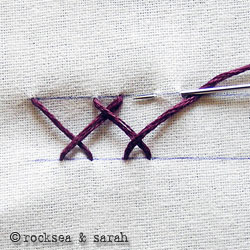 | 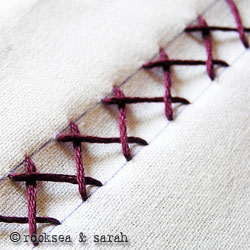 |
| Fig 3: Continue to make such crosses on both stitch lines alternately. Ensure the diagonal stitches are parallel to each other to bring out the best look. | Fig 4: A finished sequence of the Herringbone Stitch would look like this. |
Learn to do Herringbone Stitch in 2 minutes!
Use this stitch on a pattern
Visit and Subscribe to Sarah’s YouTube Channel


Sarah, I purchased one of your books and can’t find the directions for downloading it. Can you point me in the right direction? (Sorry to hijack comments!)
Hey Lillian, we have emailed you the purchase details with the download link once again. Could you check your mailbox junk folders too? Let’s know if you got it!
THANK YOU!!!
You just saved me on this wedding dress with stretchy fabric that needs a hand stitch applied. Your instructions and pictures are very easy to follow.
😘
Blessings from Dallas TX
Hi Jamila,
It is so nice to read your comment. So happy that this page was helpful to you. Makes my day!
Love,
Sarah
What is the ratio of length to width for this stitch?
I plan on using it for a shirt placket which is about 1cm wide.
Hi Kathrin,
There is no fixed ratio to the herringbone stitch in hand embroidery. You can make it as narrow or as wide as you wish. I, personally, use, roughly, a width-to-length ratio of 1:1. So, if my stitch is 1cm in length (height), the width (on the wider side) would be 1cm.
If I were to mark my fabric before stitching, I would mark at every 0.5cm distance on both the parallel lines. When stitching, I would see my herringbone stitches leaving every alternate dot between them. Hopefully, my explanation has not confused you. Let me know if it has worked for you. 🙂
Muchas gracias por compartir tus tutoriales, son muy buenos, muy didàcticos.
Gracias, Pedro. Estoy tan feliz de que te esté gustando aprender de nuestras páginas.
Hi Sarah, I am keen to know the history of Singalese stich. Does it have any connection Sinhalese? Thanks
Hi Ashley,
Yes, this stitch is used in traditional Sinhalese embrodiery. Usually, the red and blue threads are used on either side to intertwine between the open chain stitch.
Hey used this in school thanks really helpful. your amazing have a good day✨
That’s awesome. ❤️
I love being able to see each step in making these stitches but I would love a hard bound book of all your instructions. I have to constantly bring the instructions up on my phone or computer. Do you have any publications of your stitch instructions?
Hi Judie,
Thank you for your interest shown. As of now, we have just the eBook. It is a 452 pages book and will take time to bring out the printed version of such a big book. The digital version will require you to use the phone or computer, but is designed in the form of a printed book. Also, you can use it even without internet and carry it around in your mobile phone or tablet! 🙂
Thank you for your response, Sarah, I will most likely try the e-book but was curious to know if there might be a hard copy available. Your explanations are so clear and your pictures so helpful , I can learn a new stitch fairly easily. Right now I am trying the color wheel sampler and having great fun with it. Thank you again for your help.
u r tutorial is soooper .i learnt many stitches from u .and took print out of all kinds of embroidery
Thank you, Lakshmi! 😊
Sarah… Your tutorial is wonderful…. It’s really really awesome… It’s easy to understand n work out… Thanks for ur website.. I’m jus a beginner I feel very happy for this wonderful tutorial….
It’s wonderful to know, Saha! 😊
Thank you for these tutorial, we’ve been looking for tutorial on how to do the stitch and the steps of it. Because our homework is to give the step-by-step on how to do the stitch w/pics. Actually, its not me who found this but my partner. We started searching for tutorials of the stitch last Friday, and finally we found this tutorial, we are so happy when we found this. Thank you very much, if you didn’t do this tutorial, we are so dead in our homework. Thank you again😀
Hi Gia, it’s great to undergo that our tutorials helped in your assignments! Happy! 😊
THANK YOU………… 🙂
BECAUSE OF YOUR TUTORIALS I DO ALL MY HOMEWORKS
Hi Mejaila,
It’s nice to know. It’s a pleasure to make these tutorials.