

How to do Flat Stitch
This stitch has technical similarities to the fishbone stitch and the opened fishbone stitch. The difference is that this stitch cannot give sharp ends, and therefore, is not ideal for leaves with tapering ends. Instead, this is one of the best stitches to fill in flower petals.
I will be working on a petal-shaped pattern to demonstrate. The pattern has been divided into four by two lines inside. The lines are called A,B,C and D.
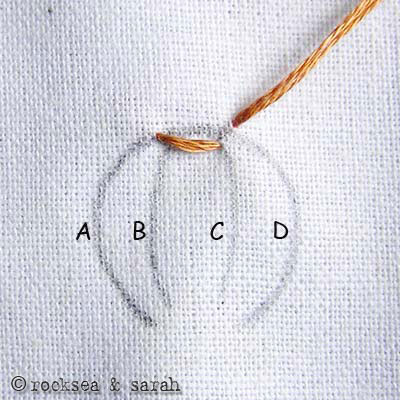 | 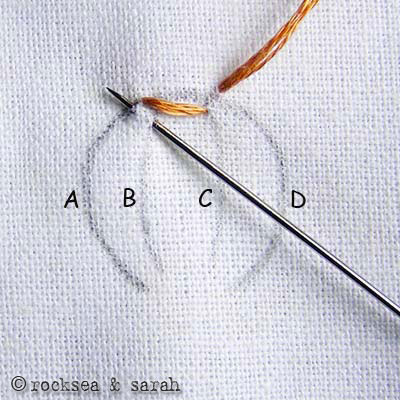 |
| Fig 1: Bring the needle out from line A and put it in through line C. Give it a slight slant, but not too much. | Fig 2: Bring the needle out through line D and put it in through the line B. Again, bring out the needle through A and continue the procedure. Remember to keep the stitches close to each other. |
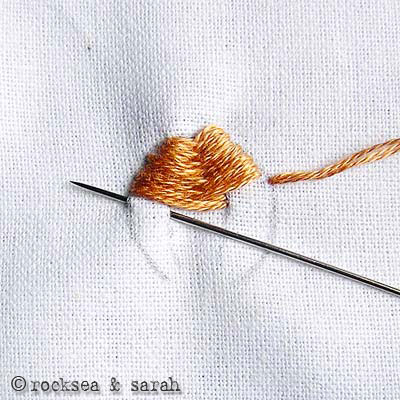 | 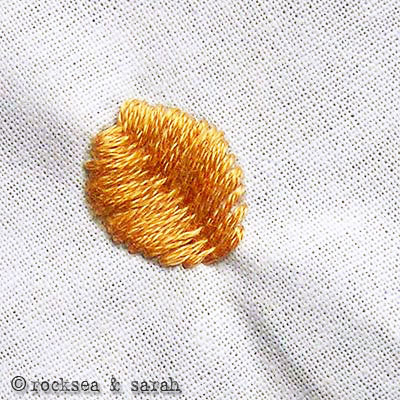 |
| Fig 3: The trick for a neat pattern is to keep the points on A and D parallel with each other. Similarly, keep the points on B and C parallel to each other. Halfway through, our pattern will look like this. | Fig 4: The completed pattern will look like this. |


Hi, I just sent a msg on hangouts but maybe this will be faster. I like this stitch and want to visualise what a red cross (as in the medical red cross) would look like in this style. Can you help at all? Thank you kindly
Dear Sarah,
Your embroidery web site is a boon to anyone who wants to see clear photos of so many stitches. I am particularly grateful for the Index of stitches you provide. This makes it quick and easy to find the stitches I’m looking for. And because you’ve grouped the stitches in “families,” it helps make all the stitches much easier to get a grip on. Keep up the great work! And thank you!
C. Murphy
Thank you so much Carole. So, glad you like our pages.
Sarah,
I just want to say thank you, I have been searching for a site that has just what you have on your site.
I have just started using different stitches on some new designs that I am creating, nothing really fancy but I think I am
on to something.
Thank you so much !!
Misty
Have a fabulous day !
Hugs
hai
I gained a good knowledge from this.but a small request miss.sarah can u pls explain in detail through video pls bcoz cant understand in detail.thats it .I hope you will fullfill this miss sarah .thankyou
sorry I hav typed this in urgent so pls to agree with my words.
Dear Arsha,
We don’t do videos of embroidery tutorials…and it is not in our plan in the near future. Sorry about that. But, if you need videos, there are some good sources if you google. Please try that. 🙂
Thank you so much Sarah! I am so looking forward to trying out all these beautifully explained stitches. Tried the Wheatear and lazy daisy together and the effect was mindblowing. Thanks to your detailed and easy to understand tutorials!! Keep up the good work for beginners like us, you are such a blessing 🙂
the sitich is little cofusig
Dear Alifia,
Just let me know at what point or which illustration you are finding the confusion. I might be able to guide you.
I tried with this stich. Thankyou for step by step tutorial. It was easy to follow even for a novice like me. How does the reverse side look usually?
I asked so since I saw one of my dresses done with hand embroidery. The stitch looked similar to flat stitch but the reverse side showed only stitches similar to the running stich.When I tried flat stitch the reverse side also had lot of thread showing. Was I wrong somewhere? Or is there any other stitch similar to this one?
By the way a very happy advanced b’day wish to cute lil one.
Many thanks in advance for your reply.
Dear Leema,
Happy to know that you were able to follow this stitch.
Don’t worry, you have not done the stitch wrong. The satin stitch family usually takes a lot of thread on either sides of the fabric.
The stitch you have on your dress could possibly be the ‘herringbone stitch’. I am yet to post the tutorial for it. Technically, it is done in a different way, but might give a similar visual effect. The reverse side will just be the outline of the pattern being filled- running or back stitch, which is what you probably might be seeing.
🙂
Thanks a lot for your wishes. We are travelling tomorrow and it is going to be a long adventure for Pratyahara.