
This stitch is used to fill in simple patterns like leaves. It uses the same technique as the Cretan stitch with each stitch close to each other to fill in gaps.
If you know the Cretan stitch, it will be an advantage.
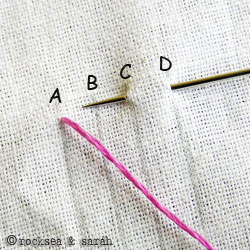
I will work between four stitch lines to demonstrate this stitch. Each stitch line is named A, B, C, D.
 |
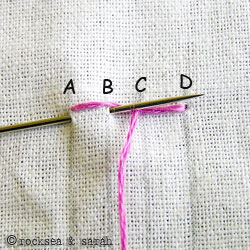 |
| Fig 1: Bring your needle out from A, taking it in through D and then out again through C. All these stitch points lie in a straight line. Keep the needle above the thread, as shown. | Fig 2: Now, take the needle in through A and out through B, keeping the needle above the thread. A and B would be in a straight line. |
 |
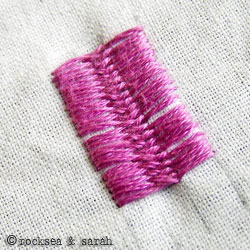 |
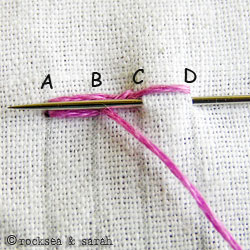
| Fig 3: Keep up with this process of taking the needle in through the outer stitch lines and back out through the inner stitch lines, keeping each stitch point adjacent to each other. | Fig 4: The final result will be as shown. You can see a braided effect running through the middle of the entire filling. |
 Sarah has been researching and sharing hand embroidery lessons for over 18 years, making it accessible to everyone around the globe.


Im trying to think of the name of that Pennsylvania Dutch back east guilt pattern stitch; are the quilt designs using a simple stitch? Thanks. (what do you think of modern quilt patterns and quilts made on sewing machines?I know the handmade quilts used a very simple stitch I think.—Some of those machine made quilts are beautiful but I still prefer hand sewing.–I think you can tell the difference, I was a small part of a group making an immense “group quilt” and I really liked doing it that way. Thank you!!
Dear Doreet,
My response comes late as I was away from my studio for a good couple of weeks.
My understanding is that the Pennsylvania Dutch Back East Quilts use the simple Running Stitch and the Blanket Stitch on the appliqued motifs.
My take on modern quilt patterns- I think it is a part of the evolution of quilt patterns and its great. Quilts carry a lot of stories and history of its times told through the motifs and patterns. For instance the Kantha quilts of India were made by women and they would make patterns inspired from their daily lives and chores. Now, those old worn quilts serve as ‘history books’ showing us how women lived in those days. Of course, the patterns have evolved today and though the same stitches are used, the patterns are dratically different to suit these times.
Hmmm.. about quilts made on sewing machines…well, I would prefer the ones made by hands. Hand made quilts might be simple, but it carries a charm that none of the fast spinnign machines can replace. Maybe the finish is better on a machine made one, but I am always a sucker for hand made stuff and I love the little imprefections that screams that it was made by someone who spent time on every little stitch!
I am so glad that you dropped by! I don’t quilt though I dream of it many times. 🙂
its a true tutorial for learning stitches…..
ciao Sarah come devo fare per seguire il tuo meraviglioso blog?
I found your website while searching for help to make leaf motifs for my crazy quilt squares I am working on. The first of your lessons I found was on the raised fishbone stitch, it was terrific! I decided to look at all of your tutorials, and I must say to you that you really should publish a book! I have numerous books I have bought, and your tutorials are as informative, and often more clear and easy to follow. I know if you had done that we would not get the benefit of learning for free; but when I see something that is really so helpful, and kind of you to do, I have to say what I think. Again, thank you so very much!
Regards,
K
Dear Kan,
Your comment is appreciated and very encouraging.
After a considerable amount of demand from students, we have started to work on a book, finally! 🙂 But, travels and pregnancy keep me unpredictably slow.
If you have any suggestion that can help me build up the book, it will be great. Thanks for the interest shown. 🙂
How do you mark your fabric before you begin a pattern? I want to try embroidering a blouse, but don’t know the process to prepare the fabric.
Dear Anna,
If you want to do a free pattern on your fabric, use a pencil or a tailors chalk to make the design. You can use any other similar source with removable ink.
If you want to trace a design, do it using a carbon or tracing paper.
I hope this helped. 🙂
Ah, so simple! Thank you!
Excellent!
I will use it my embroideries!
Would love to see your embroideries Natasha. 🙂