

Twisted Chain Stitch is also known as
Punto de cadenete retorcido [ES], Point de chaînette tortillé [FR], Gedrehter kettenstich [DE], Punto catenella ritorto [IT], Ponto de cadeia torcido [PT].
How to do the Twisted Chain Stitch
In this stitch, each loop in the sequence will look like the ‘red ribbon’. To achieve this, we always put in the needle on the left of the previous stitch point. This slight ‘dislocation’ of the needle towards the left twists the base of each loop. Follow the procedures for clarity.
For ease of lessons, I have used a straight stitch line. Knowledge of the Chain Stitch will be an advantage. It will help you to note how this differs from the basic chain stitch procedure and thereby helping you to understand the logic of the stitch easily.
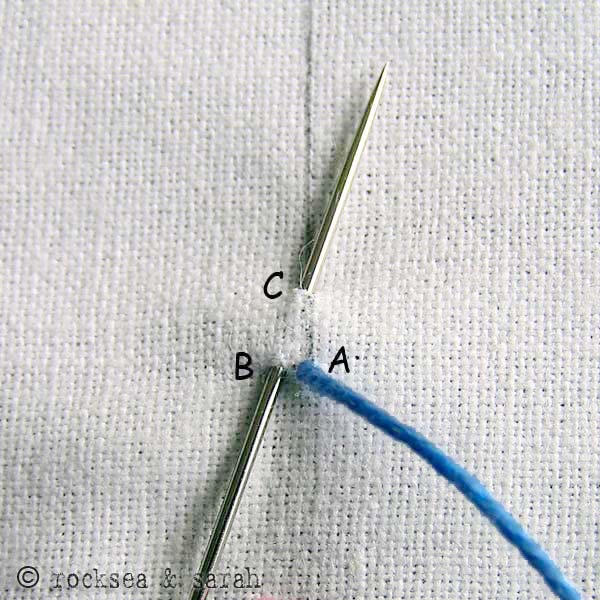 |  |
| Fig 1: Bring the needle out through A, which lies on the stitch line. Now, put the needle in through B, which lies towards the left of A and bring it out from C. C, again, lies on the stitch line. | Fig 2: Now loop the thread around the needle as we would in a normal chain stitch. |
 |  |
| Fig 3: When the needle is pulled out, we get a twisted loop as shown. | Fig 4: For the next loop, instead of putting in the needle in C as we would normally in a chain stitch, we would put it in through a point D. D lies horizontally left of C. Continue this pattern of stitching. |
 |  |
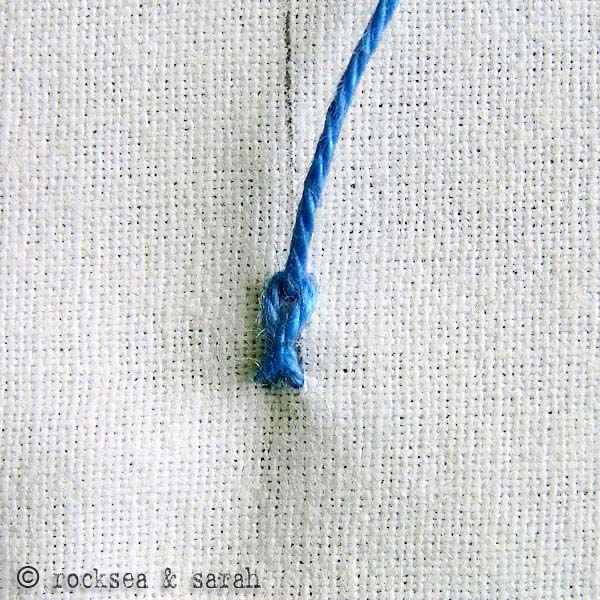
| Fig 5: A finished line of the Twisted Chain Stitch would look like this. Remember that only alternate alphabets would lie on the stitch line. For every new loop, the beginning point would be on the immediate left of the previous loop. |


Que facilidade você tem pra tornar o trabalho viável. E lindo!!! Obrigada, amei essas aulas. Abraços! 🇧🇷
Thank you, Irene. 🙂
Ik ben heel blij met de uitleg dankjewel 🇳🇱Ellen
Thank you, Ellen! ❤️
Hi!
This is awesome! I had been looking for something like this for a while. Thanks so much for your excellent work!
This is my second favorite stitch because I like the arrangement and it’s really attractive
Thanks for the lessons, Sarah!😆
Dear Sarah..u are doing a wonderful job. I am an a great fan of urs. I have recommended ur site to many of my friends who are interested in hand embroidery..may God bless ur family.
Me gustaria tener patrones de diferentes puntadas para hacer bordados para bebes.
Gracias
Un saludo
This is so amazing. I have been searching for something like this. Thanks 🙂
Hello Sarah
You have done a great job.Honestly speaking you have explained every thing A-Z, simply. Thank you so much. This really helped me with couple of new patterns.
x x
thnx a lot sarah.ur sashiko lessons r really great.shld try it soon .
ur works r awesome dear
i know nothing abt embroidery.but ur works turned my interest in embroidery.and now ppl appreciate my works.and credit goes to you.thanksssssssssss a lot.
for this twisted chain stitch how many strands shld we use?pls say me.in this tutorial what thread u hav used?it luks pretty nice
Dear Bharghavi,
I have used perle cotton thread to do this illustration. Mayeb you can use 5 or 6 strands of anchor thread to give a similar effect.
your tutorial is awesome..i could learn a lot new stitches…thanks sarah..
Thanks Shwetha. 🙂
I have been looking for a site like yours for 2 years. Thanks for all of the beautiful, well-explained tutorials.
🙂 You are always welcome Aimee.