
Open Chain Stitch is also known as
Ladder Stitch, Square Chain Stitch, and Roman Chain Stitch [EN], Punto de cadeneta abierto [ES], Chaînette ouverte [FR], Offender kettenstich [DE], Punto romano [IT], Ponto de cadeira aberto [PT].
How to do the Open Chain Stitch
This kind of chain stitch gives a ladder-like appearance. It can be used to pin down or couch down threads and ribbons. Various embellishments can be done between the spaces created in the ‘ladder’. This stitch is worked on two parallel lines, rather than a single line as in chain stitch. So, if you may want, you can draw two parallel stitch lines with a pencil or washable ink before starting the practice.
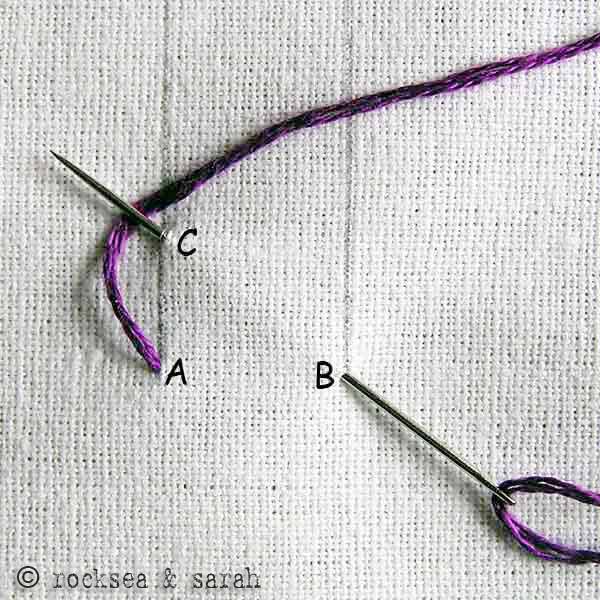 | 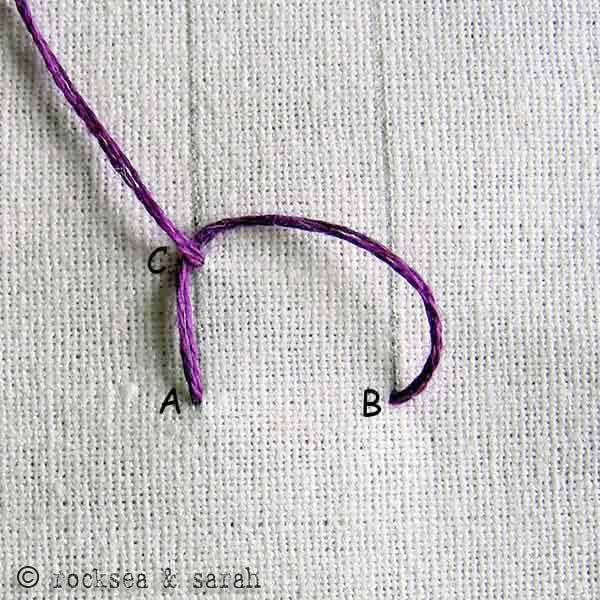 |
| Fig 1: Bring the thread out through A.Take the thread in through B and bring the needle out through C but don’t pull it out completely. | Fig 2: Loop the thread around the needle, as you would for chain stitch, and pull out the needle. Be careful not to tighten the loop too much. |
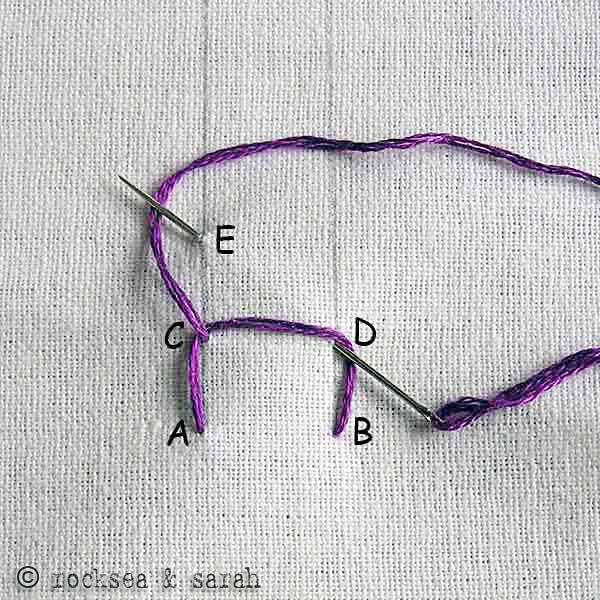 | |
| Fig 3: Take the needle in through D and bring it out through E. Loop the thread around the needle and pull it out for the next ‘step’ in the ‘ladder’. Keep the loop loose enough to accommodate the needle for the next ‘step’. Making the loop too tight will pull the thread and fabric to distortion when you try to put in the needle for the next step. | |
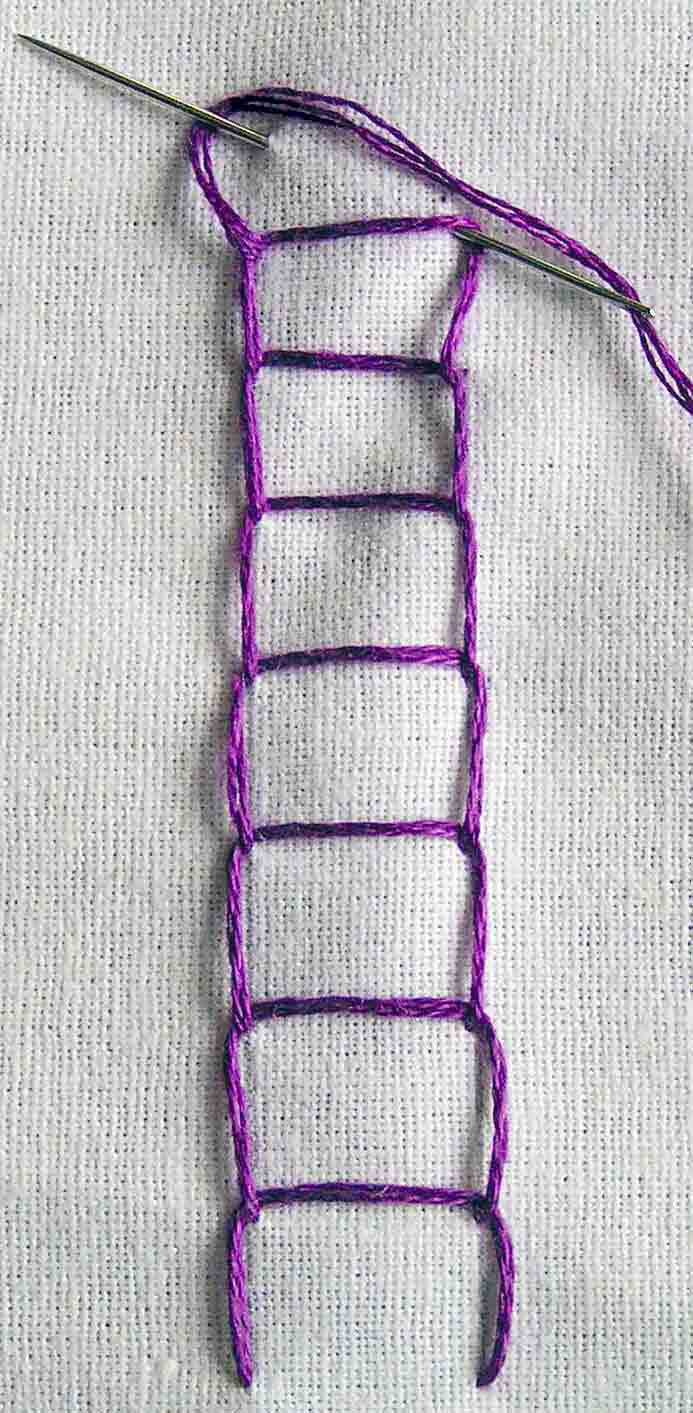 | |
| Fig 4: Continue with the action of looping pattern to give a ladder like appearance |


I am really having a tough time learning this stitch. I’ve watch and watched video tutorials and just can’t learn it. I can’t get the stitch’s to lie down properly. Hope this non video tutorial will help. Fingers crossed
I hope so too! Let me know if it did. I missed to add the last photo on how to end the stitch. But I am sure you will figure it out! Let me know that too. 😬
Phew, thank you, I was puzzled and my brain was hurting trying to decipher this from Embroidery Stitches
😄😄. Thank you, Victoria. Glad that our tutorial helped.
Thank you for this great stitch tutorial.

Hi Maria,
The way you have used this stitch looks inspiring! I am happy that our tutorial helped you. 🙂
Thank you.. I had difficulty with twisting of thread and the stitch keeping in place, while using variegated silk thread. So I worked the open chain upside down, starting with 2 posts. I happened to place the needle from left to right under the ‘posts’ and found the thread didn’t twist as much. The colours are pale orange, lemon, green, lime,etc.. The other shades don’t seem to give me as much bother with thread unravelling..
Thank you, Jan. This is a great tip for those who might be facing a similar problem during this stitch. 😊
Thank you for a great explanation. I was looking online for a similar idea and really appreciate it
I worked the open chain stitch on this design.

Though there are some gaps at the thread endings I was happy to use the newly learnt stitch. Please give your comment. Thank you.
Hi Anuradha,
Very beautifully done! Thanks for sharing. 🙂
Thank you Sarah. Your tutorials are very helpful.
Thank you so much. I needed a reminder and u r the best!
HAI
IT IS VERY EASY TO UNDERSTAND EACH AND EVERY STITCH THAKYOU SO MUCH
Dear Sarah,
Thank you so so much for these pictorial tutorials!
I haven’t embroiderd in years and am busy making a felt iPad cover for a friend with appliques. Your stiches is ensuring that the cover is elevated to something truly beautiful and unique!
Dear sarah, thanks for the detailed description of each stitches. I will suggest all my friends to see this site.
Thanks Krishna. 🙂
how do I finish the stitich (i.e tie a knot)
Dear Supinder,
Sadly, I could not illustrate the last step of this tutorial.
To end the stitch, take in the needle in through the second stitch line, as usual, but instead of bringing it up from the first stitch line diagonally, bring it up from the second stitch line itself, just above the previous point and loop the thread around. Pull out the needle and put it in through the same point to anchor the stitch down and finish the process.
I hope you were able to follow this instruction. You can also try your own way to end this stitch. 🙂
Dear Sarah, superb tutorial. I had been learning embroidery for quite a sometime now and i really feel bad of missing such a helpful tutorial in the beginning. Thank you for publishing online!!!
Dear Megha,
It is a delight to know that you found our tutorial good and hope you enjoy learnign from it. 🙂
it’s really good! we can easily learn and applicable
Thank You
Dear Jasmin,
I am happy that you are liking our pages.
Hi Sarah,
Greetings from South Africa!
I am teaching myself embroidery over the holidays and your tutorials are the best I have found anywhere. Thank you so much!!!
Best wishes,
Brenda
Hello Brenda,
Thanks! your appreciation helps us with more enthusiasm. 🙂
Kiruthiga and S. Gopal,
Thank you for refering our pages and glad that you found it good. 🙂
Thank you for all th main &sub stitches out of it.Everyone will definitly benefit out of it for free of cost.Thank you .
hai sara….
now only i saw your website…. i feel very happy to see this… you are so tallent…. and helpful to lt of people… really i walk through many sites.. but i didn’t reply to any site… ur site is very wonderful and great…
love that color…
Hey Marlin, so good to hear after so long from you. Thanks for goign thru the stitches and the responses. So glad that you loved them. I will be posting an embroidery (not stitch) tutorial soon. 🙂 Just getting back to action after the baby.