

Heavy Chain Stitch is also known as
Heavy braid chain stitch [EN], Puntada de cadena pesada [ES], Point de chaînette cordé [FR], Dicker kettenstich [DE], Punto catenella pesante [IT], Ponto cadeia sólido [PT].
How to do the Heavy Chain Stitch
As the name suggests, this is a heavy or thick looking chain stitch. It gives out a rich feeling, depending on the thread used to stitch. Like the Reverse Chain Stitch, this also follows a reverse direction. I will be stitching from top to bottom on a curvy stitch line. To do this stitch, you need to be aware of the Lazy Daisy Stitch.
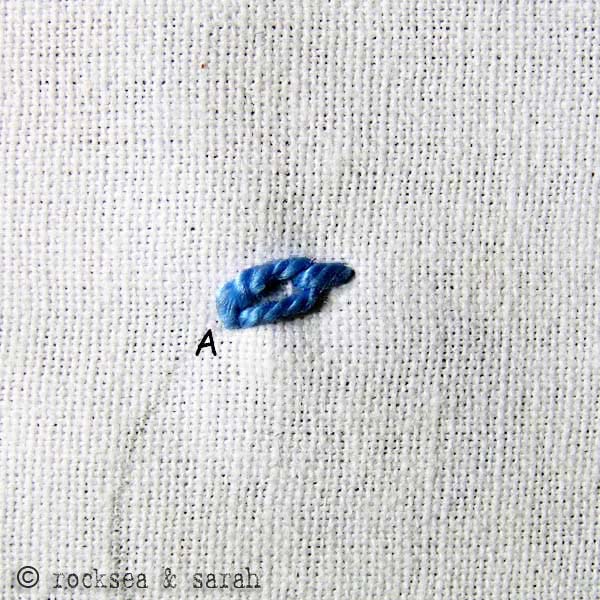 | 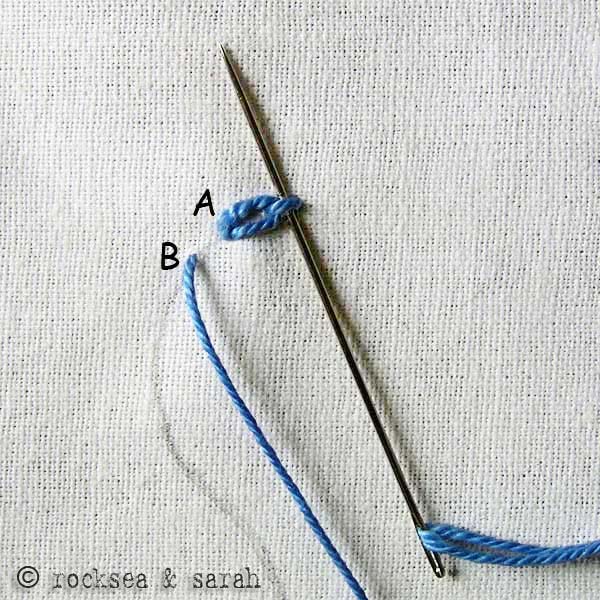 |
| Fig 1: Lay the foundation for this stitch by making a Lazy Daisy Stitch with the base as point A, as illustrated. Note that the ‘tail’ of the lazy daisy is slightly longer than the usual. | Fig 2: Bring the needle out through B and take it under the tail of the first Lazy Daisy, without plucking the fabric. |
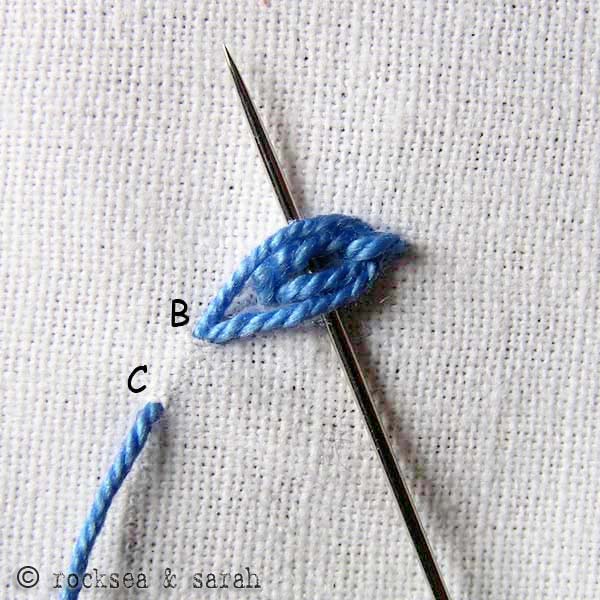 | 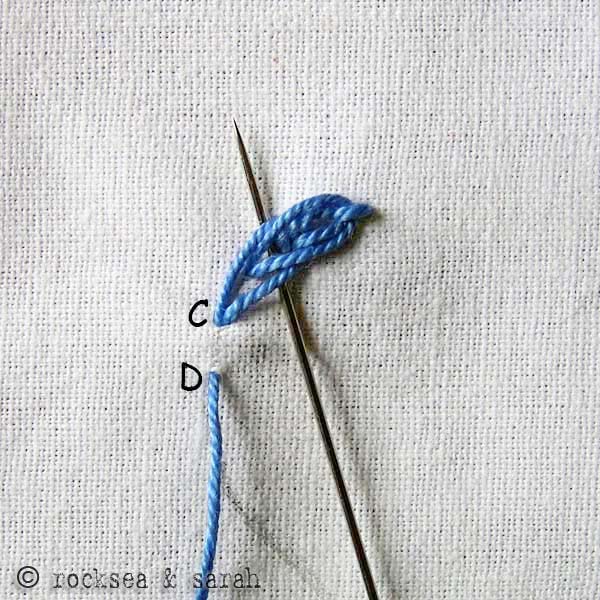 |
| Fig 3: Put the needle in through B, and we will get two layers of chain. Now, bring the needle out through C and take it under the first two chains without plucking the fabric. | Fig 4: Take the needle in through C to create another layer of the chain. Bring the needle out through D and take it under the second and third chain. Keep continuing this procedure. |
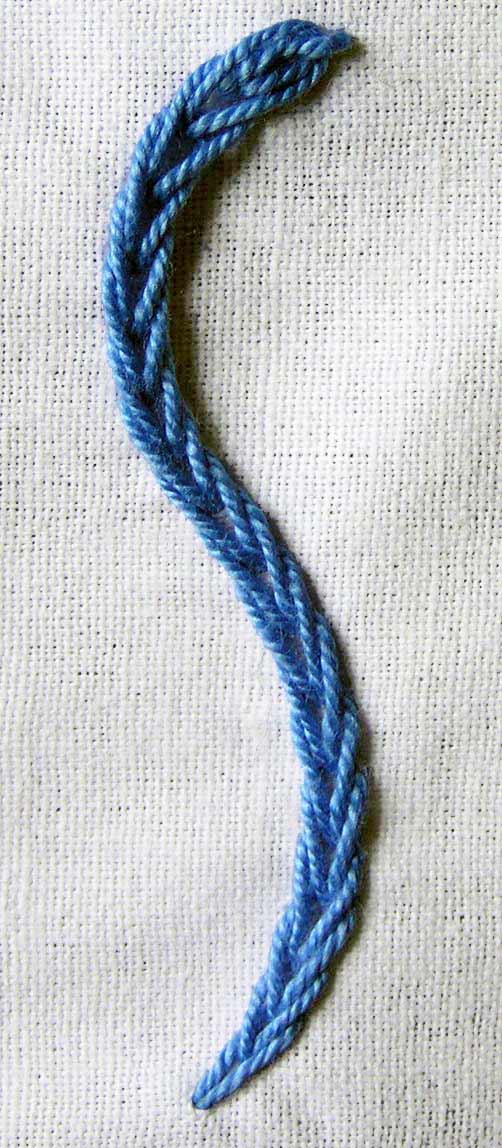 | |
| Fig 5: A finished line of heavy chain stitch would look like this. Note that, at any given point of time, we would always have two layers of chain. To create a third chain, always take the needle UNDER the first two chains. |
Learn to do Heavy Chain Stitch in 2 minutes!
Use this stitch on a pattern
Visit and Subscribe to Sarah’s YouTube Channel
Learn this stitch and 305 other stitches from our 600-page eBook.

Related Stitches from the Chain Stitch Family
Chain Stitch |
Whipped Chain Stitch |
Double Chain Stitch |
Magic Chain Stitch |
Lazy Daisy |
Russian Chain Stitch |
Long Tailed Daisy |
Feathered Chain |
Basque Stitch |
Petal Chain Stitch |
Reverse Chain Stitch |
Heavy Chain Stitch |
Braided Chain Stitch |
Zigzag Chain Stitch |
Cable Chain Stitch |
Twisted Chain Stitch |
Alternating Twisted |
Barred Chain Stitch |
Alternating Barred |
Rosette Stitch |
Rope Stitch |
Tulip Stitch |
Bull’s Head Stitch |
Detached Wheat Ear |
Wheat Ear Stitch |
Oyster Stitch |
Butterfly Chain Stitch |
Raised Chain Band |
Knotted Chain Stitch |
Knotted Cable Chain |
Open Chain Stitch |
Back Stitched Chain Stitch |
Sinhalese Chain Stitch |
Crested Chain Stitch |
Checkered Chain Band |
ZigZag Cable Chain |
Interlaced Chain |


Hey Sarah! I’ ve been surfing the internet for almost a month and I didn’t find anything like your site before. This is a gold mine!! I will be eternally grateful to you for being my teacher <3
Dear Camila,
Thank you.❤️ We are always happy to hear how our new learners like our pages and enjoy learning from them. This website is a result of 15 years of research and a constant effort to provide easy and clear tutorials to anyone who loves to venture into this art. Your words are motivating and encouraging. ❤️
Thank you I mad a nice stich for my pouch design which my teacher told to make
Awesome! You can feel free to share your stitched work here! Would love to see it. 🙂
I would love to share but the pouch is still in progress so I thought it might be good if I send you after the pouch design is over
Sure! Will wait to see it. 🙂
Can you help me with this Needle Punch Kit. My teacher sent it but I don’t know how to do it

Hi Anushka.
You can check some youtube videos to help you with the process.
I have used #10 crochet thread to good effect on coarse linen with drawn-fabric stitches. (I tried to upload a jpg image, but it said “Sorry, you can only upload mages.” It was 260 KB.)
oops, “upload images”
Dear Claudia, we are not sure what happened! Ideally, jpg image of that size should upload without any problem. Could you try again with another browser?
trying again. There! That worked.

Thank you, Claudia, for sharing this beautiful piece of work. Love the way the Heavy Chain Stitch shows up on such a delicate fabric!
Lisa Odom. Claudia this is absolutely gorgeous. Please tell me what you’re making and I would love to see more pictures of it.
Can you tell us what kind of thread you used to get this look?
Hi Mary, I am using Pearl (Perle) cotton thread #3. 🙂
Figure no 4 doesn’t get cleared when I open this page of heavy chain stitch! Pls send this picture again as this stitch looks nice and I want to try this!
Try opening the page in a different browser. It loads fine for me on firefox.
I just tried this stitch for the first time and I love it! I think it’s going to get used quite often now!
Thank you for your great tutorials. They are easy to follow and inspire me to try new stitches!
This is very nice and easy stitch i really like this thanks
Hi, I know this is really old, but I have a question about the heavy chain stitch. I love it, and find it pretty simple, but I can’t figure out where to start again when I run out of my floss/Perle cotton. It seems like I’m either going over one stitch an extra time or there’s a bit of a gap or sparser spot in that nice, heavy line. I feel like it should be intuitive, but I can’t figure it out! 🙂 Thank you.
Dear Sarah,
I hope you forgive me to respond this late. We were out on a long family vacation…sans the internet actually.
To answer your question, you can refer the fig 3 in this tutorial.
Say you finish your stitch at B when your thread finishes. When you begin again with a new thread, you come out from C, that is a little below where you finished earlier. Then, continue with the same sequence of going in through the earlier loop. I hope this gave you an idea. 🙂
Its really gud helpful to learn about more stitches can u give ur contact #
Hi Sarah,
I need to write a poem on a piece of cloth for my mother in law’s birthday. Will this stitch be a good option for making alphabets? Kindly suggest!
PS: I am totally new to embroidery, but i am confident that i will be able to manage by reading your instructions, as it is very clear!
wow, an entire poem. Since you are a beginner, try the back stitch. Take small stitches to help you in the curves of the alphabet. When done, try to post a picture of your work here. We would love to see. 🙂
Dear Sarah
I am a late visitor to your site,and really excited and happy to get embroidery tution from this.A lot of thanks to you…….
hi sarah
yr site is reallllllllllyyyyyyy too good with easy to follow instructions.im also waiting to learn kutch work from yr site.
Hello Thaarika,
Thanks. 🙂
Kutch work is in my list of embroideries, and the tutorial is slowly getting done.
Awsome….
🙂 Thanks Triana.
I love this heavy stitch look? Will try it some time.
Sure Pat. This is one of my favourite stitches as well. 🙂
hey 🙂
i really like ur tutorials as they hav helped me alot…i jst wanted to ask which sort of thread hav u used for this stitch….i tried it wth dmc and anchor but i am not gettin the same result as urs :/
Hi Maham,
Thanks for your comment. I have used perle cotton to demonstrate this lesson. Unlike the cotton floss you are using, perle cotton is a non divisible thread and comes in different thicknesses.
this ‘s one of my fav stitches…its simply beautiful….
🙂 It is one of my favourites too Preetha.
Hi Sarah,
Thanks a lot for the tutorial on different stitches. It is very kind of you to share it with everyone. Its been very helpful.
Kurshid,
All happy that our pages were interesting and helpful to you. 🙂
I did an embroidery work and gave heavy chain stitch border . The border incresed the beauty of my work.\
Thank you Sarah for teaching me all the stitches. I follow only your embroidery lessons. They are so easy to understand and work 🙂
Dear Mitra,
I am always happy when someone enjoys my lessons and feels that it has added happiness to their little hobbies. 🙂
We are hoping to post a lot more stitches, but only once I get back home in January.
sarah do u know about kuch work, brazilian embroidery, kasuthe work etc. if so is why cant u include it in this web page
Hi Padma,
The tutorials for the embroidery styles you have mentioned is in my list and ‘under construction’. Since these require detailed explanation, it will take some time before I could upload them with appropriate illustrations. So, just wait for a little while and all of them will show up in time. 🙂
looks very much braided! i like it 🙂
🙂
its beautiful piz teach me how to make birds and flowers with heavy chai stich