
This is a very nice looking and interesting filling stitch. As the name suggests, the filling would give a fishnet appearance. The fishnet is created without touching the background fabric while pinning down only on the sides. This stitch is ideal for fillings that need a netted appearance.
You need to know the blanket stitch to be able to do this stitch.
 |  |
| Fig 1: To begin with, make a foundation row of blanket stitch. | Fig 2: When you reach the right end of the row, we get ready to make the fishnet. For that, take the needle in through B and out through C, a point little above B, as shown. The stitch A-B will pin down the last blanket stitch to the side. |
 |  |
| Fig 3: Now, we work a blanket stitch row from right to left, taking in through each blanket stitch of the previous row, as shown. Do not pluck the fabric beneath. For some, it might be easier to work the blanket stitch upside down than to work from right to left. | Fig 4: When you reach the end of this row, take the needle in through D and out through E, as shown. This pins down the second row on the side. Then, work a row of blanket stitch from left to right. Keep up with this procedure of working blanket stitches back and forth. |
 | 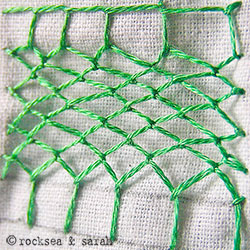 |
| Fig 5: When you reach the last row, finish up by stitching a row of blanket stitch through the fabric, as shown. Through the stitching, you will find the fish net crunching up. Don’t worry, when you finish, the last row of blanket stitch will pull up the fishnet to shape. | Fig 6: The fishnet would look like this. |


Hi Sarah,
I just wanted to thank you so much for posting all of these cool variations on stitches. This is just the stitch I was looking for, and I also love the honeycomb blanket stitch. I never would have learned these stitches without your blog! Thank you so much, this is a wonderful resource.
Anna
This is amazing site, Sarah! Thank you for bringing back an exciting, old craft, (at least to Americans). Your instructions are spot on & so easy to follow. By the time I get this crazy quilt finished for my granddaughter, I think I’ll quite proficient with your help. Thanks again, juli
Hi Juli,
Sorry for being so awfully late to respond. Did you finish your crazy quilt? If it is ok with you, please do share a couple of pictures here. We would love to see your work! 🙂
Sarah, I’m working on a crazy quilt for my granddaughter & am trying to learn embroidery stitches. Do you have any other tutorials? Thanks.
thanks sarah foe the lovely tutorial. appreciate it. will try and let you know. good day!
one of the best embroidery site ever. (sorry i couldnt be there for your workshop 🙁 ) thanks to this stitch i have found the right pattern for my embroidery which i have given to my mother as a birthday present, i think that every stitch looks beautiful but some people just think that sewing is a waste of time, at school everyone is not starting to do some sewing and i have now told everyone that i know about this website, – hopefully you will someday have billions on this website. THANK YOU for making this website, everything is explained clearly and the pictures are wonderful. once again THANK YOU THANK YOU THANK YOU SO MUCH!!!!!!!!!! (U THE BEST!!!)
Dear Vanessa,
Thank you so much for writing to me. It is really nice to hear that our pages helped you in making the birthday present for your mother. 🙂 Your good wishes and appreciation makes us happy. Thank you.
Hi Sarah,
Its truly a wonderful site. I just started having an interest to learn embroidery and was searching on the net. Believe me, I am learning the stitches from your site. The explanation is to the point and for a beginner like me its great. Every day I look forward to coming home exclusively to learn the stitches. Thank you Sarah.
Prema David
hi, new to site–found it thru Pinterest, found stitches there I’d never seen before (nothing new, lots of things I haven’t seen before!). wanted to ask if there’s a link to your E book? I can’t find it here, ALSO if there is, is it automatically updated when you post something new to your blog? I can’t carry my computer to my craft room, so I love having things in hard copy (besides, what if civilization stops and there are no more computers anyway?). thanks for your time–you really do a superb job of taking people thru a DIY step by step. 🙂
Dear Cindy,
Thanks for the interest you show. 🙂
I am only yet working on an E book. Might take a while before it is out. It gets a bit slow with two little kids around.
We do have a facility where you can use any reader, like the google reader to subscribe for the new posts I make. Here is the link to it: https://www.embroidery.rocksea.org/feed
Anyway, all the tutorial pages are in printable format, in case the E book takes a bit longer.
This is a wonderful site. I send my applique students to your site when they want to add embroidery to their applique blocks. Thank you for all your work!
Superbb…!! 😀
Sarah, your blog is so very informative, and your photos leave no doubt how to make the stitches. Thank you.
Hello Sarah, Thank you so much for this tutorial. Your blog is truly a embroidery treasure site… :-))) judy