
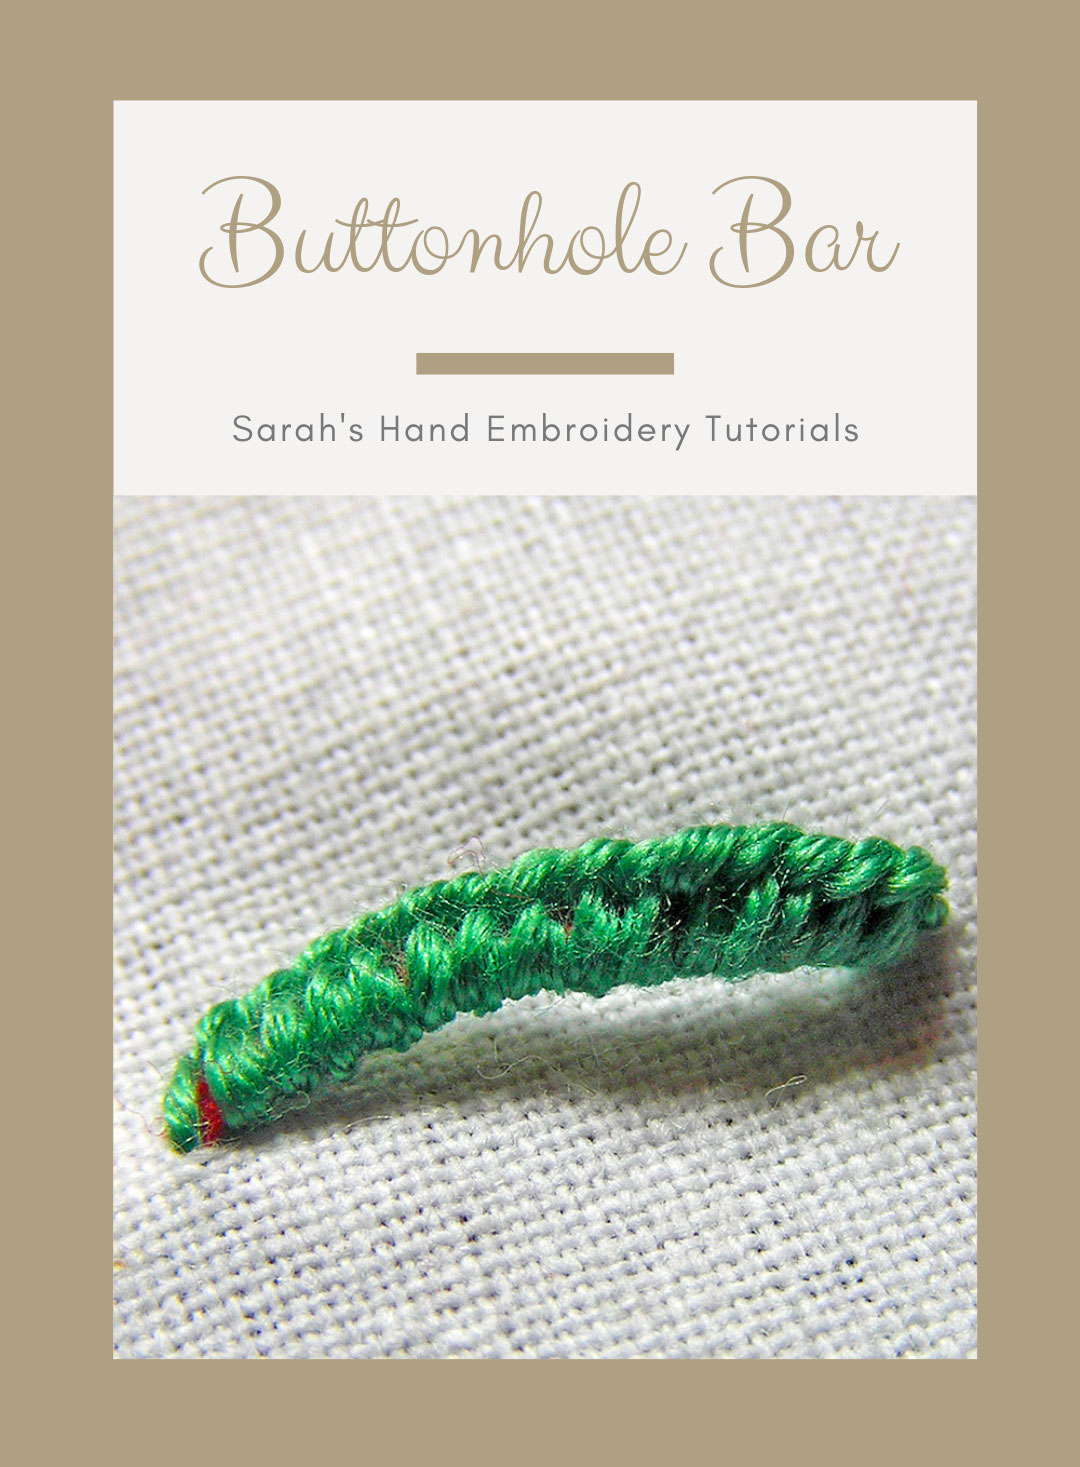
About the Buttonhole Bar Stitch
This is a multipurpose stitch made over a foundation of a long straight stitch. The blanket stitch covers this straight stitch without touching the fabric, hanging out like a loop. This stitching method can be seen in traditional needlelace embroidery forms like Aemilia Ars, from Bologna, Italy. This technique is also used to make hook loops in clothing. Since this stitch throws out a dimensional effect, it can be easily used and experimented with in dimensional embroideries.
Though this stitch is popularly known as Buttonhole Bar Stitch, it uses the Blanket Stitch.
How to do the Buttonhole Bar Stitch
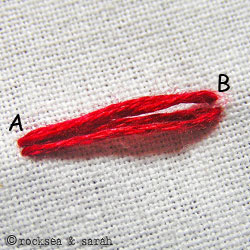 | 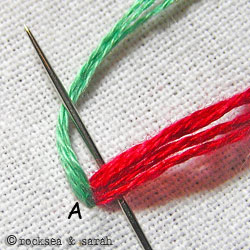 |
| Fig 1: Begin by making the foundation of straight stitches. The illustration shows two straight stitches made between points A and B. For the tutorial’s sake, a contrasting colored thread is used, but ideally, a similar colored thread is better. | Fig 2: Now, Bring the needle out from point A. Take the needle from under the straight stitches without plucking the fabric underneath. Loop the thread around the needle as we would for the blanket stitch. |
 | 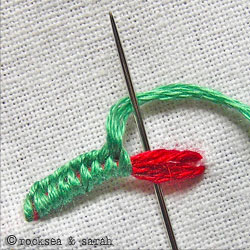 |
| Fig 3: Pull the needle out. We get our first blanket stitch over the bars of straight stitches. Now, continue the process for the entire straight stitch length. | Fig 4: Halfway through, the stitch would look like this. Keep nudging the finished stitches to keep them close to each other. |
 | |
| Fig 5: A finished buttonhole bar stitch looks like this. You can make the straight stitches loose to give it a more outstanding effect. |
Learn to do Buttonhole Bar Stitch in 2 minutes!
Use this stitch on a pattern
Visit and Subscribe to Sarah’s YouTube Channel
Related Projects
Do you want to know where and how to use this stitch? Check out the projects below and learn more. Make something beautiful!
Learn the Buttonhole Bar Stitch along with 305 other stitches from our 600-page eBook.


Hi! I purchased the pdf for your basic stitches book. How do I download it? Do you send an email with the download?
Hi Kimberly,
Thank you for purchasing our eBook. You should find an email with the invoice and download link. Please check your spam folders, too, for the email. Let me know if you still have trouble with the download. I will be happy to help you.
Regards,
Sarah
Hello Sarah, I am new at embroidery and I am having problems trying to keep the buttonhole stitch straight in a bar, always end up curling and I can’t keep them flat. I am working on an Hedebo design. Could you help me?

Hi Eleonora,
There could be a few reasons why this is happening. I will list them out.
1. If the base stitch is too thin. Using at least three stitches as the base will make it thicker and more stable, thus avoiding the curling. From what I see in the photo, you probably have used two?
2. If the base stitch is loose or sagging. So, if the stitches you use as the base stitch over which you are working the buttonhole stitch is not taught, chances are that it will tend to curl. You can ensure that your stitch is taught by making the Buttonhole bars before cutting out the fabric. Having the fabric at the base while doing the buttonhole bar will ensure that the base stitches do not sag and loosen but remain taught.
3. The length and width proportion matters a bit. If the length of the bar is too much in proportion to the girth, there is a chance that it will curl. Compare it with the woven bars you have done in a light blue shade. Using more strands to work the buttonhole stitch over the base stitch can help. I think you have used one strand? Try two strands.
I hope this helps you. Please try it out on a sample cloth and see if it works. Let me know either way! 🙂
Thanks a lot for your answer, I will try your suggestions
hi, I am from Idukki. This site is more effective for me. from where I can buy hand embroidery needle ?
Dear Jain,
You should be able to find hand embroidery needle in most shops that sells threads or any ‘fancy’ shop. It is not difficult to find.
dear sarah..
I am amazed to see ur wrk…itz easy yet so creative..I am a teacher n one of my subjects is embroidery..wid ur tutorials i am able to teachmy students soo many new thngs ..thnq u soo much for sharing ur ideas n creativity..Its my request if u cld also tell us where each of the stitches can be used as it wld be easy to relate ….thnx again
god bless..
regrds
Pallavi
Dear Pallavi,
It is nice that you are finding our tutorials an easy and good referal to teach your students. You can upload some fo your students’ work on our website for others to see and feel inspired.
In many cases, where I can tell about the stitch, I do mention the kind of embroidery or where the stitches can be used. Just read the beginning of each stitch page. 🙂
dear sarah
thnk u soo much for ur reply….i will surely upload the piks of my students wrok as soon as possible….
regrds
PAllavi
I love your tutorials on embroidery stitches. I am learning new stitches all the time. I just took hand embroidery up again after decades of not doing it, and am thoroughly enjoying. But I never knew anything but the basic stitches. I have a question. I have always used 6 strand embroidery floss divided as needed. But I was at the store and noticed some larger skeins of thread that seem twisted, like yarn. And I notice that some of your stitch directions seem to use this type of thread. Is there an advantage for different stitches. I realize it will look different that the floss when stitching, but is it normal to mix the two at times. I assume you just use one of those threads at a time as it seems to be about the thickness of a 6-strand floss. Any suggestions or input?
Hi Kathleen,
Thanks. 🙂
I think what you saw at the store are perle cotton yarns. They are also used popularly in embrodiery work. The difference is that unlike the 6 strand cotton floss which can be divided, perle cotton cannot be divided. Instead they come in a range of thicknesses which you can choose from to suit your needs. I have used perle cotton in some of my illustrations, like the chain stitch family and the satin stitch family.
Perle cotton has a nice sheen to it, so you might prefer it in some of your embrodiery works. I hope this information helped.
Sarah.. I couldn’t subscribe to your embroidery tutorials. when I click the link it displays lots of HTML tags only (https://www.embroidery.rocksea.org/feed/). What should I do?
google chrome does not have support for reader. search and install google chrome feed extension.
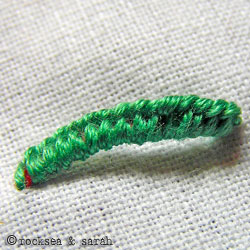
wonderful, colorful! caterpillar feeling 🙂
😀 ooh look at that…I see a different flag near your name. hehe.