
Stitch flowers using the Buttonhole Wheel Cup Stitch.
|

This is the first time I am using the Buttonhole Wheel Cup to stitch flowers, and I must say that I am pretty pleased with the outcome. I think it works great on small flowers as it makes it look dense. The flower and the color of the flower are inspired by a tropical flower called the Globe Amaranth. It is an annual plant with flowers that last a very long time and looks wild and beautiful. It is round in shape, but our stitched flower is open on the top. This flower is super good to dry and use in crafts involving dry flowers as it retains its color. I made the leaves blue to give it a change from the usual green leaves.
 | 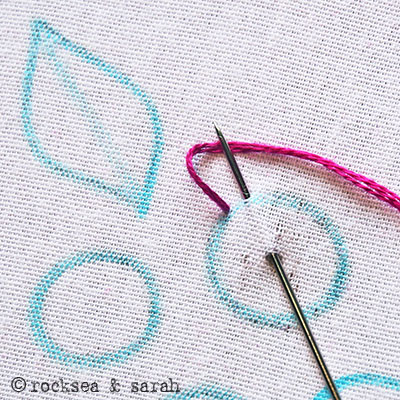 |
| Fig 1: Get your fabric, hoop, and threads ready. To stitch the flowers, mark the outline with a circle. Small flowers look really neat. I am using a 4″ hoop. | Fig 2: Start stitching the Buttonhole Wheel Cup Stitch around the circle. |
 |  |
| Fig 3: When you finish with it, continue to work over the Buttonhole Wheel Stitch to make the ‘cup’. You can also work the Buttonhole Wheel in a different color and the work the cup in a different color. | Fig 4: Keep adding layers of the Buttonhole Stitch. Four layers will be enough to make a decent looking flower of the size I am working on. |
 |  |
| Fig 5: You can finish up the stitch by knotting the thread near the last stitch of the ‘cup’, or, you can take the needle down through the fabric, as shown, and finish up behind the fabric. More layers will cause it to curl inwards giving it a closed look. | Fig 6: Continue making the other flowers. I am finishing up the Buttonhole Wheel as my thread almost finished. I will use a new thread to weave the cup. |
 |  |
| Fig 7: The flowers are finished and look like this. | Fig 8: I added some leaves to make it look prettier. The leaves are made using Lazy Daisy Stitch. |
TIPS to make your flowers beautiful:
- Keep the flowers small.
- Keep the spokes of the Buttonhole Wheel Stitch closer to make a denser flower.
- Another way to get a denser look is to make two or more Blanket Stitches on each base of the Buttonhole Wheel Stitch for a denser look.
- Finish off the stitch by taking the needle in through the fabric – it gives the flower an angle and anchors it down.


Sarah I purchased your ebook yesterday.and I love the look of the flowers etc. Anyway I accidentally clicked out of it and can’t seem to find it can you help me please Margaret Brooks my email dande314@comcast.net thanks so much
Hi Margaret,
I am sorry that you lost the eBook. Don’t worry. Here is what you can do:
1. Check your ‘Downloads’ folder for the eBook, if you are using your desktop. If not,
2. You must have received an email with the link to download the eBook. Please check your inbox. In case you do not find our email in your inbox, please check your spam folder or any other such folders. You can then, just click the link to download the eBook again.
Please let me know if you have any trouble with the process.
Regards,
Sarah
Thank you you gave me a great idea
Awesome! 🙂
Thank you I am still learning the art of embroidery and find the tutorials very clear and helpful as well as beautiful.
We are happy to know, Gaynor. Thank you. 🙂
i know buttonhole stitch but the way you transform it into 3-dimensional flower is innovative!
Thank you, Madhumita! 🙂
What a lovely, simple, easy to follow tutorial. I love doing embroidery and have just completed a large picture for my wall.

Sorry it’s come out sideways on !!
Thank you, Lesley! I love your project. It is beautiful and inspirational. What a great idea!