
Continued from Sashiko Lesson 2
Patterns based on curves, single patterns, and border patterns
This lesson will familiarize you with patterns that are based on curves. It will also give you an idea on how to deal with single and border patterns. Like usual, when stitching these patterns, you will follow the order of horizontal and vertical lines first, then the diagonal lines, and then the curved ones. But, each pattern will require its own treatment as well, so study the pattern well, before picking up the needle.
Patterns based on curves
These patterns are based on circles and its curves. It can take a little practice before the curves can be learnt to be stitched neatly and with precision.
Amime (net pattern)
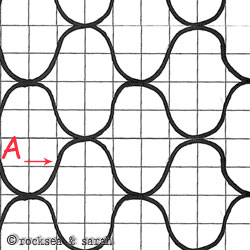 |  |
| Stitch each horizontal curve, from one end to the other, row by row. The stitches should look like mirror images where the curves meet. This might take some practice. | |
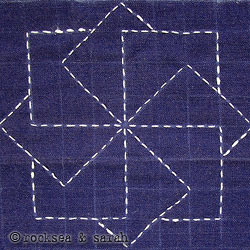
Fundo-Tsunagi ( Japanese traditional weights)
 |  |
| Work on the diagonal curves on one side first, then move to the diagonal curves on the other side. The points where these curvy lines intersect should be left open as shown in the stitched illustration. | |
Single pattern
This example will help you to understand the different ways in which a sashiko pattern can be dealt with. Single sashiko patterns can be made using a combination of lines and curves.
Kiku (chrysanthemum pattern)
 | 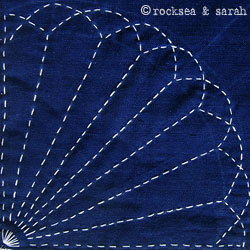 |
| This pattern is made from a quarter portion of a circle. Start working O-A-B, O-B-C, and so forth until you finish it at F. Then, start working G-H-O, H-I-O, and so forth until you finish it at K. Now, in this pattern, whether you begin or end, the thread is left open and long at O. Later all the nine strands of long thread are tied together or made a pigtail from. | |
Border pattern
Some patterns can look very complicated and confuse us. Breaking down the components of such complicated patterns can bring clarity to make it easier for us to decide on our stitching. The following pattern will illustrate that.
 |
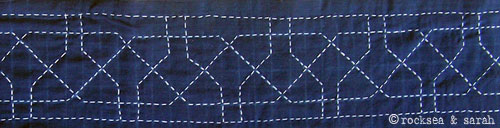 |
| Start by doing the horizontal straight lines A and B. Then, stitch the hexagon-based lines, C and D, from one end to the other. Later, finish up with the smaller lines marked by E and F. |
Next, go to the other tutorials of Sashiko:


Discovered you today- what a find! These tutorials are the best I’ve been able to find and will make learning Sashiko much easier! Thank-you!
If you are still doing Sashiko today (2022) do you have any sources you recommend for supplies?
Hi Catherine. So happy that you loved our pages. Thank you for dropping by.
Dear Sarah,
You embroidery tutorials are the best I have come across. The sashiko ones are very easy with all the techniques well explained. Eagerly waiting for your e-book. And also a hard copy one day!
Hi sarah,i have not found Lesson 4 on shashiko designs for practice..where r they?
Goodness! Self correct has struck again! Sarah I ment Sashiko tutorials! Sorry for any misunderstanding.
LC
Thank you for such clear and sensible sashiko tutorials – I have cheated in the past by using the designs on high numbered aida (22 count), which is fabulous to get the hang of creating the look. Of course, that only works in a limited way, but is good for boosting morale! I was delighted with the result and at how quickly the designs grow. I shall be trying the technique using the traditional materials next, now that I’ve seen how it looks ‘in the flesh’. I also do blackwork, and cross stitch as well as the traditional embroidery.
Thank you sarah. It is embrassing. wow thank you thank you thank you so much. Love you lot
Hello, your work is amazing! Thank you very much for sharing all Tutorial about Sashiko! They are very great to I learn about it! Have a nice day!
Hello, your work is amazing! Thank you very much for sharing all Tutorial about Sashiko! They are very great! Have a nice day!
Hello Sarah! I am so thankful to you for tuis wonderful tutorial site that you offer! Your work is beautiful and so very inspiring!
I wanted to mention a publisher (located in Canada) whome you might be interested in contacting. Uppercase publishes exquisite little books focusing on individual artists and their work. I recently purchased the book ‘dottie angel…the peachy crafty world of tif fussell’ from them, and must say it is probably one of the most wonderful books I own (and I own many!). Tif Fussell is a crafter, primarily embroidery and crochet, and mixed media. She has created an alter ego, dottie angel. The book is absolutely magical in how it expresses her work…capturing the whimsy fairy tale world she sets dottie/tif in as they create by repurposing thrift store finds.
http://www.dottieangel.com
If you are thinking about publishing your tutorials – which, in my embroidered heart of hearts, feel would be a very welcomed publication to the crafting community – I think they might be a publisher to approach:
http://www.uppercasepublishing.com
http://www.uppercasemagazine.com
http://www.uppercasegallery.ca
Also, CreativeBug is an online classroom for crafters. It hosts a variety of artists and their expertise for which customers pay a fee to take the online tutorial. There has been a lot of publicity about this young company, based in San Francisco, and it is rapidly gaining popularity!
http://www.creativebug.com
Your site is tremendous, and I, for one, would be thrilled to see you more in the mainstream!
Fondly,


Barbara
Dear Barbara,
Thank you for your appreciation and recommending the publisher. 🙂
We have in mind coming out with a book, all the more because we have a lot of requests for one from readers around the world. The only thing I struggle to find right now is some time as we have two little kids at home. So, it seemed more practical for us to work on an E-book right now, and we are successfully doing it, slow though. If all is well, we should be out with it in a few months. 🙂
Later, when we look for a publisher, we would certainly keep Uppercase in mind.
I suppose the pictures of the samples belong to you. They are lovely! We have an idea to invite samples from readers to publish in our E-book, with due credits of course. If you feel interested, I would like to ask you for some samples of your work, in good quality, so that I can feature it in our E-book. If you do send, please mention your full name and place, so that we can accredit you. It will be great if you can also mention the stitches you have used in the samples.
Looking forward to hear from you. 🙂
Your site is amazing, really, I mean it. I never found one so clear, accessible and complete. Thank you so much !!! The picture dictionary is a fabulous idea.
Marine.
Very informative and useful for the beginner and advanced users. Thank you for the effort to have put in such a organised website.
Pls send personal message to email address. I need to know how to transfer ur patterns to material. I am a newbie to embroidery and quilts. Thanks.
its really very helpful thanks for uploading this
Hi Sarah, I totally agree with Emily:) You must try getting your tutorials published. We do have lot of design books in India but they are mostly meant for working embroiderers and many books are of poor print quality. You have so much knowledge and many tutorials on embroidery of high quality; a book will be the best to happen:)
Hello, found your site while browsing Pinterest. I love your tutorials, easy to follow and the step by step pictures are a great help for a newbie like myself. I spent money on a couple of sewing/embroidery books, but none can compare to your site. You should look into getting published, I sure would buy it for when I don’t have your site to use as a reference.
Hi…
These lessons are very useful. Your website is perhaps the most popular one…
great job sarah..Thanks for sharing this! really beautiful designs
Simply superb…
hi i want to know how to draw these designs pls tell me bc i dnk knw how to draw design in ur images u use square shape paper thats why i want that pls tell me is there any special paper for drawing emroidry design
bellos trabajos