
Continued from Sashiko
Fabric, needle, and thread
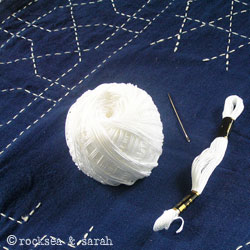 |
Traditionally, Sashiko uses light-colored thread over darker shades of fabric. Again, the most popular shade was dark blue or indigo, and white cotton thread was used to work over it. These days, you can always experiment with the color shade of the fabric or thread to apply the Sashiko technique. |
The fabric used popularly was and still is cotton. Tightly woven even weave fabric can be good for Sashiko. These days, silk and wool are also catching up on popularity.
The Sashiko thread is made of pure cotton and has no sheen. It has a heavier look and is more twisted than the Perle cotton thread. If working on cotton fabric, the Sashiko thread can be replaced with Perle cotton (#5, preferably) or four strands of cotton floss. Of course, different fabrics would have different thread requirements. For instance, while working on silk, you might use lighter or thinner threads.
Traditionally, the Sashiko needle is almost 2 inches long with a small eye. This needle helps in taking many stitches at a time. It is best to avoid short needles as the stitching can become tiresome and time-consuming. Try to use a long needle with a comfortable open eye.
Stitching
 |
1. Keep the running stitches as even as possible. Any unevenness will easily be shown on the pattern.
2. The stitch on the front side of the fabric is more than the one under. The general ratio is 3:2. 3. Keeping the working thread at a length of 20 inches at a time. That will help in comfortable stitching. |
How to begin, continue, and end
Traditionally, Sashiko does not allow to start or end a stitch with a knot. But, for ease of it, we can use knots where the reverse of the fabric will not be used or shown. For fabrics where reverse will be shown, use the traditional method as following:
 |
Consider that the stitch is worked from left to right. Note that the overlapping of the few stitches is what secures the thread. Try keeping the ends of the thread at teh reverse side of the fabric.Cut the ends of the thread as close as possible to the fabric to give a neat appearance. |
 |
 |
 |
| Beginning | Continuing with a stitch | Ending |
Making turns
1. When the designs are reversible, you need to keep the back as neat as possible. For this reason, you need to cut out the thread at every turn and hide it under the other threads. To achieve this, follow the same method as you would to begin or end a stitch traditionally. (Refer to the illustrations above).
2. When the reverse side of the fabric is hidden, you can turn using the same thread. You can carry the working thread at the back of the cloth if the distance is not more than an inch. Try to leave the carrying thread loose to avoid puckering of the fabric.
Corners and Centers
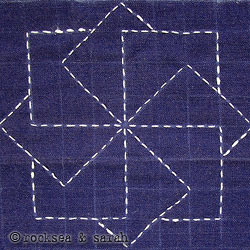 |
The corners should be kept sharp. for this, one of the stitches should fall on the corner. That is, the needle should either come up or go in through the corner point. Any other effect other than what is shown in the illustration is wrong (See the different corners).
The centers should be left open. It should look like as in this illustration. Anything apart from this is wrong. |
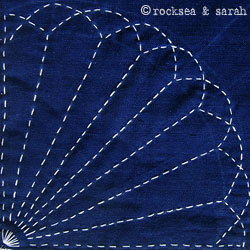
Sewing orders
Basically, Sashiko follows the following order of stitching. But, note that the stitching order depends on the design too. A stitch is to be kept continuous as far as possible.
 |
 |
 |
| 1. Horizontal & vertical lines | 2. Diagonal lines | 3. Curved lines |
Transferring of designs
There are a few ways in which the designs could be transferred to the cloth.
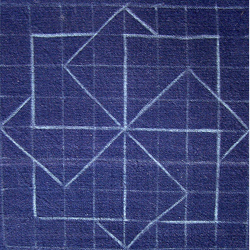 |
1. Use a transferring tool to draw the grids and pattern directly over the fabric. Learn about the different transferring tools and choose the one that suits you the best. 2. Draw or print the pattern on paper and transfer it to the fabric using a graphite sheet or a light box. Learn how to use the graphite sheet from my quick tutorial. |
Next, go to the other tutorials of Sashiko:


 Sarah has been researching and sharing hand embroidery lessons for over 17 years, making it accessible to everyone around the globe.


Very interested in trying Sashiko in a quilt, has anyone done this with success? Will the stitching hold up to the quilt being washed in a machine?
Did you quilt individual squares then put them in a quilt top? If so, how did you quilt it once batting and backing were added?
Is it possible to successfully quilt Sashiko through all layers of a quilt?
Most grateful for any advice/counsel on this🥰
I have used sashiko thread on a quilt and on clothing that is washed regularly. I find that the thread sort of beds into the fabric and becomes better and better. If you wanted to hand quilt in a sashiko design, then a bigger scale pattern would work.
I have developed immense interest in Sashiko and did this table runner ..
Hi Deepali. Thank you for sharing this beautiful sample. It is really neat and pretty. Love the color choice. ❤️
Thank you. I m self made Sashiko artist . So please give me your suggestions . Thanks 🙂

I think yr sashiko work is beautiful Deepali! I hv just taken an interest in sashiko stitching n find it fascinating..as well as being v therapeutic. I hv only been doing small pieces..n hope to progress to stitching a table runner!
This was a cheap 7 dollar jeans trouser brought and torn to make the base cloth : ). I agree Miss Aiwah, it is very therapeutic and I forget the work stress. The simple natural objects and insects and birds are given importance and place in sashimi design. dragonfly being my favourite!. – Deepali
Hello Sarah,
I hope you are doing well.
I am kindly asking you if you will let me use some of your photos for my new book on Visible Mending? I am having a hard time finding great projects, and you have many great ones. Please note that all the credit will be given to you.
Thank you for your time.
Best Regards,
Todor P.
I can give you my work of Sashiko
Hi Sarah,
I am very thankful for your kind reply and cooperation. The work of Sashiko is plenty. Thank you again for the extremely generous gesture.
I remain available if you have questions.
Kind Regards,
Todor P.
Dear Todor,
I am doing good, thank you. I hope you are fine too.
Thank you for contacting me for the images in my website. It will be great if you specify which images you would like to use. Will your book be in print or digital? Please respond to my email at sarah@rocksea.org . I will be glad to give you the permit once I receive the email from you.
Regards,
Sarah
HI Sarah.

Love your tutorials here, very easy to follow. I have a question regarding one of your pictures. I am making a sashiko quilt and wanted to use the square design as attached. Is this one of your designs or open source? can it be used on something to sell? Love the simplicity /accuracy of it. Cheers Paul
Hi Paul,
Thank you. Your Sashiko looks beautiful. This is a traditional Japanese design. So, yes, you are free to use it. 😁
Cheers!
Thank you very much Sarah. How do you transfer the design on the fabric. Thanks so so much for your advice.
Shirin 💗
Hi Shirin,
You can check this link to know how to transfer:
https://www.embroidery.rocksea.org/reference/for-hand-embroidery-beginners/transferring-the-designs/
Hi Sarah and thanks for the tutorial.
How long should each stitch be?
Thanks,
Brita
Hi Britta,
Half a centimeter should do for each stitch. But if the project is small, I would keep the stitch smaller.
Hello Sarah. Thank you for this wonderful page. I had never heard of this embroidery. I will really appreciate if you could send me a link for tge design on graph paper and how it is being transferred on fabric. Secondly, I have a white linen dress. I wish to do thus embroidery on it. Will it be fine? What thread colour should I use.
Thank you again. Shirin
Hi Shirin,
Sorry for being so late to respond. Had a busy year.
I don’t know if my response would make any sense now, yet, let me write what I feel. White linen is a great fabric to work sashiko on.Try blue or lime green or even red and black for a great look. Of course, these are my suggestion, but there are plenty of other colors that can look great based on what pattern you choose and how much area you want to cover. 🙂
Dear Sarah, lovely work and seems so simple. Could you please show what the reverse side looks like so I know how to move from one square to the next? Thanks
Tenga en cuenta que no todos de ellos de los cerrajeros veinticuatro
horas están capacitados para enfrentarse a esta clase de dispositivos.
Hi Sarah!
I was trying to subscribe to your site but am getting an error.
Kindly help.
Sarah – I have linked your excellent description of sashiko techniques to my web page. I offer sashiko designs inspired by the landscape and cultures in the American Southwest (New Mexico, Arizona, Texas, Colorado and Utah). My hope is to encourage people to “Discover Your Creativity” stitching sashiko in non-traditional ways.
Thank you, Joyce. This is awesome!
Hi Sarah… Amazing work!! Very clear instructions!
Can you please let me know how to transfer the Sashiko designs to our work cloth? We wont be able to continuously trace it right? We have to break at the end of the tracing paper. Is there any way we can do it?
Thanks a lot for ur tutorials!! It helps me so much in my projects 🙂
thanks for your advices. I am happy to find your web side.
I am going to learn about sashiko as much as possible.
I will be yours attentive pupil.
best regards katerina
I would like to buy stamped designs Can you tell me whereI can purchase them
i want some designs for my sari..can u send some design patterns..
haiii….everything is awesome..i am a beginner in this field so it helps me a lot..thanks a lot..
very good stiches . want some designs for necklines inwich we use these stiches
thanks for this website
hi i want to do embroidery on my kurtis neck. the designs may be like flower, rose ect. plz send me some designs for my kurtis neck with the procedure to make it.
its just intersting …i learned alot…i am getting more crazy to learn…thankz
hi i want to know how to draw these designs pls tell me bc i dnk knw how to draw design in ur images u use graph paper thats why i want that pls tell me is there what paper for drawing emroidry design
Reply
Dear Sana,
I have used a normal graph sheet to draw my designs. You can design your own designs too. It is not very difficult. If you go through the lessons, you will understand and get an idea on how to make these designs using a graphed sheet. (I have used a primary school mathematics practice book for the graphs).
Later, you can trace these designs directly on to the cloth. Else, you can make a graph on the fabric and draw the designs over it.
Hope this information helped.
Merci Sarah pour toutes ces explications. J’adore le bleu et je trouve ce modèle fort réussi.
I have a cross stitch project I want to do but I’m confused on a part of it… what is the difference between a back stitch and a straight stitch?
Dear Alesha,
you can check these links to clarify your doubt.
https://www.embroidery.rocksea.org/stitch/straight-stitch/straight-stitch/
https://www.embroidery.rocksea.org/stitch/back-stitch/back-stitch/
Hi,
I’m so enjoed from you’r website. it is so great and professional.
may i aske you for help? actully im looking for some women thtat know well to embroyed for my project.or mabye we can make appointment and talk?
I’m so appreciat you gave me your precious time.
Best Regards
Regine Orren
Dear Regine,
Thank you. You can probably email me with some details about your projects and the background. Then, we can try to fix an appointment to discuss further?
You can pick up my contact details from : https://www.embroidery.rocksea.org/reference/summer-workshop/
I just love it! your work looks great. Thanks so much for showing us this.
wow, thats awesome!! especially the combination of indigo and white… oowww….
I dont have anything in indigo sure i am gonna try it on a kurthi….
Sarah, I am really interested in Brazilian embroidery can you post instructions and on that which might be really helpful..!!
Cheers..:-)
Happy embroidering…:-)
That’s just awesome! Neat, crisp appearance. I’ll have to try it some day!