
This kind of pattern is done over fabric that is used only on one side. For instance, a table cloth. Since the reverse side is not so important here, we need not concentrate much on keeping the reverse of the fabric as neat.
I will illustrate using a border design with vertical stitches.
Check Pattern Darning: Reference for detailed instructions to help you more with the lesson.
1. Fabric and thread
I have chosen aida cloth (11 counts) with anchor thread (6 strands). This thread might not give complete coverage for my design but will help to illustrate the embroidery.
2. Choosing and planning the pattern
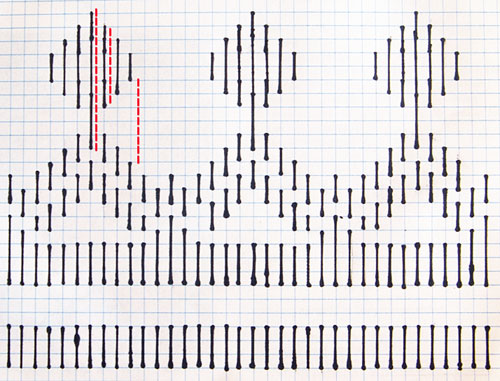 |
I have chosen a vertical stitch border design. All I have to check is if the pattern has any long stitches that need to be avoided in any kind of pattern darning embroidery. This pattern has some long stitches (more than 5-6 square limit), which is marked in red. So, some corrections in the pattern are needed.
3. Making the pattern workable
 |
I have made gaps in the diamonds to split the long stitch into two, each lesser than the 5-square limit. The long stitch on the reverse side is left as it is since it is in a 6-square limit.
4. Beginning
 |
I now start stitching the pattern. The picture illustrates the front of the fabric. I tie a knot at the end of the thread and pass it through the fabric a bit away from the area of embroidery- extreme left bottom corner. Being a vertical pattern, I begin from the bottom(or top). Each column is taken one at a time. Once one column is finished, I turn to begin the next column, as illustrated.
5. When the thread runs out
 |  |
When my thread runs out, I leave the loose end, most certainly, on the reverse. I then take the new thread and leaving a fairly loose bit on, continue with my pattern. In the end, I would tie the loose ends together.
6. Ending
 |
In the end, all loose threads are tied up. Cut the knot of the beginning thread and weave it into the pattern where the stitches are. Do the same with the loose end of the final thread. So, the reverse would look like this.
7. Finished pattern
 |
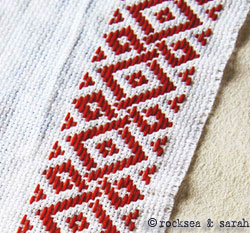
The finished pattern would look like this. 🙂
Next, go to the other tutorials of Pattern Darning:


I Learnt this as ” Brocado” an ancient technique of Andean original people. We use it till today in some ponchos
hi sarah
i need pattern for CHOUCHING stitch plzz help me
it is my colg project
which stich will be suitable for floral design in a salwar……..
Sara
I have tried a pillow cover using pattern darning. Have a look.The link in my blog is

shamiatcraft.blogspot.in/2012/07/pattern-darning-pillow-cover
Nicely done Shami.
what fabric did you use for this work
Hello Garcia,
I have used aida fabric here. This fabric has holes or gaps between its weaving, making counted forms of of stitching easy. It is commonly used for cross stitch embroidery.
adorei seu seu blog mande mais modelos prontos de bordado.
um beijo
Katia Caro,
Obrigado:)
Eu adoraria compartilham padrões para você praticar o bordado, e vai tentar colocar algum logo que eu recebo uma chance.
Translate as:
Dear Katia,
Thanks 🙂
I would love to share patterns for you to practice embroidery, and will try to put up some as soon as I get a chance to.
Is aida available in India? Is it the same as matty cloth?
Yes Deepa, aida and matty is the same. It is pretty much available in India.