
How to work Kasuti using Neygi and Menthe stitches
This lesson will teach you how to work on an even weave cloth. All the four stitches of Kasuti can be easily done over aida fabric. The fabric itself acts like a graph sheet and we have to just transfer the design directly. Since we have already dealt with Gavanti and Muragi in Kasuti Lesson 2, I will illustrate Neygi and Menthe styles of stitches here.
Referring to Kasuti Lesson 1 would be good before proceeding.
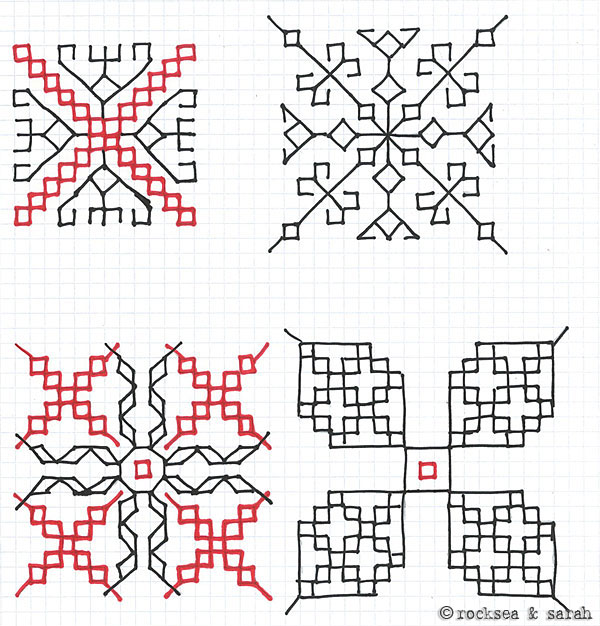
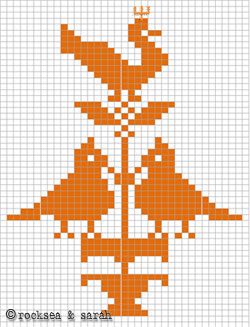 | This is a traditional pattern of a lamp. Each colored cell in the graph represents a cross-stitch or the Menthe stitch of Kasuti. |
 |  |
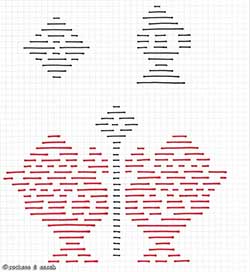
| Fig. 1: I begin stitching the lamp from the bottom. | Fig. 2: I chose to do the birds on either side of the lamp with a contrasting colored thread. There is no rule where to begin the stitching from. So, this time, I began from the top. |
 | Fig 3: The finished pattern would look like the illustration on the left side. |
 | Fig 4: To border the pattern and for the sake of an example, I have used the Neygi stitch below the lamp pattern. We take the needle up and down the fabric with running stitches in a designed pattern. Refer Pattern Darning lessons to understand Neygi in detail. |
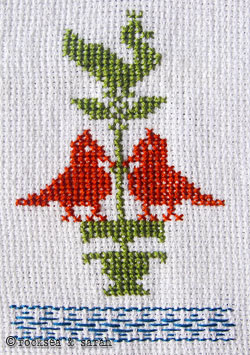 | Fig 5: The finished pattern looks like this. 🙂 |
Next, go to the other detailed Kasuti lessons:


Any vedios for these stiching. And also the please explain what fabrics can be used so that it will be great help.
Hi. It’s nice to see you explain things so well. I have one question though, when one wants to do them on saree, what would be a easy method to follow to draw the kasuthi print on the saree?
From where we will get voile nets? Any alternate material? CAN u show what actually is voile net?
Hi Manju,
Voile net is also called Waste Canvas. You can get it online or any some stores dealing with hand embroidery supplies.
Sara

You are the first person to introduce kasuti to me. I learnt the basics from this site and now I have advance to a level to make a border and a motif in the middle for a cushion cover. My sample piece is here:
I have one more picture of this in my blog. I have blogged about it here:
http://www.shamiatcraft.blogspot.in/2013/01/kasuti-embroidery-cushion-cover_4.html
Do have a look in your free time.
Dear Shami,
This is real neat work! And , I am proud of you. 🙂
Dear sara
first of all i like to thank you for the great job u do.i am very much interested in embroidery but i have no proper guidance after seeing ur tutorial i have once again got energy continue so that it will help me a lot
ok then what kind of fabric we should use for kasuti pattern .i like to know how this is used in sarees.i also like to know how net is used in doing this pls illustrate i am eagerly waiting for ur upcoming lessons
Dear Shabana,
Thanks for your interest. 🙂
For kasuti, you can use cotton or silk. If you do not have prior practice, start with a simple cotton fabric.
On sarees, you can use kasuti to do scattered motifs, borders, or fill up the pallav. You can check here for some patterns: https://www.embroidery.rocksea.org/hand-embroidery/kasuti/kasuti-patterns-1/
To use voile net, attach it over teh plain fabric where you want the design to be. You can tack it down using running stitch on the edges. Then, use it as a representation of a graph sheet to count and stitch over. Once the entire design is done, the tacking stitch can be removed and the net fibres can be pulled out. I hope you have followed this. I am sorry that I don’t have illustrations for using voile net yet.
Do let us know how your project is coming out to be and share a few pistures with us.
what fabric did you use here
Dear Gracia,
I have used aida fabric here. This fabric has holes or gaps between its weaving, making counted forms of of stitching easy. It is commonly used for cross stitch embroidery.
Dear Sarah,
I’m absolutely stunned by your website. You have the most comprehensive, beautiful tutorials I have ever seen on hand embroidery. I Stumbled on your site, and have bookmarked it for future reference.
I work in crochet and knitting, and am starting to sew, and have only just begun to look at embroidery. After visiting your site, I have a new respect and appreciation for the craft.
My husband has an Indian friend at work who recently had a new baby. I made a blanket for him, but I would love to try out embroidery on a small gift like a washcloth. Traditionally, are there motifs that are more applicable to a particular age/gender? Could you recommend a pattern (or even an appropriate embroider-able gift) that would work for a baby boy?
Love your site.
Kathy
Dear Kathy,
We are delighted to read your appreciations for our tutorial. 🙂 It is nice to know that our website is serving its purpose by infusing a new respect for hand embroidery in our readers.
Our best wishes for your friend who is blessed with a baby. In fact, we too have a 1.5 year old son. So, from experience, I can suggest a few things that you can embroider and gift.
One tip I would give is to keep your embroidery to a corner or edges and borders of the cloth that will be used over his bare body, to avoid the baby getting irritated with the embroidery thread. Though not all babies are sensitive, it is probably a better practice.
You can probably make bibs, towels, blankets, napkins to wipe face and hands, hand made diaper pouch, or a handy bag to carry baby stuff while travelling. Since we used to travel immensly with our baby, I had a handy bag to carry all his creams, diapers, wipes etc… All these are made by cloth, and so, embroiderable gifts…and much needed too.
Traditionally, there might be patterns and designs that are applicable to certain age and gender. For instance, blue is associated with boys and patterns like cars would be more found in a boys stuff. As the child grows, the look of the pattern or motif also matures. You can look at embroidering subjects that are more likely to be used by both genders, like animals, fish, stars, moon, teady bears etc…
A washcloth is a wonderful gift. You can probably embroider a simple animal like a giraffe, or a fish, or a border of small cars or star fish. Keep them simple with just outlinings and few details inside. You can also put the name of the baby at one corner. Try using any of the simple outlining stitches from the chain stitch, the stem stitch or back stitch family.
I hope this information will help you out.
Best wishes. 🙂
the embroidery in this kasuti lesson was used for pratya’s blanket, right?
Hi Sarah,
WOW. I love your site and I just wanted to tell you how much I really appreciate all your hard work to put together such wonderful illustrations, lessons, and photographs, making such a beautiful art available to others to learn.
Hand stitching is almost a lost art in the modern world…so sad. We get machines to do everything for us. I’ve learned there is so much value in doing something so lovingly by hand.
Thanks again!
Dear Val,
Thanks a lot. 🙂
I agree that hand embroidery is almost a lost art, and in many places even considered to be a ‘grand mother’s’ hobby. I totally enjoy embroidering with my hands and feel happy about the creation. Machine embroidery can never match the richness of hand embroidery.
How very nice, I will have to take my needle and try this kasuti technique. Also the neygi stitch looks lovely and very decorative.
Thanks Blandina 🙂
This is only a simple neygi stitch, which could have looked better with a thicker thread. If chance premits, I will add some patterns for practice too. This will give you an idea of more neygi patterns.