
How to work Kasuti using Gavanti and Muragi stitches
This lesson will teach you how to work Kasuti on plain fabric with a traced design. While using this method, the two stitches that can be done easily are Gavanti and Muragi.
Here, you will see an illustration of a simple pattern using a combination of Gavanti and Muragi. This lesson will also demonstrate elaborately on how to deal with the logic of the ‘stitch route’. This will be especially helpful to beginners to embroidery. For the more experienced, they can just breeze through to get an idea.
You need to refer Kasuti Lesson 1 before starting with this lesson.
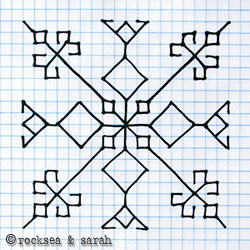 |  |
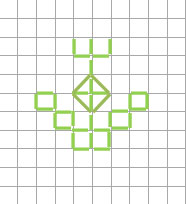
| Fig 1: Trace out the pattern from the graph paper onto the fabric using a carbon tracing paper or any other tracing medium. | |
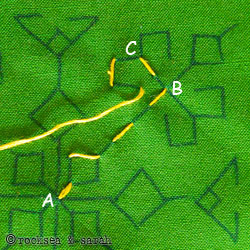 |  |
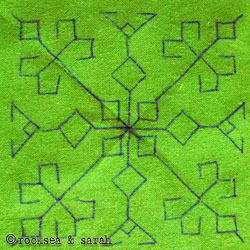
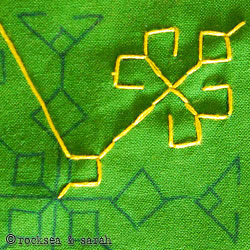
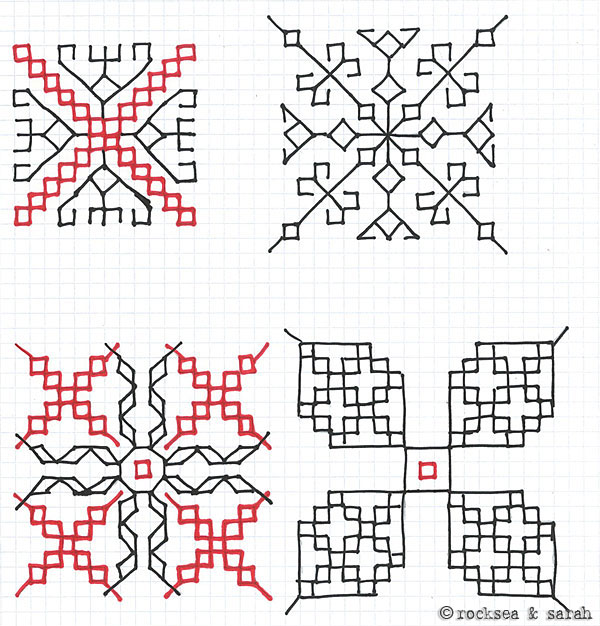
| Fig 2: Trace out the pattern from the graph paper onto the fabric using a carbon tracing paper or any other tracing medium. | Fig 3: Every time you reach a point with a choice to go either left or right, the trick is to keep finishing all the lines/patterns on the left first and then move to the right. This is a simple logic to keep any confusion at rest. So, start the return journey and when you reach back at C, move to the right side. |
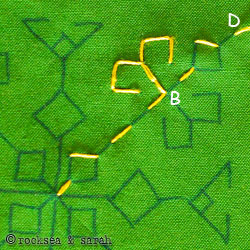 | 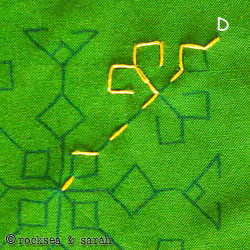 |
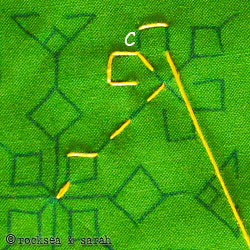
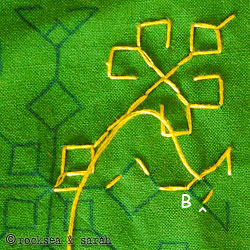
| Fig 4: Once you finish with the right side and return to the point B, continue the journey upward until you reach the last point, D.You will see that the patterns hanging on the left side is finished. | Fig 5: Start the return journey.Just a simple note: diamonds are seen as a split in the mainline, and not as a pattern in itself. This is the reason why the diamonds are finished during the return journey. |
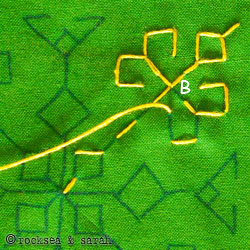 |  |
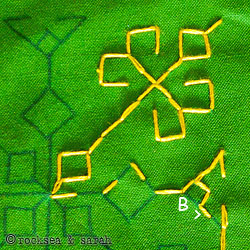
| Fig 6: Now, we start with the right side of the pattern. Finish up with the diamond, return back downwards. From B, turn to the right. Finish the left part of the hanging pattern first before moving to finish the right part. | Fig 7: Once you reach back to point B, continue the return journey downwards till you reach the first diamond. |
 |  |
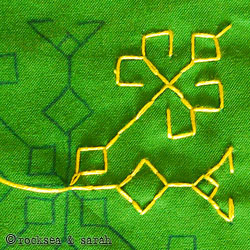
| Fig 8: Finish up with the diamond. | Fig 9: Return back to the center, A. Now we begin the next part of the pattern. Work upward, through point B till the very end. Keep to the left all the way. |
 |  |
| Fig 10: Begin your return journey and come back to B. Move to the right side of the pattern, but before going all the way up, you have to finish the little diamond shape lying in between. So, take a diversion to where the little arrow points to. | Fig 11: Take the return journey and follow the little arrow to the right and continue to finish up with the remaining pattern. Now, instead, you can also finish the little diamond on return journey from the right side. |
 |  |
| Fig 12: Continue the return journey downwards. | Fig 13: Finish up with the diamond and return to the center. Now, continue with the next line of the pattern until the entire design is done in a similar way. |
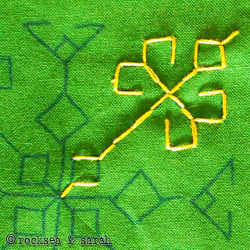
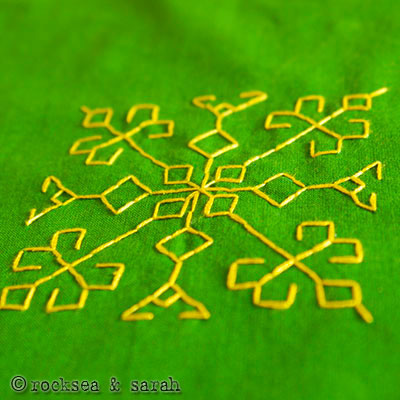 | Fig 14: he completed kasuti pattern would look like this. |
Note: This pattern has been borrowed from ‘Traditional Embroideries of India’ by Shailaja D. Naik.
Next, go to the other detailed Kasuti lessons:


Thank you for your lessons and initiative to host the website. I appreciate your efforts.

I am sharing my first attempt at Kasuti, using the same pattern as your lessons.
Hi Anupama,
What a delight to see your sample! How neatly done. Love the way you have used two colors, and made the pattern into two sections- the ideal way! 😉 Keep sharing!
Hi Sarah,
It’s exciting to read your response:)
I am having fun creating kasuti designs, expanding on the graph using Autocad’s sketchbook. I am sharing one of my designs that realised recently as a part of my current art work.
I am yet to incorporate knotless method, but the process itself is very relaxing.
Here it is _
Wow, Anupama. This is elaborate and you did it so well! It is great to hear that you are creating your own designs. You should keep sharing them as you stitch! Will look forward to seeing more. 🙂
Hi Sarah,

Thanks!
Here is another one – kasuti motifs on the edges..
Central one is giving life to equations!(Navier stokes).
that’s all about my recent embroidery attempts.
I drew many more kasuti patterns.. but hope I will realise them sometime. I will be happy to share them if it would help.
Hi Sarah,
Just wanted to thank you again for your tutorials.
This is a pic of my very 1st embroidery.
I just created a design from putting your kasuti and buti example patterns together in a repetitive way so that I can get as much practice as possible.
I’ve been wanting to do this a long time, thanks again and looking forward to trying more tutorials.
I would also like to see some embroidery tutorials sometime with how to add beads and sequins to adorn and highlight the work. 🙂
Wow, well done Vee. Thanks for sharing your first work with us.
Do you think you might be able to send us a clearer and crisper image of this work? 🙂
Hi Vee,
How beautiful has your first attempt on embroidery turned out to be! Thanks for sharing it with us. 🙂
Fantastic .
Loved the article
i’m excited….thanks so much
Hi,
I am an absolute newbie but I absolutely love this design and I think I want to try it on fabric to make a little cushion.
You said that this example was done on plain fabric.
What type of fabric do you suggest for my throw cushions.
Should I specifically be looking at cotton fabrics?
thanks
Hi Vee,
I have always preferred cotton for furnishings, and so, would suggest you the same. There are different kinds of texture you can pick up in cotton. As a person new to embroidery, you would enjoy working on cotton more. You can also look at fabric with cotton mix…Look for something not too smooth, thin or slippery, like polyester or satin.
Hope this helps. 🙂
hi sarash
thanks for tutorial. i came to know that kasuti stitch starts and end without knot. plese tell me how to do that.
thanks
saraswathi
Hi Saraswathi,
I will try to do a lesson on your request. But, it follows the same method as Sashiko. Please check the section ‘how to begin, continue, and end’ from this link: https://www.embroidery.rocksea.org/hand-embroidery/sashiko/sashiko-lesson-1/
I want to ask is their like some particular colour for this embroidery like only yellow thread to use or mix of so and so colour thread to use or we can use any colour thread??
Dear Amaya,
Kasuti does not use thread of any particular color. It traditionally uses basic colors like red, yellow, green, orange, white, etc. You are free to play with all the colors you like! 🙂
hi sarash
thanks for tutorial. i came to know that in kasuti stitch stars and ends without knot. how to do that.please help me.
thanks
saraswathi
Dear Sarah, sometime back I wrote to you. I am not very good in handling computer. How to get in touch with you.
Hi Revathi,
You may email us. You can also contact us through Facebook!
Great work Sarah You step by step diagram is of a great help thank you so much for the painstakingly done work.Keep it up!
Thank you, Kiran! 🙂
Hi Sarah
I want to know how do you draw the design or pattern on the plain cloth as you have shown above. let me know so that i can do the same. I am slowly starting to get back in this groov. thanks sudha
Dear Sudha,
First, try to make a design on a paper. You can check out the other tutorials in Kasuti (check the panel on right hand side), for designs on kasuti. You can trace these designs using a carbon paper onto the fabric.
Wow Sarah!!!!!!!!
U make even the most boring stitiches look amazing……..
U have the gift.
I hated kasuti when I learnt it.
But wow look at the combi and the designing. Its amazing
Hope u keep making world more colourful and keep teaching us too.
I will also copy a few 😉
Rati
Dear Rati,
It is nice to know that after our pages, you have a new found interest for Kasuti. That is what all our website about! 🙂
Do share with us some of your Kasuti projects when they are finished. You can upload them along with the comments. Best wishes.
Dear Sarah,
The tutorial for Kasuthi is very good. i know Kasuti. Can you post some advanced designs. It will be of great help.
Regards,
Sandhya.
Dear Sandhya,
We are happy that you liked the Kasuti tutorials. Have you checked these links for patterns:
https://www.embroidery.rocksea.org/hand-embroidery/kasuti/kasuti-patterns-1/
https://www.embroidery.rocksea.org/hand-embroidery/kasuti/kasuti-patterns-2/
If you have, then, I will try to upload more patterns as soon as convenience permits. 🙂
dear madam
i saw your kasuti stitches .i would like to have some more design as i can prctice it perfectly.can usuggest which site u would prefer so that i can get some more design.i am interested in learning this stitches. and thiking of doing this on saree so befor doing it i have to practice some more design.
thank u
Dear Kasuti (?),
It is nice to know of your interest in this form of embroidery.
I do have a collection of Kasuti designs, but uploading might take some time. Sadly, I don’t know of a website where you might get a collection of designs, but it will be worth if you can do a search over the net.
Hi Sarah
thanks a lot for the kasuti tutorials
I do a bit of embroidery myself and hence i am familiar with kasuti. I am planning to do kasuti on a silk sari.I would like to which thread would be bast for this and how many strands.
Thanking you once again
nandini
Dear Nandini,
Happy to know that you found our lessons good. 🙂
If you are working on a silk sari, I would suggest you use silk thread. If you want to use cotton floss, you can take upto 3 strands of threads, depending on how heavy the sari is.
I hope this information helped. Best wishes.
Dear Sarah
thanks for the prompt reply. I would like to know how many strands of silk thread would be best for a new silk sari (the kind of sari you get for doing embroidery)
nandini
Dear Nandini,
Silk threads can come in different weights (thickness). Try using 2 or 3 strands of silk thread. But if you feel the need to increase or decrease the number of strands, feell free to so so.
Also, try to use a thin smooth needle to avoid any damage to the fabric. Make sure the eye of the needle is big enough to accommodate the silk strand easily.
Best wishes. 🙂
Hi Sarah,
I browsed through your bolgs posts and they were very good. Can you teach us on ho wto make the beautiful flower rangolis that are laid during Onam.
Regards,
-Sonali.
Hello Sonali,
🙂 Thanks.
The flower rangolis of onam…we call it ‘pookalam’…which effectively translates as flower rangolis. I am not much of a master in it myself! You can try simple colorful rangolis and fill them with different colored flowers instead of colored powder.
hello i Gulay
Izliyorum.bende you handicrafts from Turkey to continue education in a great interest in traditional crafts etmekteyim.bizde duyuyorum.şuan lessons we learn embroidery, but was very different than what we have learned What you do in your very beautiful site, this beautiful and very nice things to me if öğrendim.izin Library information would be useful to save the istiyorum.eminim olacak.teşekkür very useful. I wish you continued success
Dear Gulay,
Thanks a lot for your appreciation and wishes.
I am delighted if these pages have added value to your interest and knowledge of handicrafts and traditional crafts. 🙂
Best wishes.
Dear sarah, Your demonstration of kasuti stitches are very good you remember iwrote from usa that iam 80 and stitch till now Iam back in india and am a neighbour of your friend anceline mathews she showed me you photos too.now iwould like to know if you have published a bookf so i would like to buy it janaki
Dear Janaki Paati,
Of course I remember you. Hope you are feeling fine and settled back in chennai.
Did you really see my pictures? I am not so sure if Anceline Mathews is a direct acquaintance. She could be a friend of my husband’s, but whom I don’t know.
I have not published any book yet. Life is a bit too busy with a 1 year old at the moment. We do have an idea for a book in mind though. 🙂
Hi Sarah!
Thanks for the Kasuthi tutorial. Kindly tell me how many strands of Anchor thread to be used for this stitch.
I have a doubt : In some other website I saw people using Net for stitching this stitch. Is that not necessary?
Viji
Dear Viji,
You can use 2 or 3 strands of anchor thread to do this stitch.
I will be using three different methods to stitch kasuti, each shown in a different lesson. What you see in this page is the tracing method. You can also use voile net to stitch over plain fabric, but that illustration is provided in the subsequent lesson which is yet to be posted. 🙂 Voile net is not necessary, but a good option.
Dear Sarah,
this is very interesting indeed. And beautiful.
I can not believe that I went through Karnataka without seeing this kasuti technique…but this was before my interest in embroidery. I will be back!
Blandina
Dear Blandina,
Thanks. I hope you enjoy trying out Kasuti. It is still in its ‘revival’ stage.