
This lesson will illustrate how to do, probably, the most common pattern in chicken scratch : the heart.
It is advised to go through the thread-fabric-and-stitch section of the chicken scratch page before beginning this lesson. It will help you to understand the logic and techniques used in this embroidery.
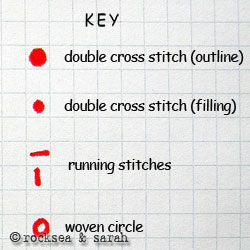
The stitches used are mentioned with each illustration. To go to the instruction page of each stitch, you just need to click over them.
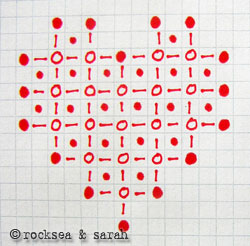 |  |
| This is the heart shape I intend to stitch. The key will help me to decode the symbols on the graph and use the stitches on the gingham cloth. Each cell on the graph represents each cell on the cloth. Unlike, in lesson 1, I try to get a bit experimental with the shades of threads I will be using here. | |
 | Double cross stitch: I begin the pattern, the traditional way, that is, by doing the outline first. This helps me in demarking the pattern and containing all the stitches inside this parameter. I plan to do the heart in a dark shade, and so, the outline will be done in white over the dark cells. |
 | Running stitch: Next, I plan to do the woven circle for the filling. So, I prepare by doing running stitch horizontally, in the light colored cells. Then, I do the running stitch vertically over the rest of the tinted or light colored cells. Note that, traditionally, light colored cells are used only for straight stitches to anchor woven circles or woven ovals. |
 | Woven circle: Between these straight stitches, I weave circles in the same dark shade of blue. This encircling of the dark cells will make it stand out giving it a lacy effect. |
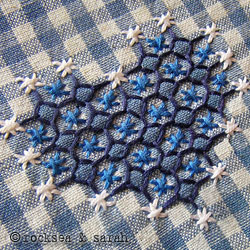 | Double cross stitch: Though, ideally, I am supposed to finish the double cross stitches before the woven circles, I chose to use them for filling in the end. This gave me a chance to experiment using a different shade of blue as shown. |
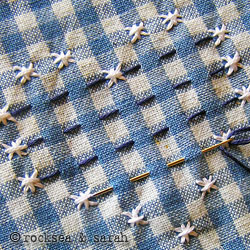
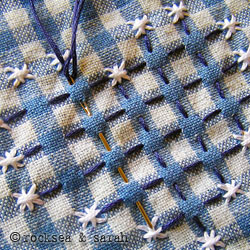
| This is a sample of how different effects can be created by using chicken scratch embroidery. | 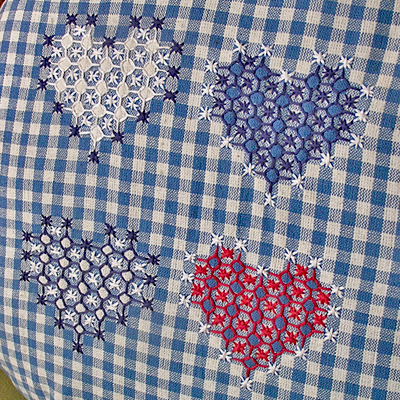 |
Other Lessons:


Thanks for all the info, I have reseached this type of embroidery for quit a while and are so glad I found it here. I have the unspoken question…what should it look like at the back. I know what it should look like in ordinary cross stitch, is there a picture that somebody can show me of begining and ending of this chicken scratch stitch, please.
Hi Maryna,
Sadly, I did not take a picture of the backside of this embroidery. Anyone who has it is free to share. How ‘should’ it look like at the back…it will be mostly just straight stitches in different directions, usually. 🙂
Thanks for the reply, I read somewhere that it can even be covered at the back.
This is a fun project to do and very easy. Made many projects and gave for gifts.
Hey Judi, thanks for the comment. Please share your fun embroidery projects with us. We have an upload option for images 🙂
My first sewing and embroidery was done when in elementary school. The finished item was chosen to be exhibited!
As an adult, I wore that apron in an off-Broadway show and it felt absolutely incredible.
Wish I could show it to you and others here.
Thank you for sharing so much of yourself.
Dear Marny, we have a system to upload your images along with the comments. Recently we had deactivated it due to lot of spam. I have activated it again for you. You can upload the image using the upload utility below.
Cheers,
this is really cool . thank you sarah
I have LOVED embroidery since I was a young girl! It is very gratifying (in MY opinion)!! I just found your website via Pinterest–THANK YOU! Your tutorials are fabulous, and very easy to follow. Lots of new stitches and knots I want to try! Bless you for sharing. 🙂
Thank you, Yvette! I hope you are enjoying this beautiful art!
Hi Sarah:
You’re heaven sent!!! I have been researching this kind of embroidery for quite a while. Bought from church bazaar a pair of gingham pillow cases with embroidered border and was intrigued with the lace like embroidery. I have been looking for instruction on how to do it until I found your website. Bless your heart — my search is over! I love you!
Hopefully I can make my project and everyone that I can do it. Thank you, thank you, thank you.
🙂 Am happy to read your comment, Ellen. Please do share a picture of your work , once done, with us. We’ll be glad to see it.
hey sarah.. i just gave it a try yesterday… find the pic of my swatch 🙂

Hey Chicky,
Real nice. And a different color of gingham cloth. 🙂
Thanks for sharing.
Dear Sarah, thank you so Much for your tutorials !
I made a Skirt with this embroidery.
Nancy
Hi Nancy,
It is really nice to know that you have made a skirt with chicken scratch embroidery. Is it possible for you to upload a picture of your work here? It will be nice to see it. 🙂
hiii……sarah this is really awsome work…….about hand work…..pls send me all info about the embroidery and other hand working tutorials…..plzzzzzz
Hi Sarah,
I love your chicken scratch. What size gingham do you use?
Dear Ginger,
I have used 1/4″ size gingham fabric.
Sorry for the delayed response.
tried the chicken scratch work. going to try the kasuthi lessons.
Dear Shami,
I am very happy to know that you have worked on the chicken scratch. Best wishes for your Kasuti lessons.
Sadly, I am not able to view the picture you have uploaded. Let me check if it is some error from my end. If not, I will ask you to upload again.
Best wishes. 🙂
Dear Shami,
I was going thru this page and realised that your uploaded picture is now visible to me. 🙂 Thanks for sharing. I think you have done a nice job.
Dear sara
Very beautiful tutorials. Had all the printouts of your tutorials.
Tried the chicken scratch work. Have a look at it.
dear sara,
your teaching is awsome. i liked it very much. it is very very useful one for all the beginners. i think still there are so many varieties of emb. stitches. i would like to learn ‘chemanthi’ stitch. though i tried to learn it in some blog, i find it difficult to learn. will you help me to learn that stitch? it is a flower ‘shamanthi’ like emb. waiting for ur reply. bye
Dear Gayathri,
Thanks for referring our pages and showing interest in learngin newer forms of embroidery. 🙂
I will surely post something on Chemanthi work. But, I can do it only when I get a chance to. So, if you can, please wait for some time before I can get the tutorial ready.
Hi Sarah,
I may have already posted this somewhere else, but I just wanted to keep giving you positive reinforcement. I love your site and especially when you explore a particular type of embroidery. I have linked to your site from my website as well.
Margaret
Thanks again Margaret. Your positive comments really does help us to keep goign with our efforts to make more pages. We are happy that you have been enjoying our tutorials. 🙂
Wah! It is really a poem made out of thread and needle
That is stunning!
Strix, 🙂
wow.. this is really cool!
wish I could make embroideries 🙂
🙂 Thanks Dessy. Why don’t you try making embroideries…these pages are for beginners.