
This lesson will demonstrate how to do the embroidery using the different stitches over a border design.
It is advised to go through the thread-fabric-and-stitch section of the chicken scratch page before beginning this lesson. It will help you to understand the logic and techniques used in this embroidery.
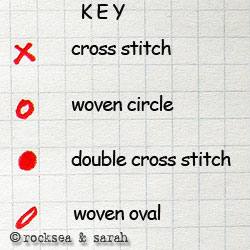
The stitches used are mentioned with each illustration. Clicking over them will take you to the instruction page of that stitch.
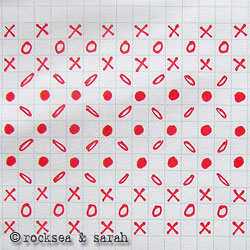 |  |
This is a border design. I want it to have a very lacy effect, and so, will use two strands of thinner perle cotton thread. The key will help me to decode the stitches onthe graph and use them on the gingham cloth. Each cell in the graph is like each cell on the cloth.
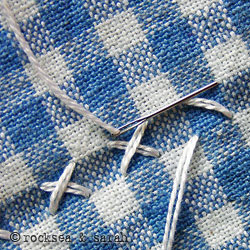 | Cross stitch: It is always better to begin any design with the outer stitches or outlines. So, I begin the border design by doing the cross stitch. I will be doing the cross stitch over the darkest cell. |
 | Double cross stitch: I begin filling up the inner part of the border with the double cross stitch. The filling is done only over the darkest cell. |
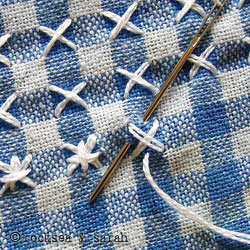
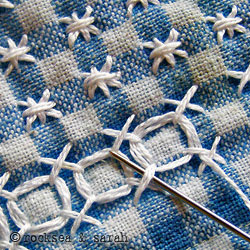 | Woven circle: The legs of the cross stitch provides good anchors to make a woven circle. I make two rounds of circle, each time. This gives a bolder, more embossed look. |
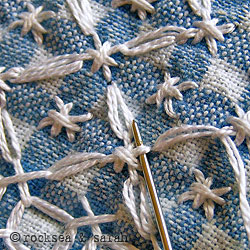 | Woven oval: I weave ovals with the diagonal stitches of the double cross stitch as the anchors I make the ovals only in the white cells. |
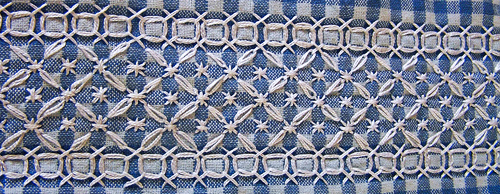 |
The finished border looks like this. It gives a very lacy and rich effect when viewed from afar. 🙂
Note how all the tinted cells are left alone. Working the cross and double-cross stitches over the darkest cells nullifies the color in the design part of the fabric. Woven ovals and woven circles over the white cells, amplifies the ‘whiteness’ and gives it a more raised, lacey look. The tinted cells will throw out a background effect.
Other Lessons:


Thank you for sharing this. I had had this on my list of things to do for sometime and when I saw this pattern I knew it was the one! It really does look like a lace panel. I am planning to turn this into a little make up bag.

Wow! This looks so beautiful, Carol!! Thank you so much for sharing your work. 😍😍
Not sure if photo of finished article will load, but thank you again 🥰
Carol, this is such a beautiful pouch!! Love it!! Can I share this photo in my Facebook page?
Hi Sarah, yes that’s absolutely fine. I’m glad you like it ☺️
I was taught this technique when in elementary school. I still have the apron I stitched by hand and, of course, did the cross stitch.
In fact, in 1995, I wore the apron onstage when in a play in NYC.
It’s fun to see the stitches my little hands did as a child.
I hope the photo shows up!
Wow, Marny! Thank you so much for sharing this picture. I am sure the apron is a treasure for you. Not many things last like hand embroidery. Beautiful! ❤️