

This stitch, as the name suggests, is a series of chain stitch loops made over rows of straight stitches. It has a raised effect and used in embroidery types like Stumpwork. It looks nice if contrasting threads are used, and it makes nice border stitch. It can also be used as a rich filling stitch by doing multiple rows of chain stitches over a broad row of straight stitches. For demonstration sake, I will be doing only one row of chain stitch over a narrow foundation of straight stitches.
To do this, knowledge of the chain stitch is good, but not necessary. I will use two parallel stitch lines to lay the foundation of the straight stitches. Then, I will be using a contrasting thread to work the chain stitch over it. Remember that we do not go through the fabric or even pluck it when doing the chain stitch as they will be done over the foundation of straight stitches.
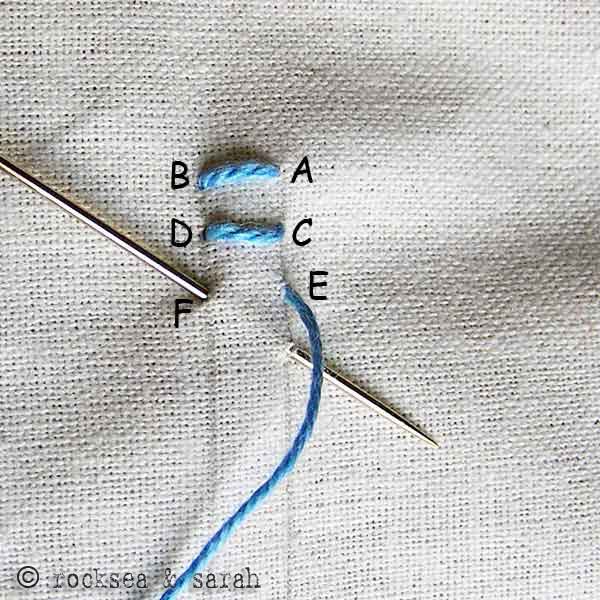 |  |
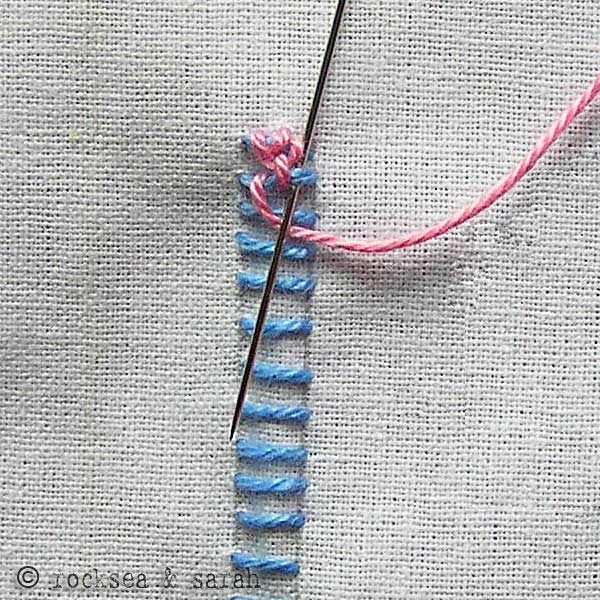
| Fig 1: We first lay the foundation by doing a row of straight stitches. For that, we drive the needle from A-B, C-D, E-F and so on between the parallel stitch lines. | Fig 2: Now, take a contrasting thread and bring it out from the top of the first straight stitch, as shown. Then, take the needle from beneath the first straight stitch as if to whip it once, as shown. Do not pluck the fabric below. The slant of the needle should be towards the left as shown. |
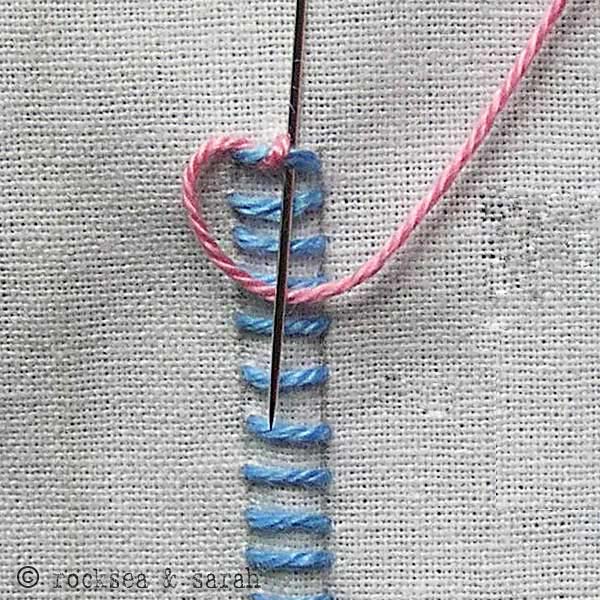 |  |
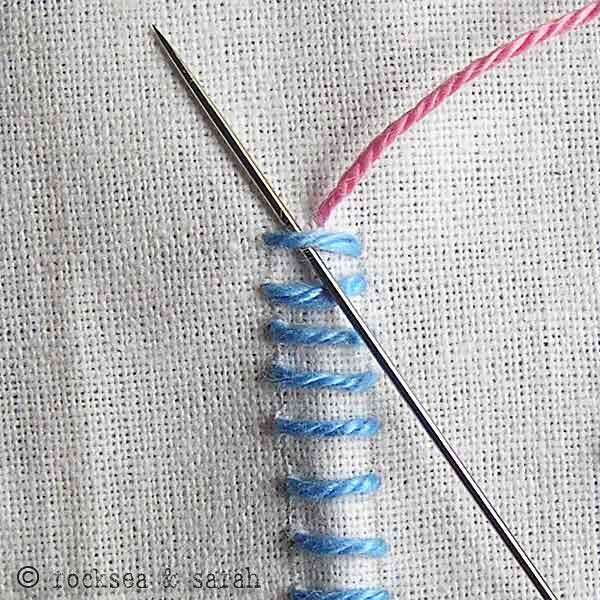
| Fig 3: Once you pull the needle out, you will find a tiny loop or ‘whip’ around the straight stitch. Now, take the needle again from beneath the first straight stitch, but this time from the top right side. Again, do not pluck the fabric below. Loop the thread around the needle to make the loop of the chain, as shown. | Fig 4: Your first chain loop will look like this. |
 | 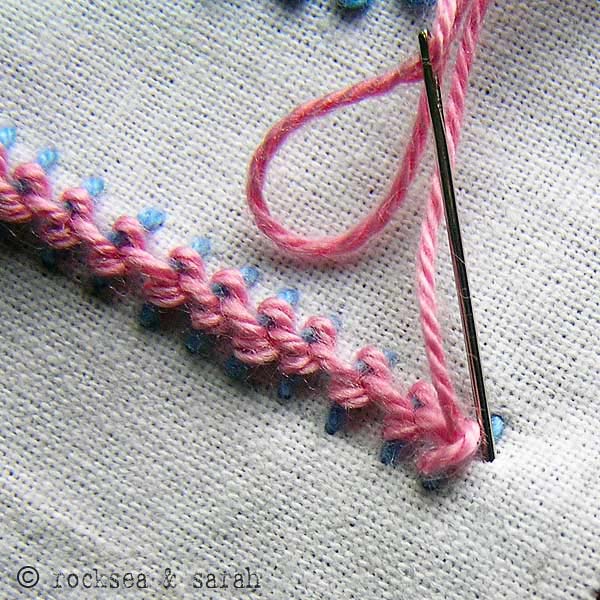 |
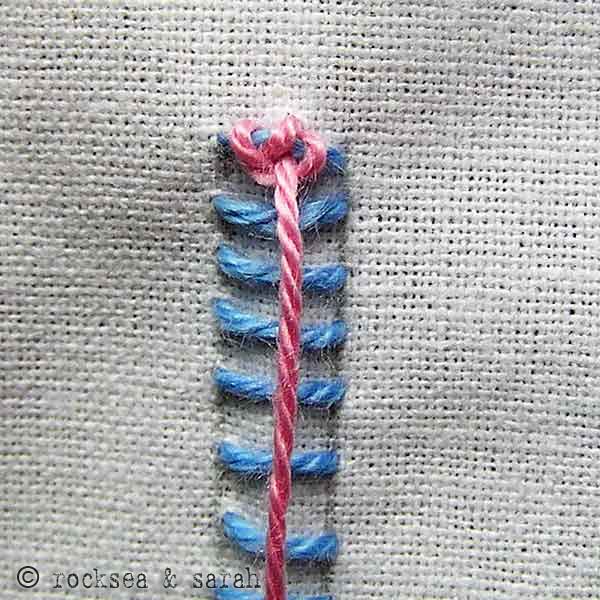
| Fig 5: Continue this procedure for the rest of the straight stitches till you finish the row. | Fig 6: Your finished raised chain band would look like this. You can finish off the last loop by anchoring it up as shown. |
How to do this stitch using the 3sat Hair pattern
Learn Hand Embroidery Stitches | Cable Stitch, Split Stitch, Raised Chain Stitch
Visit and Subscribe to Sarah’s YouTube Channel


I love the way you stitched her golden hair! You have given me new insights to embroidery. Thank you.
Thank you so much, Barbara. 🙂
Merci beaucoup pour ce point, trés joli. Bonne journée.
Thank you, Marijo. 🙂
MERCI pour le TUTO, très bien expliqué, moi qui voulait savoir le faire…………. Bonne continuation……..GILLOT
Merci, Stephane.☺️
Thank you for teach me thank you
Pleasure is mine, Gehan.
Hai..
I am really impressed to your hand embroideries.. Keep it up and give to tips for me bcoz I am learner
Thank you, Bhavani.😊
hi Sarah
Since long i have been looking for a site with simple illustrations through pictures. Thanks a lot for such a beautiful blog. now i shall start learning all of them one by one.
thnx
sonia
Do you have a book of all your stitches? I love your site and would love to have a book if you have one. It is kind of hard to have to dig out the computer every time I need a stitch. Please let me know if you have a book.
Thanks for all the lovely stitches.
Georgie Morrow
Hi Sarah..really very well explained..!!
Keep going with ur good work..:)
This looks REALLY cool!!
Superb!!!. Thank you for teaching me this one.
Hey Sarah,
Its just been couple of days i had visited ur website for the first time. I am so very impressed that i started to practice the stitches the very same day and by now i have almost practiced all the stitches…. it was a amazing experience to see beautiful outcomes on my piece of cloth… i have just fell in love with embroidery…. thanx a lot, all credit goes to you….
* Please can you tell me which thread have you used in the stitches, i mean the same thread which is used in the above raised chain band.
Love N hugz
Komal
Pune
Hey Sarah!
im a beginner and i really love ur tutorials. The detailed explanation with the pictures is amazing. Can u add some patterns if possible so that we can practice the stitches.
Dear Amy,
I wish I could get some pattern up here as soon as possible, but there are so many other projects right now in hand, that it might take a while before I could upload some.
In the meanwhile, I could only ask you to check online for the many patterns and try them…
Hi.
I have one question.
I usually do the needle work keeping the work facing on the other side. My needle goes from bottom to up while I see in ur tutorials , it goes from top to bottom.Have I been doing it the wrong way or is it only a matter of convinience.?
Dear Shilpi,
Do you mean to say that your ‘right side’ of the embroidery is always kept facing down when you work? If so, then, I must say, that it is a rare practice. But, if it brings out good results, take it as only a matter of convenience.
However, I teach my students to keep the ‘right side’ of your embroidery facing up, and not down. 🙂
Correct me if I understood you wrong.
I guess by the term “right side”, you mean the “facing side”.
Yes, you are right.
‘Right side’ means the front side or facing side.
another 1… which i just love it……..
🙂
wow really like it