Herringbone Stitch is also known as
Mossoul stitch, Plaited stitch, Catch stitch, Witch stitch [EN], Punto de escapulario [ES], Point de chausson [FR], Hexenstich [DE], Ponto espinha [PT], Flätsöm [SV].
How to do the Herringbone Stitch
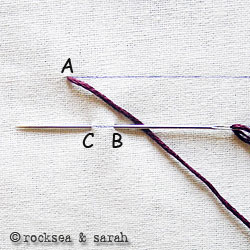
This is the basic Herringbone Stitch made of crosses not cut exactly in the middle but in quarters. The Herringbone forms the base for many embroideries across the word. It can also be easily incorporated onto aida fabric. I will be working between two parallel stitch lines.
 |
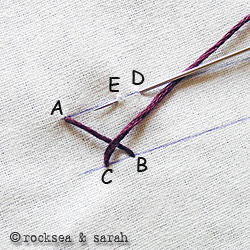 |
| Fig 1: Bring the needle through the first stitch line at A. Take the needle in through B, which lies diagonally across A on the second stitch line. Then, take the needle back through C, which lies near B. | Fig 2: The same procedure will be worked on the first stitch line. Take the needle diagonally across to D and bring the needle back out through E. |
 |
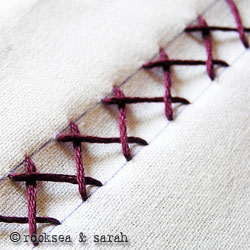 |
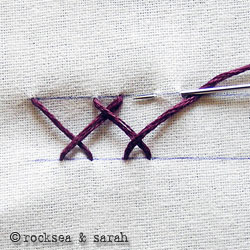
| Fig 3: Continue to make such crosses on both stitch lines alternately. Ensure the diagonal stitches are parallel to each other to bring out the best look. | Fig 4: A finished sequence of the Herringbone Stitch would look like this. |
Learn to do Herringbone Stitch in 2 minutes!
Use this stitch on a pattern
Visit and Subscribe to Sarah’s YouTube Channel
 Sarah has been researching and sharing hand embroidery lessons for over 17 years, making it accessible to everyone around the globe.

another stitch with herringbone

Looks neat adn well done. Are you creating some patches?
thanks. I am trying to make an album with all the stitches doing.
Sarah, I purchased one of your books and can’t find the directions for downloading it. Can you point me in the right direction? (Sorry to hijack comments!)
Hey Lillian, we have emailed you the purchase details with the download link once again. Could you check your mailbox junk folders too? Let’s know if you got it!
THANK YOU!!!
You just saved me on this wedding dress with stretchy fabric that needs a hand stitch applied. Your instructions and pictures are very easy to follow.
😘
Blessings from Dallas TX
Hi Jamila,
It is so nice to read your comment. So happy that this page was helpful to you. Makes my day!
Love,
Sarah
What is the ratio of length to width for this stitch?
I plan on using it for a shirt placket which is about 1cm wide.
Hi Kathrin,
There is no fixed ratio to the herringbone stitch in hand embroidery. You can make it as narrow or as wide as you wish. I, personally, use, roughly, a width-to-length ratio of 1:1. So, if my stitch is 1cm in length (height), the width (on the wider side) would be 1cm.
If I were to mark my fabric before stitching, I would mark at every 0.5cm distance on both the parallel lines. When stitching, I would see my herringbone stitches leaving every alternate dot between them. Hopefully, my explanation has not confused you. Let me know if it has worked for you. 🙂
Muchas gracias por compartir tus tutoriales, son muy buenos, muy didàcticos.
Gracias, Pedro. Estoy tan feliz de que te esté gustando aprender de nuestras páginas.
Hi Sarah, I am keen to know the history of Singalese stich. Does it have any connection Sinhalese? Thanks
Hi Ashley,
Yes, this stitch is used in traditional Sinhalese embrodiery. Usually, the red and blue threads are used on either side to intertwine between the open chain stitch.
Hey used this in school thanks really helpful. your amazing have a good day✨
That’s awesome. ❤️
I love being able to see each step in making these stitches but I would love a hard bound book of all your instructions. I have to constantly bring the instructions up on my phone or computer. Do you have any publications of your stitch instructions?
Hi Judie,
Thank you for your interest shown. As of now, we have just the eBook. It is a 452 pages book and will take time to bring out the printed version of such a big book. The digital version will require you to use the phone or computer, but is designed in the form of a printed book. Also, you can use it even without internet and carry it around in your mobile phone or tablet! 🙂
Thank you for your response, Sarah, I will most likely try the e-book but was curious to know if there might be a hard copy available. Your explanations are so clear and your pictures so helpful , I can learn a new stitch fairly easily. Right now I am trying the color wheel sampler and having great fun with it. Thank you again for your help.
u r tutorial is soooper .i learnt many stitches from u .and took print out of all kinds of embroidery
Thank you, Lakshmi! 😊
Sarah… Your tutorial is wonderful…. It’s really really awesome… It’s easy to understand n work out… Thanks for ur website.. I’m jus a beginner I feel very happy for this wonderful tutorial….
It’s wonderful to know, Saha! 😊
Thank you for these tutorial, we’ve been looking for tutorial on how to do the stitch and the steps of it. Because our homework is to give the step-by-step on how to do the stitch w/pics. Actually, its not me who found this but my partner. We started searching for tutorials of the stitch last Friday, and finally we found this tutorial, we are so happy when we found this. Thank you very much, if you didn’t do this tutorial, we are so dead in our homework. Thank you again😀
Hi Gia, it’s great to undergo that our tutorials helped in your assignments! Happy! 😊
THANK YOU………… 🙂
BECAUSE OF YOUR TUTORIALS I DO ALL MY HOMEWORKS
Hi Mejaila,
It’s nice to know. It’s a pleasure to make these tutorials.
THank you ♥♥♥
Hi, I found your tutorials really helpful. I just started a garment making and for our assignments I come here for help. Thanks sooooooooooo much. Ps. You really need to make this into a book
Thanks for your stitchwork tutorias with accompanying photos. They are all stunning! Quick question: I love this tacked herringbone stitch. Would it be appropriate for around a curved edge? I made a Christmas tree skirt and would love to do some stitching around the edge. Many thanks,
Jo
Dear Jo P.
Sorry for a late response. Was on a vacation with the family sans much access to the internet. If it is not too late, I would like to answer to your query. Yes, herringbone can take simple curves easily, and therefore any variations over it. Best wishes.
Thank you so very much for these tutorials. I have tried several different places to learn these stitches and don’t always want to go to YouTube. Hope you get your ebook done. I DEFINITELY would like to order one when you complete it. Appreciate your site very very much. Thanks again for posting these excellent tutorials and photos.
Hi Jeannie,
Thank you for your kind words. It always keeps us encouraged. 😊 I hope you are enjoying hand embroidery. Our eBook is ready and available through our website. Yes, it took us long…but we did it!
❤️ Sarah
Hi Sara,

I am here with my new work in herringbone and other stitches.
Thanks for all the tutorials.
Hi Shami.
Very beautifully executed kutch work! Thanks a lot for sharing. 🙂
Hi! Sarah,
I started stitching ever since I was 7 years old. Now, that we are tackling up stitching again, this site really helped me understand most of the stitching required in our class. I suggested this site to my classmates because of the clear and understandable instructions with photos that were taken beautifully.
I hope you continue a job well done! 🙂
hi sarah!
just went through your stitch tutorials .i am passionate about these as i always wanted to go for fashion designing. soon i will post my design with ur stitches. luv u loads.
thank you to help me lot.
This is the easiest embroidery tutorial I have found so far. Thank you so much for posting this!
I tell everyone I can about your site.
Hi sarah
yr embroidery tutorial is very wonderful and highly useful for me. possible can u pls. give notes on aari work.
thanks
vanitha
Hi sarah ds tutorial is si very helpful m doin fashion designin 1 year n if at al i have mised my lecture of embriodery i dnt have to worry its really very much helpful
Sara,
My trial using herringbone stitch.
shamiatcraft.blogspot.in/2012/06/herringbone-stitch-chudithar-project.html
Shami Immanuel.
Hi Shami,
Thanks for sharing. Really nice work. 🙂
Dear Sarah,
Can herring bone stitch be used for a leaf pattern? If yes, can you please demonstrate how it can be applied? Found the coral stitch useful and I recently completed a nice bird pattern with coral stitch and it came out really well.
I found your site useful and learning something new every day.
Regards,
Aruna
Dear Aruna,
Sorry for responding late. Yes, herringbone can be used fro doing a leaf pattern. You can fill in the leaf by working the herringbone stitches between the two outlines of the leaf. So, instead of workgin between two straight parallel lines, your stitches will be worked between two curved lines that make the leaf. Hope this helped. 🙂
You can upload soem of your works here and share it with us and the others.
Dear Kayenderes,
I appreciate you taking up hand embroidery to learn at this age. 🙂
Each of our tutorial page has a ‘print’ button which can be used to print out the tutorial. The button is in a small gray colored section just after the tutorial ends, and before the comments’ section begins.
We are working on a book, slowly though. I shall be glad to inform you of it, once it is done.
We would love to know how you are enjoying our lessons. 🙂
Please do you have a book on the dictionary of the stitiches. I am just near 70 years young and want to teach myself this hand work. But, I need to see the stitches in front of my magnify glass.
Can you help. I also am not too computor wise.
Can you send me the pages to print off? Or is there a book ? Easy one?
what wonderful tutorials, love the clear instructions and beautiful photographs. I cant wait to get your book when it comes out. My friend who wants to knows basic embroidery will also benefit from your book.
Dear Smita,
Thanks for the interest and encouragement. 🙂
Dear Jane,
What a wonderful idea. 🙂
You can use a normal cotton fabric to make your sampler. But, if you want to give it some kind of a vintage look, try using an Aida cloth. It is an even weave fabric and can accomodate most of the stitches that I have illustrated. If you would want your younger daughter to be a part of it, I would say, aida fabric would be easy and interesting.
Also, try doing something like a child with bonnet, or include something like alphabets or sayings.
I hope to have given you some idea. Let me know if you want more help. Do let me know how it comes out to be. 🙂
Thanks for teaching in such a clear and concise manner.I would like to make up a “Sampler” to practice all of these stitches you teach. What kind of fabric should I purchase for this and how would I set this up? I would love it to look like a “Vintage” sampler from the “pioneer days and make one up for my young daughter to work on with me! Can you give me some tips or have you ever seen anything like this for sale?
I like it to learn
🙂 Sure Wavy. Let us know how it is coming out to be. 🙂
Your demonstated notes were so much help ful for me, please include sozini ,bead work and darwari embroidery techniques too for reference.
rgds
resmi
Dear Resmi,
Thanks for referring our pages. 🙂
I will try to include your requested embroidery forms when I get a chance to. I have already posted tutorials on Darwari embroidery (also known as Kasuti). You can refer https://www.embroidery.rocksea.org/hand-embroidery/kasuti/
Cheers.
Do you have any plans to make this into a book? I printed out a bunch of pages as reference so I can work on some embroidery during a 6 hr road trip but I was thinking how much easier it’d be if I had a book full of these! Your pictures and instructions are very clear and wonderful and I’d happily purchase a book of them as is.
Dear Aimee,
It is so nice to know that you have printed out pages from our tutorial for reference, and I hope you enjoy them. 🙂
Yes, we have been thinking of publishing a book, but don’t know how long it might take before it is printed and out on sale. Maybe a year? I must thank you for letting know that you are interested to see a book from us…it is truly encouraging. 🙂
Have a safe and wonderful road trip.
Hi Sarah,
I have been lurking around your website for quite a while now, but I think its high time for me to post a comment !
I had started browsing for embroidery related sites, and quite accidentally, or rather should I say fortunately, came across your site 2 months ago ! Being more of a visual person, rather than taking help from printed instructions, was so awed by each of your post !
And i too second Aimee’s comment where she had asked you about publishing a book ! I think it would def become a big hit 🙂
Keep up such an excellent work….! and would love to get more inspired …and was wondering if you can put up posts on more types of Indian Embroideries…Am sure you have your kid to take care of…but pls do give it a thought on introducing more tutorials on Indian embroideries…I think I have read of more names, but could recognize only Kasuti from this list….
Nevertheless, I really love the way you are presenting this entire thing !!! 🙂 Way to go…and looking forward to seeing more from you 🙂
And oh yes, one more thing I forgot to comment/ask was….I was wondering if along with the tutorial for different kinds of stitches, would it be possible for you to show their usages/applications…I mean, I know it would really depend on each one’s creativity…but just for beginners like me, who would want to know where we can apply the stitches, say by either using random pictures from the net, you can say that this stitch would apply on this kind of pics…
I really understand that this takes quite some effort, but I hardly get to see such kind of information….am currently doing a short term course on basic embroidery, but sometimes I really wonder if we had some designs to work on or practice such stitches…it would get registered in our minds…good or bad, atleast thats the way my mind works ! 🙂
anywayz that was just a thot, but if you could help me with any other external links also to practice these stitches, or even if you could put up something on your own website that would be great !
Hope you got what I have been trying to blah blah all thro’ this comment ! 🙂
Dear Vidya,
Thanks for your comment. 🙂
Well, trust me, if I had the chance, I would have kept to every request that I get here. But then realized that I should take one thing at a time. This time, it is the e- book, which is getting done, slowly though. Will keep note of (literally) of the suggestions you have made, and try to bring it up here asap! Till then, showcase some of your own creations here. We would love to see it shared.
Dear Sarah,
Your site is very useful for people like me who want to practice embroidery. The types of stitches displayed has helped me a lot. I have recently finished for table cloth and pillow cover. Tihe demonstration given by you is quite easy to learn and has made me more confident. Appreciate what you have been doing.
Will herring bone stich be suitable for leaf pattern? If yes, can you please demonstrate how it can be done? I am not very confident with this. It will be helpful if you can let me know this.
Regards,
Aruna
Hi Aruna,
Of course herringbone can be used for filling leaf patterns. In fact, it is one of the most common usages. Just keep the edges of the leaf as the stitch line (it will taper at the ends), and work the herringbone stitch between them. Hope this helps.
I agree wholeheartedly with Aimee and Vidya. PLEASE publish in some form or other–a book, an instructional DVD or a series of demos on YouTube. These are the clearest embroidery instructions ever and so well illustrated.
Thank you for the tutorials!!
You are welcome Kerry. 🙂
The reason I like this stitch is because of the x’s and some of my classmates are asking me how to make this stitch 😀