
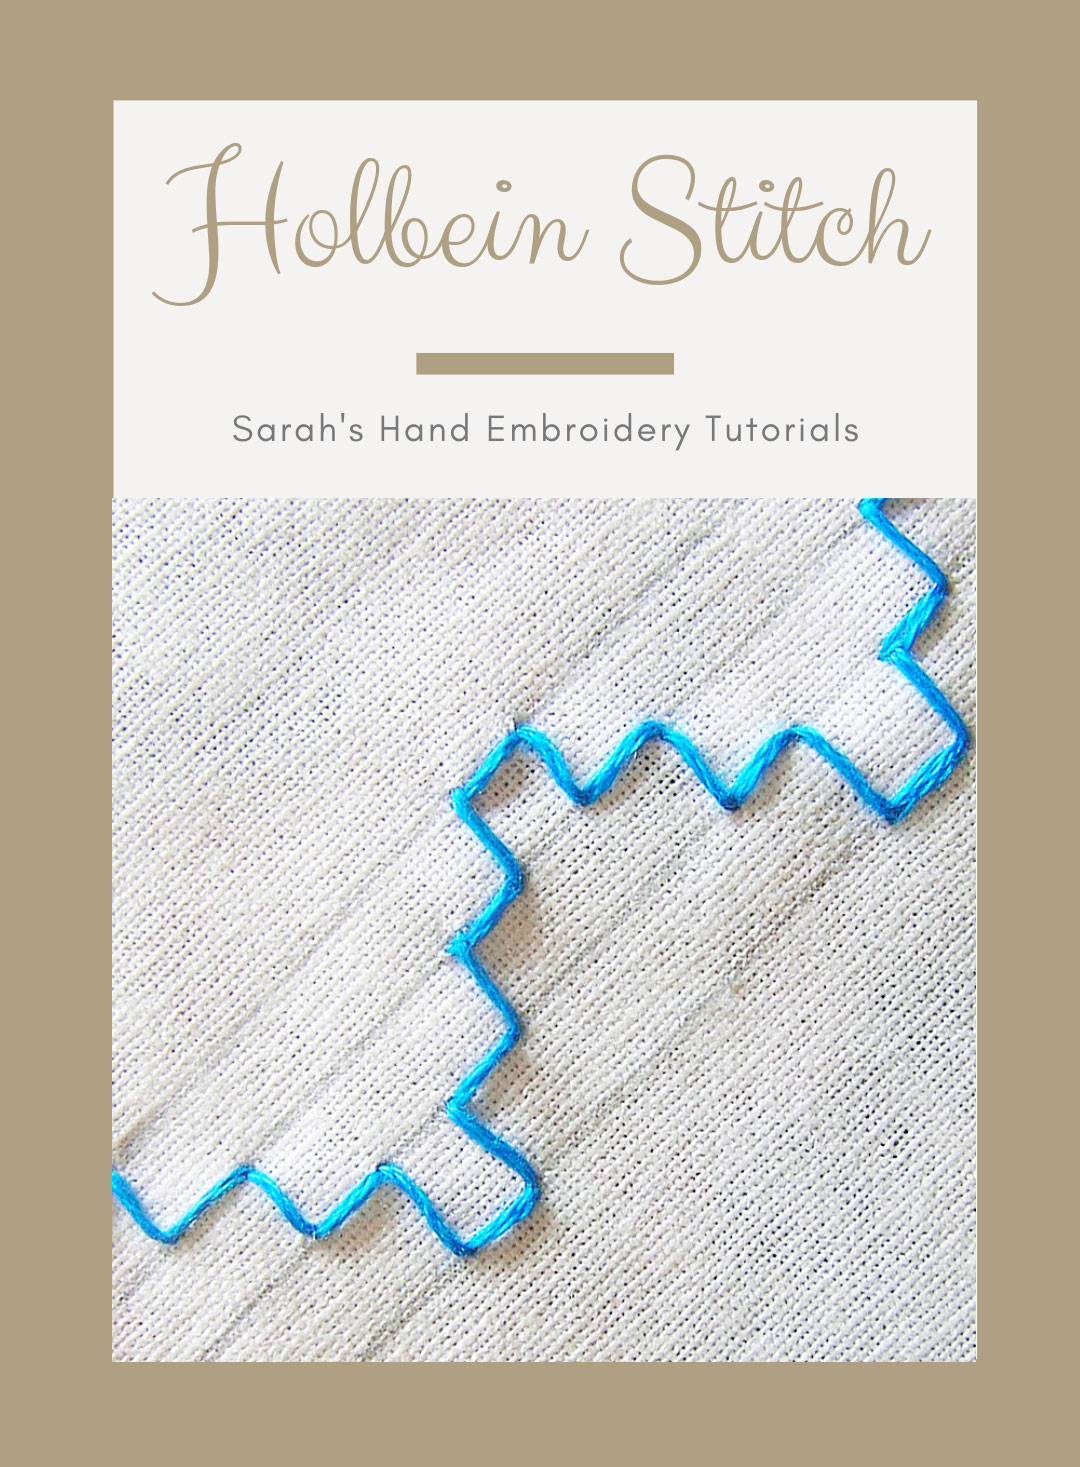
Holbein Stitch is also known as
Double running stitch, Line stitch, Two-sided line stitch, Two-sided Stroke stitch, Square stitch, Chiara stitch [EN], Punto Holbein [ES], Point Holbein [FR], Holbeinstich [DE], Punto di Holbein [IT], Ponto de Medici / Ponto de Holbein [PT].
About the Holbein Stitch
This stitch follows a pattern where a running stitch is done and the gaps between this running stitch are filled during a return journey of the needle and thread. This causes the stitches to bring out identical patterns on either side of the cloth.
History of the Holbein Stitch
Looking at the history of it, Holbein stitch derives its name from Hans Holbein the younger, who was a German artist. He was a portrait painter of the 16th century, who is more known to have painted Henry VIII and his children wearing clothing with ‘blackwork embroidery’.
Holbein stitch is widely used in Blackwork Embroidery and Assissi Embroidery as well. We can widely see it in cross stitch patterns too. This is because Holbein Stitch is a form of counted thread stitch.
Blackwork is again commonly known as Spanish work. Catherine of Aragon was the wife of Henry VIII. She is believed to have brought garments into England from Spain and they had Blackwork on them. Blackwork is done using only black thread.
Assissi embroidery originated from Italy at around the 13th and 14th centuries. It is a combination of Blackwork, or Holbein stitch, and cross-stitch. Traditionally Assisi embroidery employed only Holbein stitch, but later, it incorporated varieties of cross stitches as well. Assisi embroidery is not confined to a single thread color but uses different threads.
How to do the Holbein Stitch
I have done two variations of the Holbein stitch. This will help understand the technique.
| Variation 1: The straight line | |
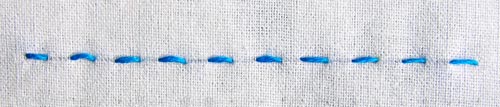 | |
| Fig 1: Lay a base of Running Stitch. | |
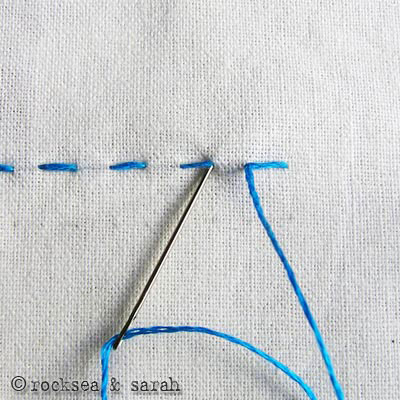 | |
| Fig 2: Now, start a return journey with the same working thread. As shown in this illustration, the return journey of running stitch will fill the gaps made during the first onward journey. You can use a different colored thread for creative effects. | |
 | |
| Fig 3: A finished line of Holbein Stitch would look like this. | |
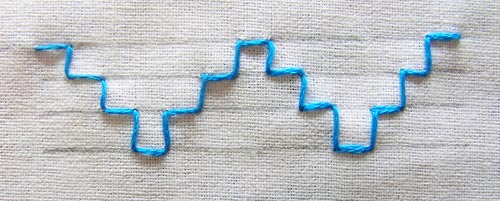
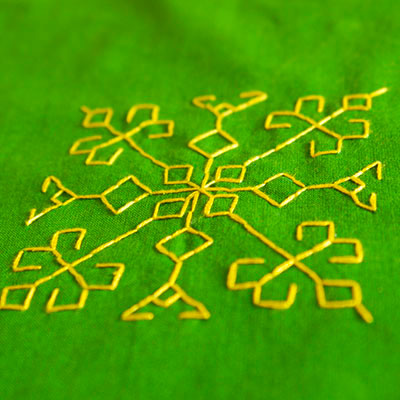
| Variation 2: The temple pattern | |
 |  |
| Fig 1: Follow the alphabets to make a step of Running Stitches along the four stitch lines. Note that all the stitches would be horizontal. | Fig 2: Do a return journey by filling up the gaps left by the first onward journey of the running stitch. This time all the stitches would be vertical. You can use a different colored thread for the return journey for a more creative Holbein Stitch. |
 | |
| Fig 3: A finished ‘temple’ design using Holbein Stitch would look like this. | |
Related Projects
Do you want to know where and how to use this stitch? Check out the projects below and learn more. Let’s make something beautiful today❤️


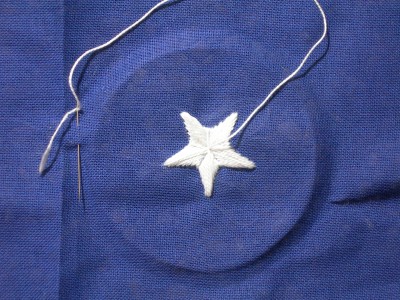
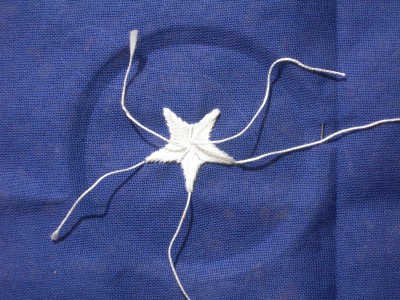
i’m tring to find a way to embroider a star that looks the same on both sides. these are two sides of the same star.
Hi Michelle,
This star is made using the Satin Stitch. It shows up the same on both sides. The fabric is even-weave, so keeping the stitches aligned and even spaced is pretty easy. The start and the end of the threads are hidden inside the stitches. Is this done by you? Did you mean that you are looking for more stitches that show up same on both the sides?
hi, Sarah, yes, i did this. there are straight stitches running underneath the satin stitches from one point to the next alternate point. maybe these are unnecessary, but i thought they would keep the edge straight and create a more defined edge. i need to learn how to hide the beginnings and endings of the threads too. i’d just like to know if i’m on the right track, so to speak.
how do i hide the starts and ends inside the stitches?
Hi Michelle,
Please check these pages to learn how to start and end a stitch in different ways:
How to start: https://www.embroidery.rocksea.org/reference/for-hand-embroidery-beginners/starting-a-stitch/
How to finish: https://www.embroidery.rocksea.org/reference/for-hand-embroidery-beginners/finishing-the-thread/
Please scroll to find the section where I show the satin stitch. Hope this helps.
thank you, sarah
Dear Sarah,
Nice work and very well explained. I have seen very nice decorative kasuti designs on other tutrials also but they didn’t explain how to do it. It will be great if you can show the tutorials of some more beautiful kasuti designs.
Regards,
Bharti Tripathi
hello mam
may i know if u provide classes for heavy embroiderys like bridal lahanga lachas and sarees with heavy work
pls reply me on my mail id mentioned above as soon as possible
thnk you
hi sarah
amazing work keep it up. can u please some of your samples like kurtas or dresses so that we get some idea.
Sarah, Your tutorials are amazing and has generated my interest in embroidery. I went through each stitch family and concluded that i had to learn all of them . I started with the running stitch family and completed all on a piece of calico fabric. i’ll work on the others and create a file .
Dear Jogun,
I am delighted that our pages have created an interest in embroidery in you…as it should. 🙂 Do share with us some of your works. We woudl be so happy to see them, and it will also serve as an inspiration to the other new enthusiasts.
Hi Sarah
Thank you for your reply. 😀
Hi Sarah
Do you conduct embroidery classes?
If you writing and publishing books on embroidery, may I know the name of the same pls?
In case, if you coming to Bangalore to conduct embroidery classes, please let me know, so that I can come to your place to learn the same.
Thank you
Dear Soumya,
Thanks for your interest shown. 🙂
I do conduct embroidery classes, but in Pune. We are working on an embroidery book and will let you know when it is out.
Hi Sarah
Nice and clean display of Embroidery stitches. Easy to understand the explanation.
Will you please let me know of where you are residing. Are you in Bangalore ? If yes, pls email your contact details to ma email address.
Awaiting for your reply…. 😀
In short you are rocking… !!!
Keep stitching and rocking always…!!
Wish you all the Best of Luck
Dear Sowmya,
Sorry for being late to reply. We are right now based in Pune.
hai sarah,
happy to see the web page with kasuthi work with explanations. waht about mirror work? when will u include those for us? eagerly waiting to learn that
Hello Padma,
I will be including a lot more other varities of embroidery once I get back home. 🙂
Dear Sarah,
I had not heard of Kasuti embroidery until I recently went to see an exhibition at the Lalit Kala Academy in Chennai. I saw some exquisite kasuti work on silk sarees. Soon after i happened to see your website as i was searching for videos and tutorials on kasuti. Your tutorials are really very educative and easy to follow. I hope you will be posting more such content on your website. I have started doing some simple patterns on plain cotton sarees. Your guidance is much appreciated.
Dear Usha,
Thanks! I am happy that you enjoyed our Kasuti tutorial pages. Yes, there is a lot more that we are going to post, but only once I get back home in January. 🙂
Thank you Sarah! I really appreciate your response! ~Gina
Hello!
I was wondering what size needle you are using in this photograph? Also, how many strands of floss are you working here? I would like to achieve a similar effect or look. Thank you, kindly!
Gina
Hey Gina,
I think I have used 3 strands for variation 1 and 4 strands for variation 2.
You can use any normal quilting needle with an eye just big enough to accomodate the thread. 🙂
Hello!
I am a complete noob to hand embroidery, but I would like to try to recreate this pattern http://i82.photobucket.com/albums/j269/EileenGalvin/goldtrim.jpg?t=1274810198 (the lightblue zigzag/lines and the blue wavy pattern), what type of stitch would be used and material? I would be so thankful for every bit of help you can offer! Thanks!
Dear Brigit,
I would suggest that you use ‘rope stitch’ for the zig zag lines (make two rows if required) and ‘satin stitch’ for the blue wavy pattern.
The rope stitch won’t exactly replicate the design as shown in the photo, but will give you almost the same effect. Maybe it will only turn out better. 🙂
You can use perle cotton for the rope stitch (try using #5, but check out at the store what would suit the fabric you are using). You can use satin thread for satin stitch. It will fall beautifully and replicate the design exactly as shown in the photo.
The instructions to the these two stitches are linked below:
https://www.embroidery.rocksea.org/hand-embroidery/chain-stitch/rope-stitch
https://www.embroidery.rocksea.org/hand-embroidery/satin-stitch/satin-stitch
Hope this helps. 🙂 Le tem knwo of the outcome. Best wishes.
Thanks a lot! My only problem is now that the silvery fabric I got is a fine bridal satin, kind of like the blue one in the reference picture, but maybe even a little finer. Working with yarn might mess it up because it is thick, wouldn’t it? Would I have to go with satin thread for the entire thing then?
Again, thank you so very much for your advice!! Every other person/website I wrote about this just plain ignored me…
Hi Brigit,
Since your fabric is satin, it is best to use delicate threads over it. Like you said, cotton yarn can be too rough on it. Use satin to do the rope stitch as well. The only thing is that you might have to do more than 2 rows of it to get the desired thickness. Else, I would advice, you use ‘satin stitch’ or ‘padded satin stitch’ instead of the ‘rope stitch’ for the zig zag blue lines. Try making two rows to get a closer resemblance. A padded satin stitch will give a slight embossed feel like shown in the photo. 🙂
Hai Sarah,
I have done this work when studying in school. I’ve done it with the horizontal & vertical stitches in 2 different colours… that looks really nice…..
I just started browsing your site… Very organized… Me and my friend started learning the hand embroidery stitches for the last few weeks…. So we found this site is very helpful for us….
Congrats….
Dear Jisha,
Nice to know that you have done this in school.
Feels nice that our pages has helped us in your interest in hand embroidery. Do let us know if you are looking for any particular stitch or embroidery style.
Do you have patterns I can download for free which are designed to use the holbein or double-running stitch?
Dear Denise,
Thanks for dropping by. I do have a few patterns designed for using only holbein stitch. I will be putting them up my website in a few weeks, as it is a part of my tutorial. These patterns are a part of an ethnic indian embroidery called Kasuti work, and will be free to download.
If you require the patterns now, you can probably search for a few free patterns online under ‘Blackwork’. You Blackwork uses holbein stitch and can be done well over even weave cloth.