
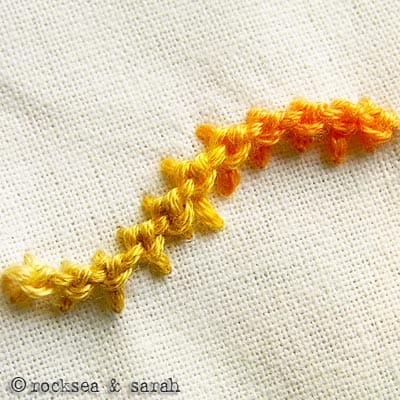
Also known as: Basque Loop Stitch, Knotted Loop Stitch, Knotted Pearl Stitch

This stitch is worked from right to left and has a wider base with the knot falling on the stitch line. It looks like a barbed knotted stitch. Traditionally basque loop is used with the Basque stitch (of chain stitch family).
This stitch follows a close technical similarity to the reversed Palestrina stitch. And therefore, this stitch is also often confused as being another name for the reversed Palestrina stitch. But, my research led me to a different conclusion. Though there are technical similarities in the way the knot is tied, the way they begin makes a difference between both. As a result, in reversed Palestrina stitch, it is not possible for the vertical ‘legs’ to extend on either side of the knot, as it is possible in this stitch (see fig.6). This is the main visual difference.
I will be working between two stitch lines to demonstrate this stitch. This stitch is worked from right to left.
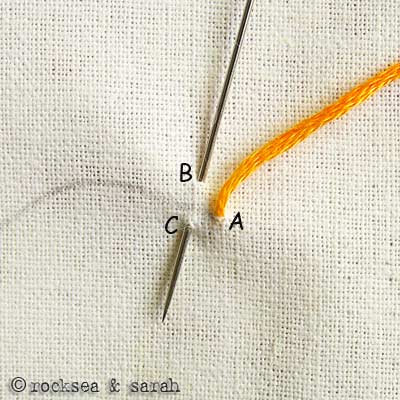 | 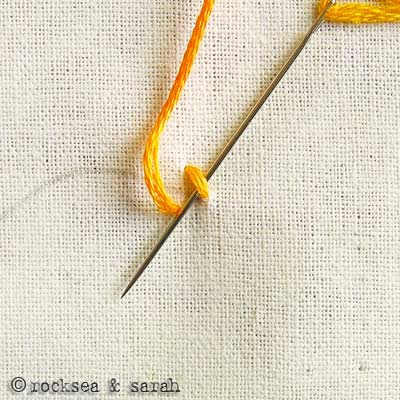 |
| Fig 1: Bring the needle out through A, a point that lies between the two stitch lines. Then, take the needle in through B and bring out through C, as shown. Both these points lie right above and below A, and on the stitch lines. | Fig 2: Now, take the needle under the stitch A-B, without plucking the fabric underneath. |
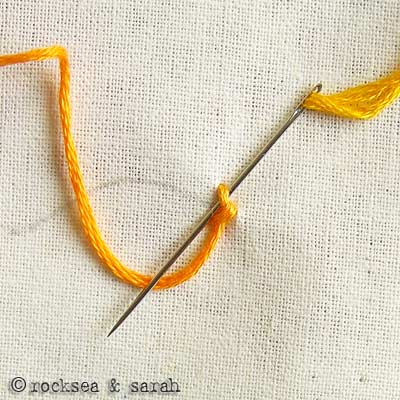 | 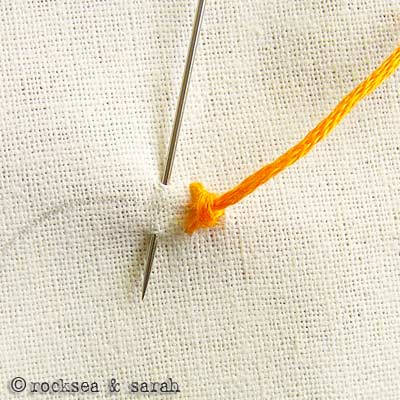 |
| Fig 3: Then, take the needle under the stitch A-B again, as shown. This finishes the knot. | Fig 4: Continue this process by taking the needle in through D and bringing out through E, on both stitch lines. |
 | |
| Fig 5: Do the knotting process and keep with the procedure for the entire row. |


Thank you so much for all this information. It helps me a lot to vary my amateur work.
Joop
What type of fabric should you use? Also how many strands of floss is used?
Feeling so excited seeing all these stitches
Starting, I love the site, it is a wonderful resource. I’ve been working on this stitch and I can’t seem to get mine to lay as flat as I see it in the picture, mine also doesn’t seem as clearly detailed, I mostly just end up with a knotted mess. Could it be the floss I am using? Or is there something in the technique that would cause this?
Thank you.
Hi Kathryn,
Somethings you can do:
1. Try to place the knots a little far from each other, and not too close, when you learn. This will help you to understand the technique better.
2. Try using 6 strands of floss. This makes the knots thicker and more prominent or standing out..
3. Be gentle when pulling out the thread to make the knots each time. Do not tighten it too much. The knots should look a bit loose and allowed to show how the threads have twined and passed.
If you are already doing all these, just try practicing more, 🙂 , and let me know!
Hello Sarah,
Thank you very much for the very great site.
I tried this basque knot and it turned to be awesome.
Thank you very much 🙂
This is s beautiful stitch, it would make a beautiful boarder. Thanks for sharing.
Thanks so much for a stunning website. So helpful and inspiring!
Again, another fabulous stitch, easily and clearly explained. Im picking up lots of new stitches to use in my work. This site is AMAZING. Thank you for sharing.
Amiga, amei este site muito legal, tudo bem explicadinho, bom seria se você colocasse vídeo.
Caro Jaimara,
Estamos felizes que você gosta de nossas páginas. 🙂
Obrigado por sugerir tutoriais em vídeo. Mas, agora, estamos a trabalhar apenas no fornecimento de tutoriais de imagens, porque pode demorar algum tempo para nós para se equipado para tutoriais em vídeo de qualidade.