

Burden Stitch allows filling by a simple a brick-like couching. The laid threads are couched down using vertical straight stitches and can make interesting displays if colors are combined well. When used for fillings, this stitch can add a wonderful texture to the surface of the fabric.
This stitch also comes with an interesting history. The Burden Stitch is named after Elizabeth (Bessie) Burden, who was known to be fine at needlework during the late 19th century. She was born in Oxford and taught at the Royal School of Needlework, an institute that was started to revive the art of needlework. Bessie taught students to work on pieces designed by William Morris, her husband, and other designers. She employed a variety of ‘cushion’ stitch from the medieval period. In the late 19th century this stitch was called the ‘Tapestry Stitch’. She used it to cover large areas, especially the flesh tones of the figurines in the design. This stitch was renamed as ‘Burden Stitch’ by the school in recognition of Bessie’s contribution.
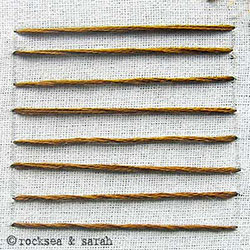 | 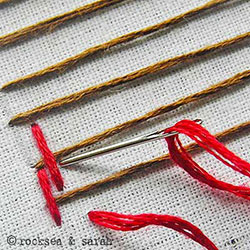 |
| Fig 1: Lay a foundation of horizontal rows of straight stitches. | Fig 2: Now, come out in a contrasting color from one corner of the pattern. Come out from just a little below the laid stitch and make a straight stitch to reach just below the next top row. |
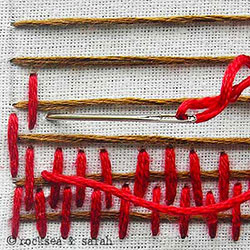 | 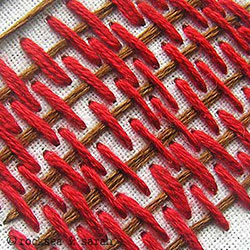 |
| Fig 3: Next come out from just above the laid thread and take ti over the laid thread of the next row to take it in just below the third row. Keep doing this alternately for a brick formation. | Fig 4: A finished portion of the Burden Stitch will look rich like this. |


I was wondering how I could do this stitch if its filling in a circle like a tire. The small stitches reminds me of tire treads. Do you have an advise as to how to sew the long stitch to make the turn. I was thinking of couching the long stitch to round the curve of the tire.
Hi Josefina,
Thank you for dropping by. To make the turns, you will need to understand that the inner circle will be smaller than the outer circle. And so, the longer stitches (foundation) will be more spaced when emerging from the outer circle, but closely placed at the inner circle. It will kind of look radiating from the inner circle to the outer one. I hope this helps. 🙂
Your history is too thin. Here’s a good place to start to catch up. https://www.laurasbeau.co.uk/news-and-blog/news/maymorris/
Hi Karla,
Of course, this page is meant to be a tutorial for the stitch itself. So, I wouldn’t douse it with extensive history! 😄
This gist was made after reading an entire report on this stitch by RSN. More historical details of the Burden Stitch can be found in my eBook. Thank you for the link.
Thank you for the lovely ideas
Please could you give me some more ideas for filling in large tree trunks, I am working on a large fire screen in crewel.
There are a lot of trees and branches in the design.Kind regards, Marcia
Hi Marcia. Thank you for writing. I think, Burden Stitch will be great for large fillings, like the tree trunks you have mentioned. Another way to fill would be using close rows of Stem Stitches. Both these stitches will add the required texture. They can give you a total coverage too. You can also try the Brick Stitch for a simlar texture and coverage. Do check the Picture Dictionary to search for stitches that might suit your project. Link : https://www.embroidery.rocksea.org/reference/picture-dictionary/
I hope this helps a bit. 🙂