

You need to finish your stitch when a project ends, or when your thread finishes mid-way. This can be done either with a knot or with a weave, based on the requirement of your project. I have illustrated both the methods here.
Method 1: Finishing the stitch with a knot
This method is easy and especially excellent for projects that go for washing and everyday use. The knots formed are tiny and come out neat. So, if you do not mind having knots behind your embroidery work, this is a good way to end your stitch. This method can be used for all kinds of hand embroidery techniques, except the ones which are reversible, like the Reversible Pattern Darning, where the threads need to be woven and tucked under the other stitches. This is all in the reverse of the project.
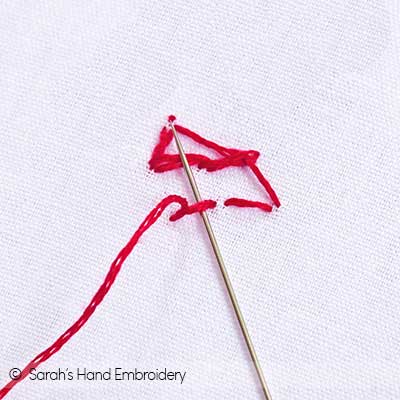
 |  |
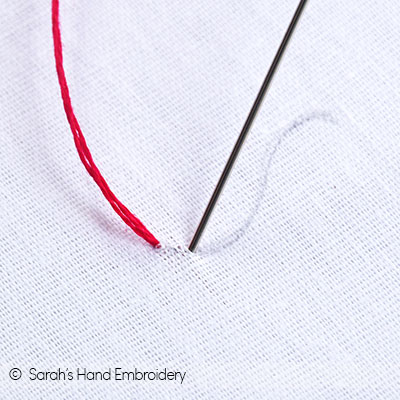
| Fig 1: I have made a row of Running Stitches. This is the reverse of the fabric, where I want to finish off my thread. First, spot the nearest stitch to the last stitch point. It can be any stitch. | Fig 2: Take the needle under that nearest stitch without plucking the fabric. Loop the working thread below the needle as shown. It is as if you are making a Chain Stitch over that stitch. |
 |  |
| Fig 3: Pull out the needle. Now, repeat the process again- take the needle under the same stitch and loop the thread below the needle as shown. | Fig 4: Pull out the needle. You will see that a firm tiny knot will be formed. |
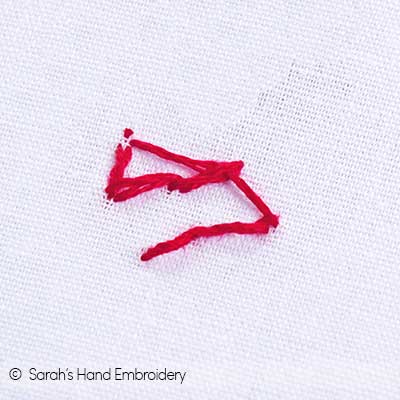
 |  |
| Fig 5: Cut off the thread close to the knot. Do not take it too close, as it will risk the knot to open. | Fig 6: The knot at the end of the stitch will look like this. |
Method 2: Finishing the stitch with a weave (no knots)
This method is used when you do not want to have knots behind your embroidery project, especially if you are working on reversible embroidery, where the back of the embroidery is as important as the front. This weave method can be used on Linear Stitches, Filling Stitches, and even Standalone Stitches. I will quickly illustrate all of them.
1. Finishing without a knot on Linear Stitches
It is easy to finish with a weave on almost any kind of linear stitch and they are pretty secure too.
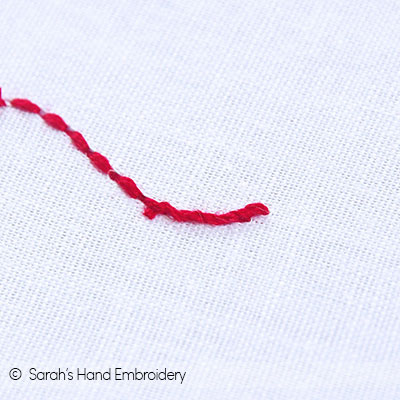
 |  |
| Fig 1: After you are done with all the stitching, pass your needle to the back of the fabric. Turn your hoop to reveal the backside. Now, pass the needle under the nearest stitches in a whipping fashion, as shown. | Fig 2: Pass under a few stitches a few times to secure the thread. Any extra can be snipped off carefully. |
 | |
| Fig 3: After a few whippings, the back will look like this. |
2. Finishing without a knot on Filling Stitches
The weave method of finishing a thread or stitch can be applied to filling stitches too. This will avoid knots at the back of the fabric, keeping it even and smooth.
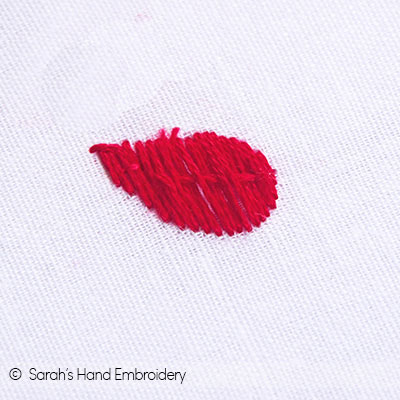
 |  |
| Fig 1: When done with your filling stitch, turn over your hoop. Your final stitch will end at the back of the fabric. This is the back of a leaf pattern that I had worked with the Satin Stitch. | Fig 2: Now, weave your needle up and down the existing stitches, as shown. If you want, you can turn around and weave back again. This is not so necessary though. |
 | |
| Fig 3: Snip off any excess thread and that’s it! You have a neat back with no knots. |
3. Finishing without a knot on Standalone Stitches
The weave method can also work for finishing the stitch after working any Standalone stitches. Most of the time, Standalone stitches are worked in clusters and the back of the work reveals the stitches made during the jump from one stitch to the other. We use these stitches to secure the finishing thread. This is the back of a cluster of Colonial Knots.
 |  |
| Fig 1: To do so, just pick the nearest stitch and pass the needle under it a few times in a whipping fashion. | Fig 2: If required, include other stitches in this process. |
 | Note: If you are working on a single Standalone stitch, you can try to use the stitches from the other stitches. If there are no other stitches nearby, using this method can be difficult. I would suggest the knot method in such a circumstance. |
| Fig 3: Snip off any excess thread after a few whippings, and that’s it! The back of many Standalone stitches can look a little messy, but it will not have a knot that will bulge out when you use this method. |
Related posts about handling embroidery threads
Starting a stitch |


Hi Sarah, hope you are taking care of yourself and your family. I want to ask you whether is there any book of yours, which has different need work patterns..? If yes, how much does it cost..?
Hi Sarah, hope you are taking care of yourself and your family. I want to ask you whether is there any book of yours, which has different beed work patterns..? If yes, how much does it cost..?
Hi Shahin,
Thank you for dropping by. I hope all is good there too. We do have many eBooks. You can go through them here: https://www.embroidery.rocksea.org/product/
Since you are in India, you can purchase any of these books through a bank transfer. You will receive a PDF that can be conveniently used on any of your devices.
Alternately, you can purchase the Kindle version from Amazon. Here is the link to the main hand embroidery eBook: https://www.amazon.in/dp/B08XQH5ZX8
This can be used on your Kindle device or Kindle app.
I hope this helps. Feel free to contact me if you have any other queries.
Thank you!
❤️
Thank you for showing me a neat way of doing this. I have always just made a couple of passes under the last stitch and hand tied a squat knot. This looks so much easier & neater!
Awesome! This method has always kept the reverse of my projects mess free.
Thank you Sarah. Sometimes the reverse is my fabric is thick and messy of all different finishing I made. I realise the reverse is as important as the front and this is so much neater. 👍🏻🌹 😘
Thank you, Mandje. ❤️ A neat reverse is always more satisfactory!