
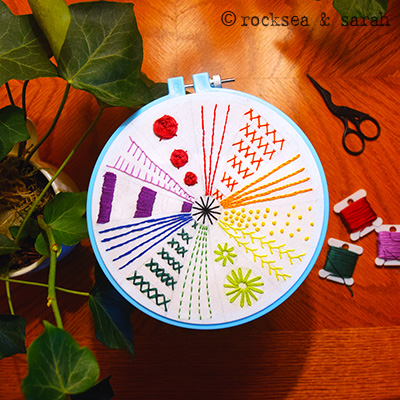
The 12 Basic Stitches using the Color Wheel
 |  |
Hand embroidery does not demand you to learn hordes of stitches to create beautiful samplers and work on a project. So, if you are a beginner, do not get intimidated by the sheer number of stitches that there are. In fact, many of the projects are done using just a few basic stitches which have stood the test of time. Most other stitches are variations or a ‘build-up’ over these basic stitches. For me, there are 12 basic stitches that are easy to learn and use. If you know these 12 basic stitches, you are ready to make beautiful hand embroidery samplers.
This project is great for beginners to hand embroidery and a fun one for advanced learners. Apart from introducing you to the 12 basic hand embroidery stitches, I have added one more component to it – the color wheel. While choosing colors for your hand embroidery projects, the color wheel can help you to decide good color combinations for your crafting projects. For a quick lesson on how the color wheel can help you to decide on a color palette for your project, just go here.
I have used the 12 basic stitches to stitch a color wheel, making it a great reference for you! So, let’s begin!
Things you need:
- A white cotton fabric
- An embroidery hoop – size 6″ or more
- Embroidery needle
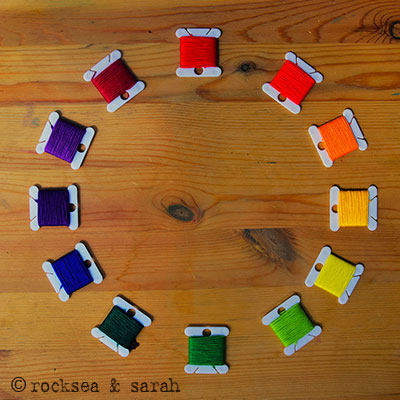
- Embroidery floss in the 12 colors from the color wheel – Red, Vermilion, Orange, Amber, Yellow, Chartreuse-Green, Green, Jade, Blue, Purple, Violet, Magenta
 |  |
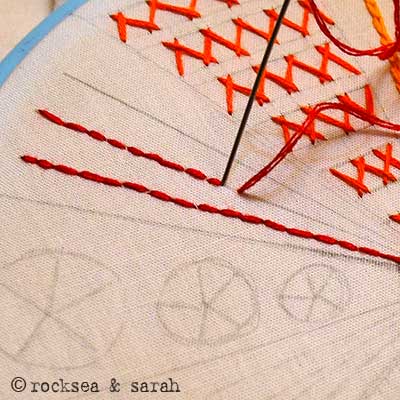
| Fig 1: Start by mounting a white piece of cotton fabric onto an embroidery hoop. I have used a 6″ hoop. I would suggest you also use the same size or bigger. Learn how to use an embroidery hoop here. | Fig 2: Now, divide the area into 12 equal parts. Each part will hold a stitch from the list of the 12 basic stitches. Here, I have used a pencil to mark the sections. |
Now, let us begin the stitches. Each stitch will be done in a color from the color wheel. You can refer the colors from the color wheel I have shown above. Make sure you place the colors in the same sequence, even if you do the stitches randomly.
Just click on the stitch names to go to the step-by-step tutorial of each stitch.
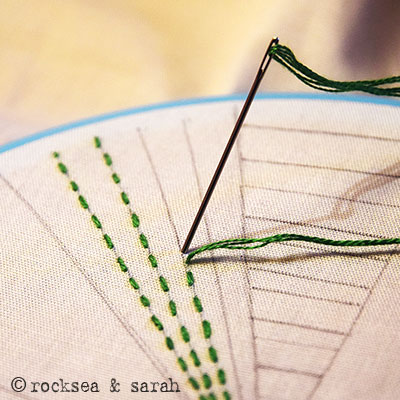 | Running Stitch: This is the most basic of all the stitches. With simple stabs up and down the fabric, you can make rows of straight stitches that can be used for outlines and fillings. There are traditional embroidery forms that depend solely on this stitch! |
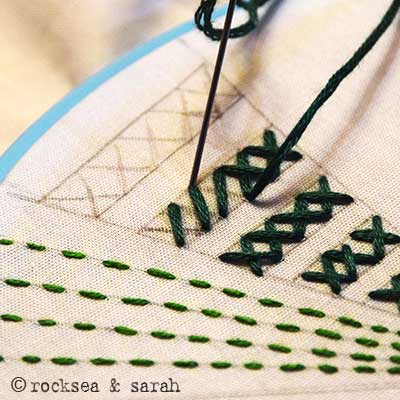 | Cross Stitch: This stitch is not only great for fillings on tightly woven fabric but also will help you to get introduced to Cross Stitch Embroidery done over aida/ even weave fabric. |
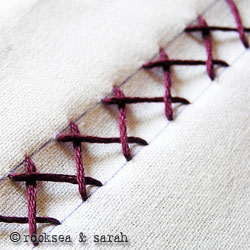
 | Herringbone Stitch: This easy stitch can be used fabulously for easy fillings, especially for flowers and leaves. They take on curves easily and can quickly become one of your favorite stitch. |
 | Chain Stitch: This popular stitch can make great outlines and fillings. The Chain Stitch has been popular with many cultures. This is a looped stitch. Try it with threads of different thicknesses. |
 | Back Stitch: I love this stitch for making outlines! Back Stitch has been replacing the Stem Stitch popularly, especially in Hoop Embroidery Art. |
 | Stem Stitch: This is another great stitch used often for outlining, but it is also a good stitch for fillings! It gives a smooth seamless look and takes on curves easily when done correctly. |
 | Blanket Stitch: This stitch started off as a stitch to secure the ends of the fabric to prevent the threads of the rough edges from fraying. It then made it’s way to hand embroidery projects to create fillings and texture. |
 | Lazy Daisy: I added this stitch to the 12 basic stitches because this detached stitch can help in creating various patterns, fillings, and motifs. I have used this stitch to make flowers as an example. |
 | Satin Stitch: This stitch creates a smooth filling. It is simple to stitch and could take time to perfect. |
 | Woven Spider Wheel: It is the only ‘woven’ stitch in this list. Since it resembles a rose flower, it has become popular in floral embroidery patterns. Use it for making flowers or patterns that involves a nice filled circle. Either way, it is a great way to get introduced to the woven stitches. |
 | Feather Stitch: This stitch kind of falls in-between the Chain Stitch and the Blanket Stitch. It is a great stitch to create textures and fill patterns. |
 | French Knot: No list will be complete without the French Knot. This stitch can be used for fillings in various densities and to add a great texture. You need to use both your hands to make the knots but is not difficult. In fact, once learnt, it can be quite addictive! |
 | And in the end, your sampler will look like this. Use it as a reference for the different basic stitches as well as a color wheel! I filled in the center with spokes of black color. |
 | |
For more guidance on colors and stitches

Learn the 12 Basic stitches from our Hand Embroidery Book
Find 10 different printable patterns and a pincushion project to learn and apply these 12 Basic Stitches in a fun way.


This colour wheel was my first embroidery project. Such a great way to make something bright and colourful, but also teach me a number of new stitches. It has even inspired my daughter to make one.

You’ve done such a wonderful job with this website. The instructions are clear and the dictionary has brought so many ideas to make. Keep up the amazing work!!
This is terrific, Amy. Thank you so much for sharing. Love ht way you have worked the color wheel sampler.
Hey sarah!!!🙈Done with my very 1st project ….I know that’s not completely perfect😊 but i still believe by just following your tutorials and doing all your projects on one fine day i could be perfect!! Just perfct!!! 🤗 .

Between keep doing this contribution…..you are an inspiration 😊🤗A well organized tutorial 😊
Hi Mahalakshmi!
I am so thrilled to see your sampler. It is perfect! You have done an awesome job. So proud of you. Thank you so much for sharing it with us. We would love to see more of what you stitch- please do keep sharing your work and keep inspiring others. 🙂
Love,
Sarah
Thank you so much sarah😍😍😍😍. Your words means a lot to me 🙂🥳Thank you for your support .
Love your website and clear details of stitches. I have a project to embroider a picture of a Korrigan (mythical woodland man) but don’t know what stitches to use for his cloak and boots etc. Would much appreciate any suggestions.
Hi Jeannie,
Thank you for writing. What stitches to use will depend on what kind of result you are looking for.
If you want to just outline the pattern, use the Back Stitch.
If you are looking to fill it in with some shaded effect, I would suggest the Brick Stitch (long and short stitch). The Chain Stitch and Split Back Stitch can work beautifully for solid fillings, both with a slightly different texture and effect.
My personal choice might be Split Back Stitch for a solid filling. 🙂 I hope this helps!
Many thanks Sarah, I will have a practice at those stitches and decide which I like best.
You are always welcome, Jeannie. If you want to share a picture of your work after you stitch, you are welcome to do it here in the comment box. 🙂
Sarah- This is a beautiful and engaging project. Incorporating the Color Wheel with stitches is a fabulous way to learn and create a little work of art.
I haven’t completed mine yet, but I will! Thank you for this practice.
Take care.
So happy that you liked this project. Please do share your sampler once done. It will be so nice to see it. 🙂
Do you have DMC (or other) color numbers for recommendations for the color choices? My color card doesn’t list color names just numbers.
Hi Susan,
I always use Anchor brand. Let me see if I can get the color numbers for you. After I made this project, we were moving and I am yet to take through my thread collection. 😁 Will get back to you as soon as I can.
Hi Susan,
So here is a list of the colors. I have put the DMC equivalent of the colors in brackets.
Colors – Anchor (DMC)
1. Red – 47 (321)
2. Vermilion – 330 (947)
3. Orange -, 316 (740)
4. Amber – 298 (972)
5. Yellow – 289 (307)
6. Chartreuse Green – 256 (704)
7. Green – 257 (905)
8. Jade – 246 (986)
9. Blue – 133 (796)
10. Purple – 119 (333)
11. Violet – 109 (209)
12. Magenta – 94 (917)
You can always try to swap the colors mentioned here with a color you feel is closer to the original but better. I had lost some of the color codes on my thread and used my eyes to pick the colors. The color numbers mentioned here should be the closest to what I have used, if not exactly that. 🙂
Thank you! I appreciate it.
Thank you! This project will be so helpful to me as a fabric lover (intermediate sewer, advanced beginner quilter) … and as a going-back-to-retry-embroidery stitcher (it’s been 40 years). I so love your designs!
That’s awesome, Judith. ♥️ I hope you enjoy this project. It will great to see how your stitching has come out.
I love this project using the color wheel! I think this will be my take with me project while we are moving and I can’t play with all of my other crafty things.
Thank you so much for posting this, it gave me some relief as to what to do while stressing over our packing and moving!
Wonderful, Claudia. This was my project while we we were packing and moving!! I know what that process can do to you. 😄 I am sure you will enjoy this project. Happy moving. ♥️