Continued from Sashiko Lesson 2
Patterns based on curves, single patterns, and border patterns
This lesson will familiarize you with patterns that are based on curves. It will also give you an idea on how to deal with single and border patterns. Like usual, when stitching these patterns, you will follow the order of horizontal and vertical lines first, then the diagonal lines, and then the curved ones. But, each pattern will require its own treatment as well, so study the pattern well, before picking up the needle.
Patterns based on curves
These patterns are based on circles and its curves. It can take a little practice before the curves can be learnt to be stitched neatly and with precision.
Amime (net pattern)
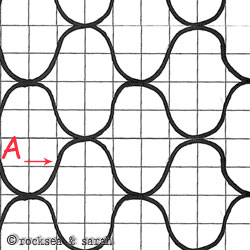 |  |
| Stitch each horizontal curve, from one end to the other, row by row. The stitches should look like mirror images where the curves meet. This might take some practice. | |
Fundo-Tsunagi ( Japanese traditional weights)
 |  |
| Work on the diagonal curves on one side first, then move to the diagonal curves on the other side. The points where these curvy lines intersect should be left open as shown in the stitched illustration. | |
Single pattern
This example will help you to understand the different ways in which a sashiko pattern can be dealt with. Single sashiko patterns can be made using a combination of lines and curves.
Kiku (chrysanthemum pattern)
 | 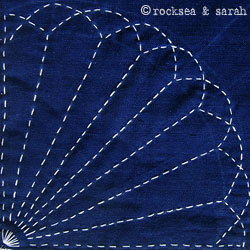 |
| This pattern is made from a quarter portion of a circle. Start working O-A-B, O-B-C, and so forth until you finish it at F. Then, start working G-H-O, H-I-O, and so forth until you finish it at K. Now, in this pattern, whether you begin or end, the thread is left open and long at O. Later all the nine strands of long thread are tied together or made a pigtail from. | |
Border pattern
Some patterns can look very complicated and confuse us. Breaking down the components of such complicated patterns can bring clarity to make it easier for us to decide on our stitching. The following pattern will illustrate that.
 |
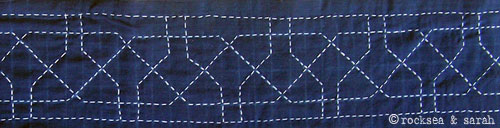 |
| Start by doing the horizontal straight lines A and B. Then, stitch the hexagon-based lines, C and D, from one end to the other. Later, finish up with the smaller lines marked by E and F. |
Next, go to the other tutorials of Sashiko: