
Also known as: chicken scratch embroidery, depression lace, snowflaking, amish embroidery, gingham lace, tic tac toe embroidery, hoover lace
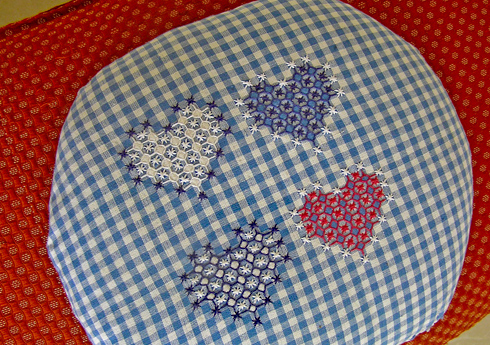 |
| embroidery sample: chicken scratch |
About chicken scratch
Chicken scratch embroidery is a very simple form of embroidery done, traditionally, over gingham fabric. Gingham fabric is a checkered fabric, making the counting of stitch easy. This infusion of a few stitches over such a fabric gives a very sophisticated look. At the first go, it seems like a lot of time and energy was spent in bringing about such an ‘appliqued lace’ effect.
This form of embroidery is used to decorate different household items like pillows, cushions, aprons, jar lids, table cloths and mats, and even bookmarks. The cloth with smaller checks (8 squares per inch) is used for smaller projects like bookmarks and pin cushions. The bigger squares (4 squares to an inch) is used for bigger projects like table cloths.
History
This embroidery is believed to have originated in America during the early years when the new settlers came in. This information, however, remains unclear. It is said that as the settlers moved to newer places, the embroidery also got newer names. An interesting fact is that during the Depression, ladies made gowns from gingham fabric and declared their stitchery as hoover lace.
With so many names that this embroidery is known with, it is also mistaken with Teneriffe Lace, which is a bit more complicated form of embroidery.
Chicken scratch today
These days, chicken scratch is taken up with new interest amongst the needle enthusiasts. A lot of experimenting with the colour of threads used, the fabric, and even the stitches is happening, probably giving way to a new kind of chicken scratch embroidery altogether, than the traditional one.
Gingham fabric is replaced with Aida, or even weave fabric. The colour of thread is not chosen to give only a lacy effect, but a different one. Even the stitches used have expanded.
Stitches used
Traditionally the following stitches are used on gingham fabric. But, these days, it is not confined to these alone.
1. Running stitch
2. Cross stitch
3. Double cross stitch
4. Woven oval
5. Woven circle
Transferring designs
The designs are first marked on a graph sheet. Usually, each design would have its own key, decoding the type of stitch to be used. The design can then be directly stitched on to the gingham fabric, taking each square in the graph sheet as each square on the fabric.
Thread, fabric and stitch tips
A variety of looks can be created using a couple of stitches. Here are a few tips to keep in mind before beginning the lessons:
1. You can use a single colour of thread or many.
2. It is common to use light coloured thread over a darker fabric and vice versa.
3. When two colors of threads are used, one is usually white and the other is the darker than the darkest cell in the fabric.
4. Generally, six strands of cotton floss or Perle cotton #5 are used.
5. Be sure to follow the same sequence while doing double cross-stitch.
6. It is advised to stitch the outline of the motif patterns first, before filling the inside.
7. The general sequence of stitch to be followed is – cross-stitch and double cross stitch, running stitch, woven circle, and woven ovals. This, however, remains a matter of convenience.
8. All stitches are either done over the white cell or the darkest cell. The tinted cell (i.e. lightly coloured cell) is usually left alone, except for straight stitches to support woven circles or woven ovals.
Lessons
The lessons will give you an overview of how to do chicken scratch using the traditional gingham fabric and the above-mentioned stitches. When chance permits, I will demonstrate a few ‘new’ stitches over Aida fabric too.
Lesson 1: border design using white thread over gingham fabric
Lesson 2: heart motif using different coloured threads over gingham fabric


